Executing automated steps (2/6)
In this section, you’ll learn how to create your first BPMN 2.0 process with the Camunda Modeler and how to execute automated steps. Start by opening up Camunda Modeler.
Create a new BPMN Diagram
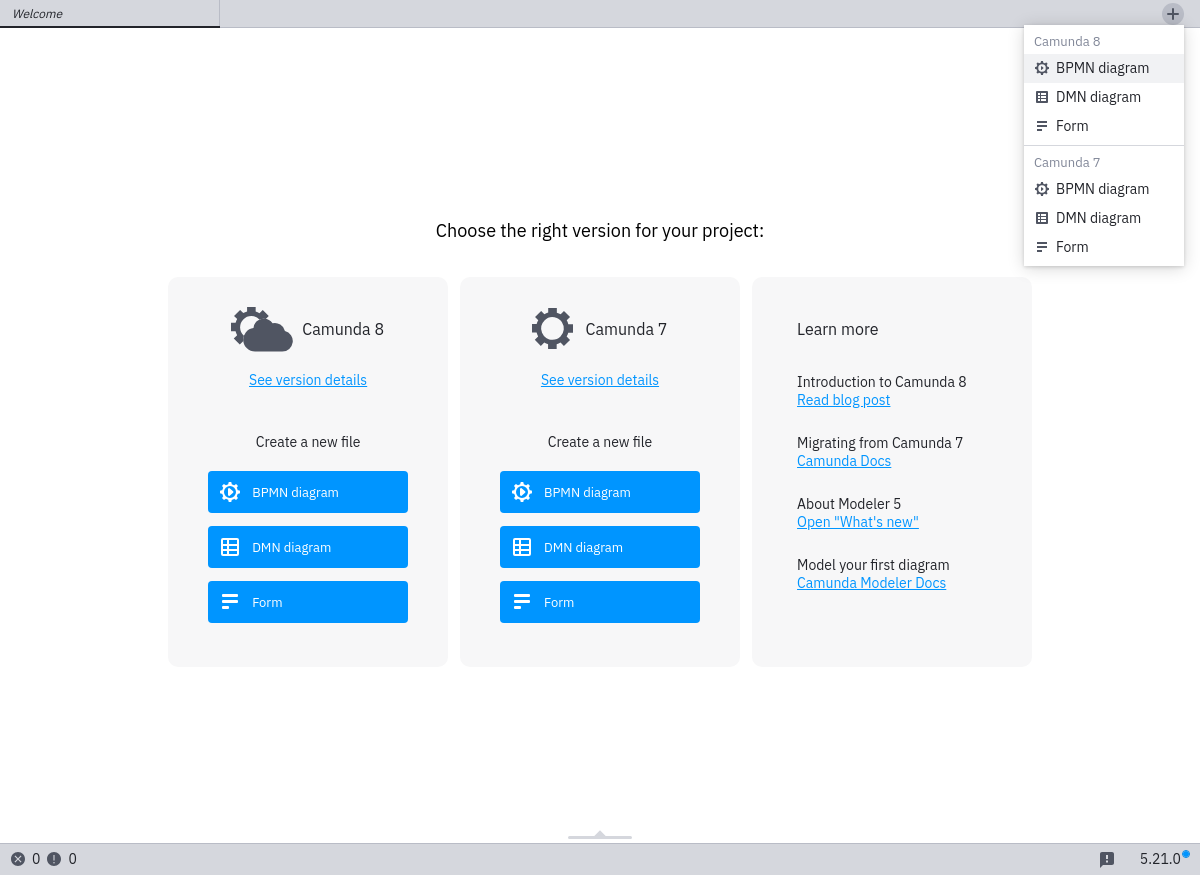
Create a new BPMN diagram by clicking File > New File > BPMN Diagram (Camunda Platform).
Start with a Simple Process
Start by modeling a simple process.
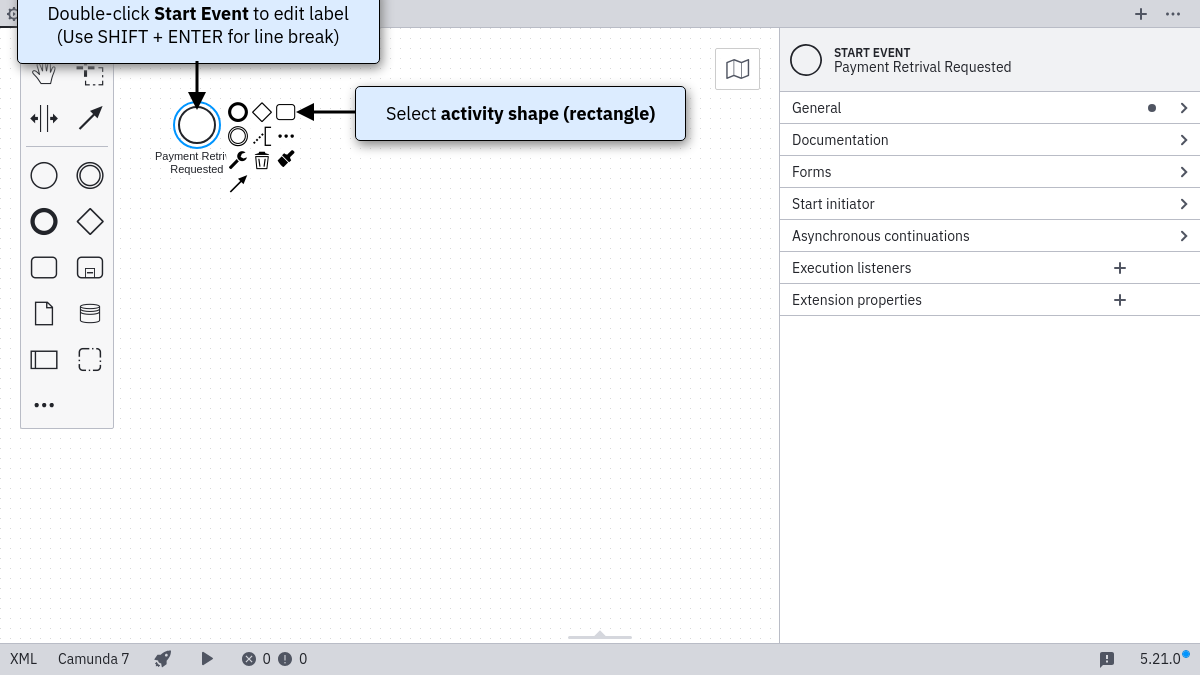
Double-click on the Start Event. A text box will open. Name the Start Event “Payment Retrieval Requested”.
Hint
When editing Labels, you can add line breaks using Shift + Enter.
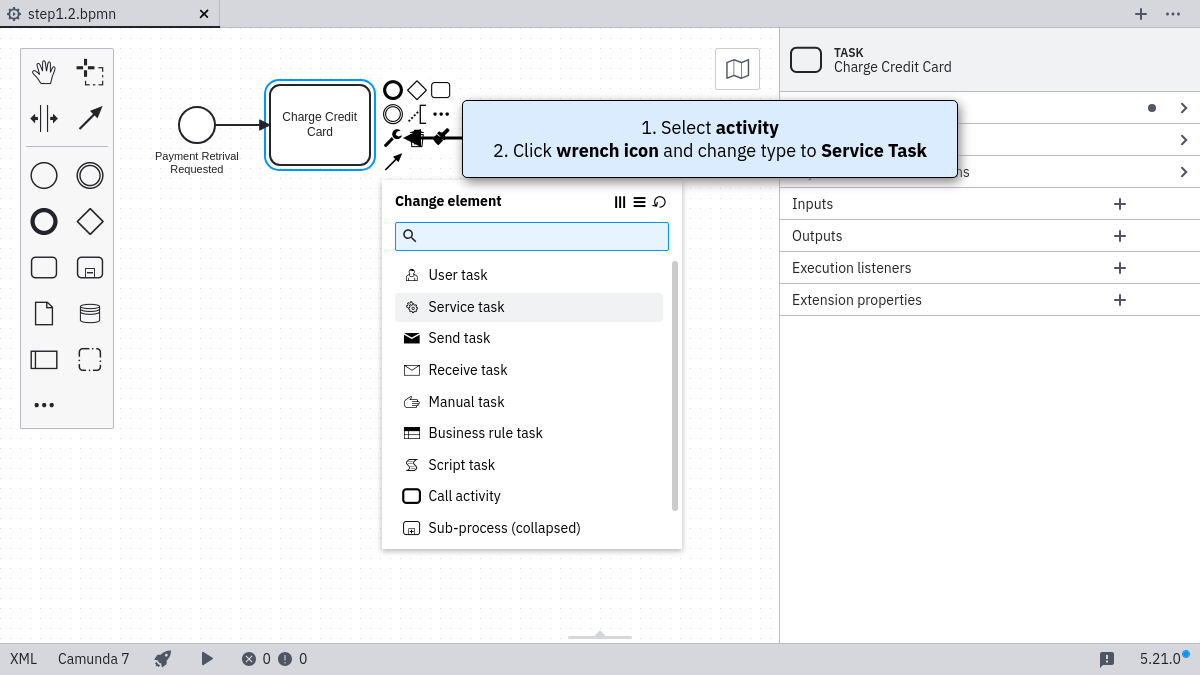
Click on the start event. From its context menu, select the activity shape (rounded rectangle). It will be placed automatically on the canvas, and you can drag it to your preferred position. Name it Charge Credit Card. Change the activity type to Service Task by clicking on the activity shape and using the wrench button.
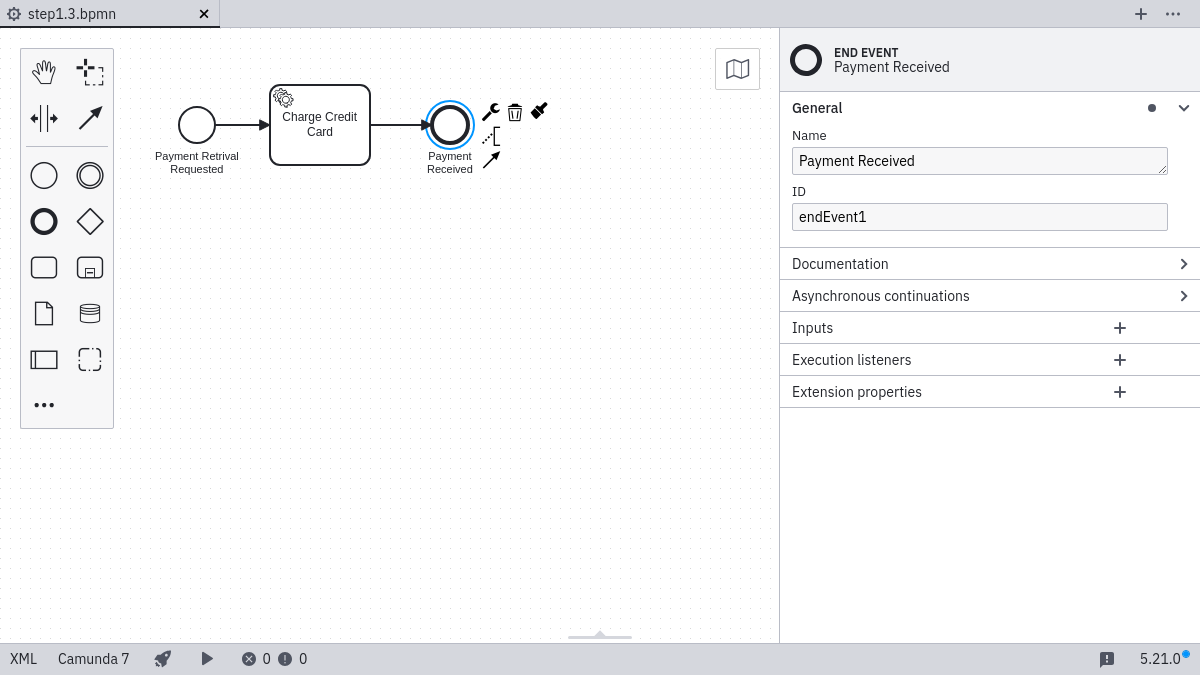
Add an End Event named Payment Received.
Configure the Service Task
There are different ways to execute service tasks using Camunda Platform. In this guide, we’ll use the external task pattern.
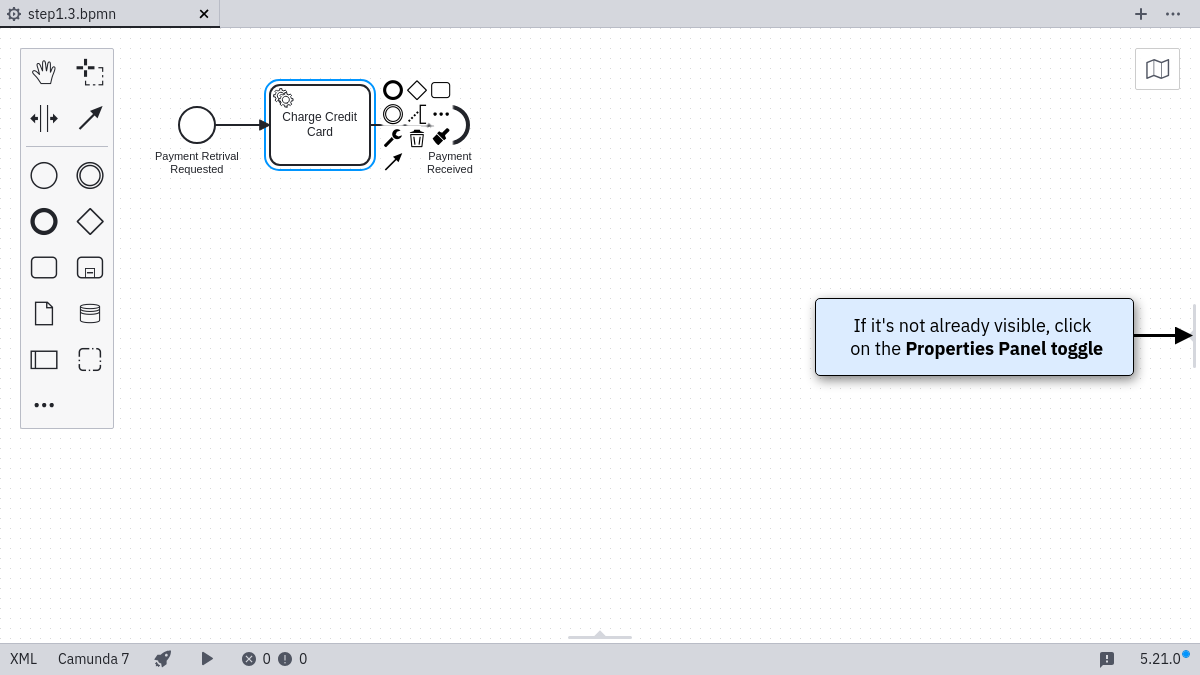
Open the Properties Panel within the Camunda Modeler and click on the Service Task you just created. Change the Implementation to External and use charge-card as the Topic.
Configure Properties for Execution
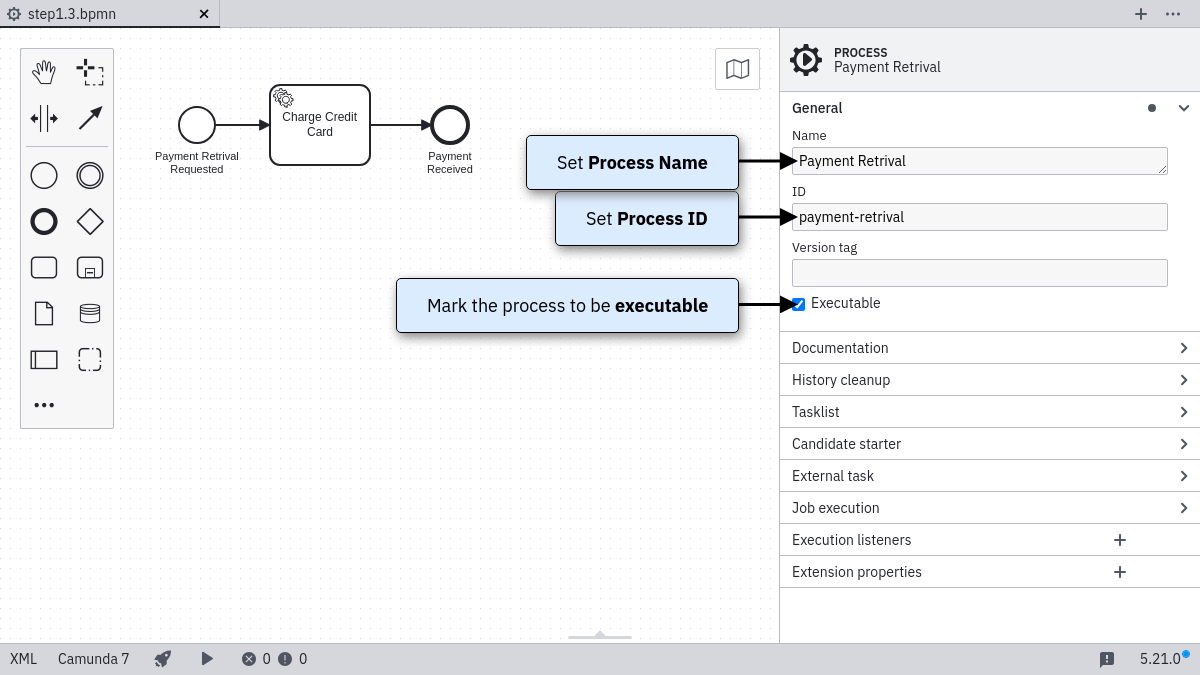
Because we’re modeling an executable process, we should give it an ID and set the isExecutable property to true. On the right-hand side of the canvas, you find the properties panel. When you click on empty space on the modeling canvas, the properties panel will display the properties of the process itself.
First, configure an ID for the process. Type payment-retrieval in the property field Id. The property ID is used by the process engine as an identifier for the executable process, and it’s best practice to set it to a human-readable name.
Second, configure the Name of the process. Type Payment Retrieval in the property field Name.
Finally, make sure the box next to the Executable property is checked. If you don’t check this box, the process definition is ignored by the process engine.
Save the BPMN Diagram
When you’re done, save your changes by clicking File > Save File As... In the dialogue that appears, navigate to a folder of your choice and save the diagram as something like payment.bpmn.
Catch up: Get the Sources of Step-1.
Download as .zip or checkout the corresponding tag with Git.
You can checkout the current state from the GitHub repository.
If you have not cloned the repository yet, please execute the following command:
git clone https://github.com/camunda/camunda-get-started-quickstart.git
To checkout the current state of the process application please execute the following command:
git checkout -f Step-1Or download as archive from here.
Implement an external task worker
After modeling the process, we want to execute some business logic.
Camunda Platform is built so that your business logic can be implemented in different languages. You have the choice which language suits your project best.
In this quick start, we’ll show you how to use Camunda’s ready-to-go task clients in:
If you’ve never worked with Java before, we recommend using the JavaScript (NodeJS) task client in this tutorial.
Hint
If you prefer a different programming language, you can also use Camunda’s REST API to access API operations via HTTP.
a) Using Java
In this section, you’ll learn how to implement an external task worker in Java.
Prerequisites
Make sure you have the following tools installed:
- JDK 11
- An IDE for Java projects (e.g. Eclipse)
Create a new Maven project
Start by creating a new Maven project in your IDE. If you’re using Eclipse, you can follow these steps:
In Eclipse, go to File / New / Other …. This opens the New Project Wizard. In the New Project Wizard, select Maven / Maven Project. Click Next.
On the first page of the New Maven Project Wizard, select Create a simple project (you can skip archetype selection). Click Next.
On the second page (see screenshot), configure the Maven coordinates for the project. Since we are setting up a JAR Project, make sure to select Packaging: jar.
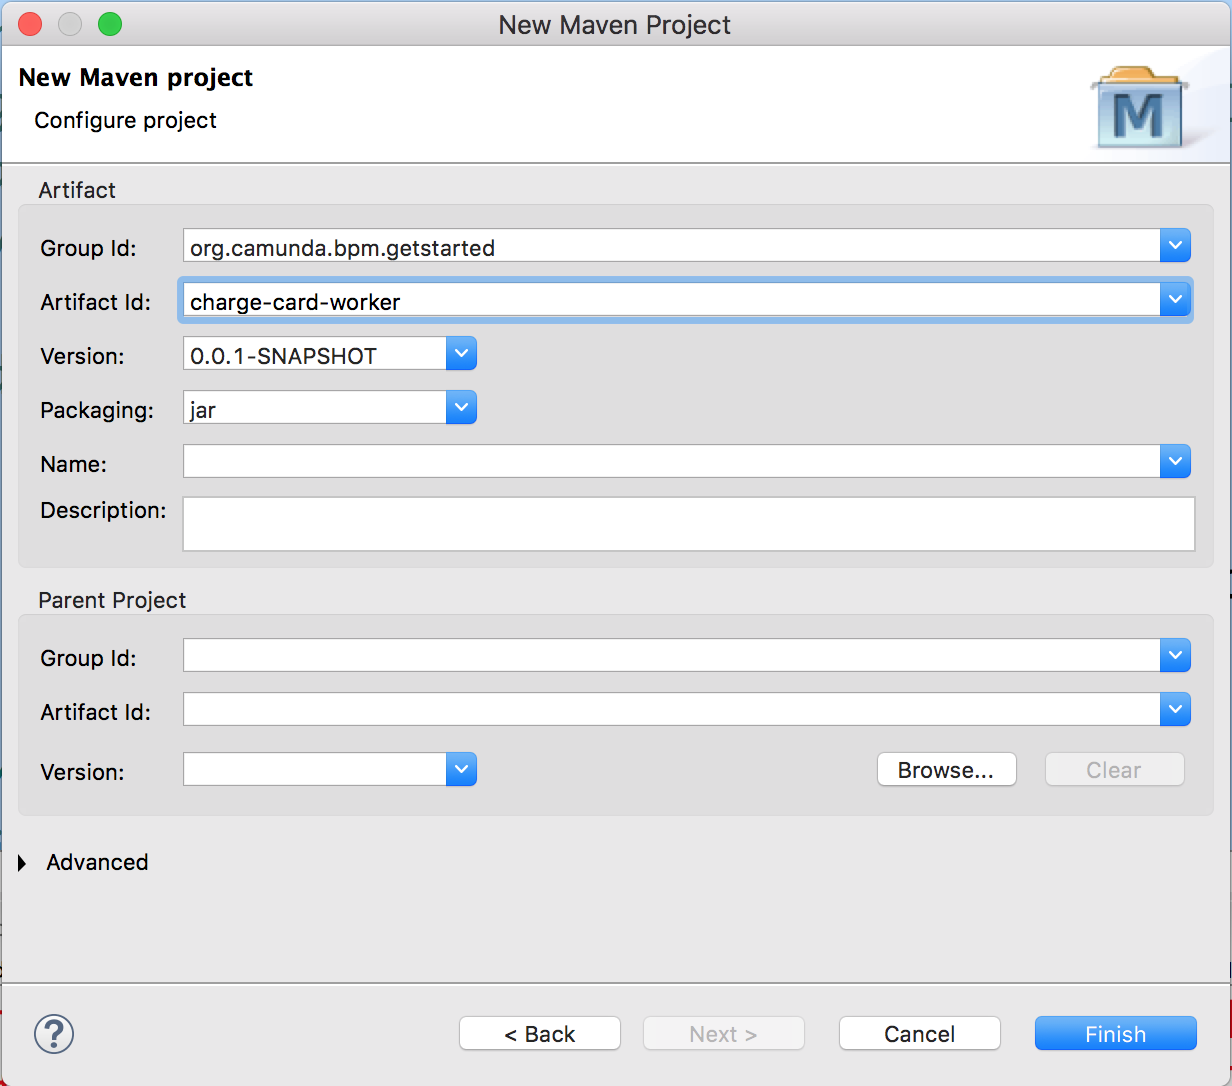
When you’re done, click Finish. Eclipse will set up a new Maven project. The project appears in the Project Explorer View.
Add Camunda External Task Client Dependency
The next step consists of setting up the Maven dependency to the external task client for your new process application. Your pom.xml file of your project should look like this:
<project xmlns="http://maven.apache.org/POM/4.0.0" xmlns:xsi="http://www.w3.org/2001/XMLSchema-instance"
	xsi:schemaLocation="http://maven.apache.org/POM/4.0.0 http://maven.apache.org/xsd/maven-4.0.0.xsd">
	<modelVersion>4.0.0</modelVersion>

	<groupId>org.camunda.bpm.getstarted</groupId>
	<artifactId>charge-card-worker</artifactId>
	<version>0.0.1-SNAPSHOT</version>

	<properties>
		<camunda.external-task-client.version>7.24.0</camunda.external-task-client.version>
		<maven.compiler.source>11</maven.compiler.source>
		<maven.compiler.target>11</maven.compiler.target>
	</properties>

	<dependencies>
		<dependency>
			<groupId>org.camunda.bpm</groupId>
			<artifactId>camunda-external-task-client</artifactId>
			<version>${camunda.external-task-client.version}</version>
		</dependency>
		<dependency>
			<groupId>org.slf4j</groupId>
			<artifactId>slf4j-simple</artifactId>
			<version>1.7.36</version>
		</dependency>
		<dependency>
			<groupId>jakarta.xml.bind</groupId>
			<artifactId>jakarta.xml.bind-api</artifactId>
			<version>4.0.2</version>
		</dependency>
	</dependencies>
</project>
Add the Java class
Next, we will create a new ExternalTaskClient which subscribes to the charge-card topic.
When the process engine encounters a service task that is configured to be externally handled, it creates an external task instance on which our handler will react. We are using Long Polling in the ExternalTaskClient to make the communication more efficient.
Next, you need to create a package, e.g., org.camunda.bpm.getstarted.chargecard and add a Java class, e.g. ChargeCardWorker, to it.
package org.camunda.bpm.getstarted.chargecard;

import java.util.logging.Logger;
import java.awt.Desktop;
import java.net.URI;

import org.camunda.bpm.client.ExternalTaskClient;

public class ChargeCardWorker {
  private final static Logger LOGGER = Logger.getLogger(ChargeCardWorker.class.getName());

  public static void main(String[] args) {
    ExternalTaskClient client = ExternalTaskClient.create()
        .baseUrl("http://localhost:8080/engine-rest")
        .asyncResponseTimeout(10000) // long polling timeout
        .build();

    // subscribe to an external task topic as specified in the process
    client.subscribe("charge-card")
        .lockDuration(1000) // the default lock duration is 20 seconds, but you can override this
        .handler((externalTask, externalTaskService) -> {
          // Put your business logic here

          // Get a process variable
          String item = externalTask.getVariable("item");
          Integer amount = externalTask.getVariable("amount");

          LOGGER.info("Charging credit card with an amount of '" + amount + "'€ for the item '" + item + "'...");

          try {
              Desktop.getDesktop().browse(new URI("https://docs.camunda.org/get-started/quick-start/complete"));
          } catch (Exception e) {
              e.printStackTrace();
          }

          // Complete the task
          externalTaskService.complete(externalTask);
        })
        .open();
  }
}
Run the worker
You can run the Java application by right clicking on the class ChargeCardWorker and choosing Run as Java.
Note that the worker should remain running throughout the entirety of this quick start guide.
Next Step
Once your worker is running, you can continue to deploy your process and start some instances.
Catch up: Get the Sources of Step-2a.
Download as .zip or checkout the corresponding tag with Git.
You can checkout the current state from the GitHub repository.
If you have not cloned the repository yet, please execute the following command:
git clone https://github.com/camunda/camunda-get-started-quickstart.git
To checkout the current state of the process application please execute the following command:
git checkout -f Step-2aOr download as archive from here.
b) Using JavaScript (NodeJS)
In this section, you’ll learn how to implement an external task worker in NodeJS.
Prerequisites
Make sure you have the following tools installed:
- NodeJS >= v16 (Download available here)
- Editor for JavaScript files (e.g. Atom)
Create a new NodeJS project
mkdir charge-card-worker
cd ./charge-card-worker
npm init -y
Update package.json to enable ES modules
Add the following “type” field to your package.json file:
{
// ...
  "main": "index.js",
  "type": "module",
  "scripts": {
    "test": "echo \"Error: no test specified\" && exit 1"
  },
// ...
}
Add Camunda External Task Client JS library
npm install camunda-external-task-client-js
npm install -D open
Implement the NodeJS script
Next, we’ll create a new ExternalTaskClient that subscribes to the charge-card topic.
When the process engine encounters a service task that’s configured to be externally handled, it creates an external task instance on which our handler will react. We use Long Polling in the ExternalTaskClient to make the communication more efficient.
Next, you need to create a new JavaScript file, e.g. worker.js, that looks like the following:
import { Client, logger } from 'camunda-external-task-client-js';
import open from 'open';

// configuration for the Client:
//  - 'baseUrl': url to the Process Engine
//  - 'logger': utility to automatically log important events
//  - 'asyncResponseTimeout': long polling timeout (then a new request will be issued)
const config = { baseUrl: 'http://localhost:8080/engine-rest', use: logger, asyncResponseTimeout: 10000 };

// create a Client instance with custom configuration
const client = new Client(config);

// susbscribe to the topic: 'charge-card'
client.subscribe('charge-card', async function({ task, taskService }) {
  // Put your business logic here

  // Get a process variable
  const amount = task.variables.get('amount');
  const item = task.variables.get('item');

  console.log(`Charging credit card with an amount of ${amount}€ for the item '${item}'...`);

  open('https://docs.camunda.org/get-started/quick-start/success');

  // Complete the task
  await taskService.complete(task);
});
Run the NodeJS script
You can run the NodeJS script with:
node ./worker.js
Note that the worker should remain running throughout the entirety of this quick start guide.
Next Step
Once your worker is running, you can move onto the next step to deploy your process and start some instances.
Catch up: Get the Sources of Step-2b.
Download as .zip or checkout the corresponding tag with Git.
You can checkout the current state from the GitHub repository.
If you have not cloned the repository yet, please execute the following command:
git clone https://github.com/camunda/camunda-get-started-quickstart.git
To checkout the current state of the process application please execute the following command:
git checkout -f Step-2bOr download as archive from here.