Setup a Spring Web Application Project
Now you are ready to set up your first process application project in Eclipse or the IDE of your choice, the following description uses Eclipse.
Set Up a Java Project
We will start by setting up a Spring web application as an Apache Maven Project inside Eclipse. This consists of four steps:
- Create a new Maven Project in Eclipse
- Add the Camunda & Spring framework dependencies
- Add the web.xml file for bootstrapping the Spring container
- Add a Spring Java configuration to set up the application context
In the following sections, we go through this process step by step.
Create a new Maven Project in Eclipse
First, we set up a new Apache Maven based project in Eclipse. Let’s call it loanapproval-spring. The screenshot below illustrates the settings we choose. As we are deploying a web application, make sure to select Packaging: war.
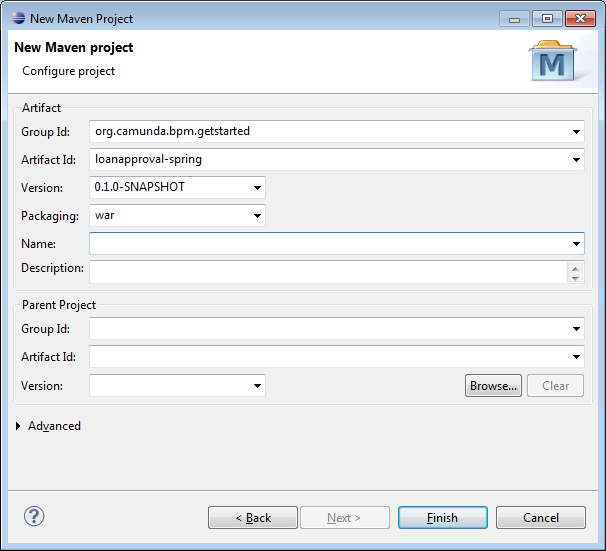
When you are done, click Finish. Eclipse sets up a new Maven project. The project appears in the Project Explorer view.
Add Camunda Platform & Spring Framework Dependencies
The next step consists of setting up the Maven dependencies for the new project. Maven dependencies need to be added to the pom.xml file of the project. We add both the Camunda Platform and the Spring Framework dependencies:
<project xmlns="http://maven.apache.org/POM/4.0.0" xmlns:xsi="http://www.w3.org/2001/XMLSchema-instance" xsi:schemaLocation="http://maven.apache.org/POM/4.0.0 http://maven.apache.org/xsd/maven-4.0.0.xsd">
  <modelVersion>4.0.0</modelVersion>
  <groupId>org.camunda.bpm.getstarted</groupId>
  <artifactId>loanapproval-spring</artifactId>
  <version>0.1.0-SNAPSHOT</version>
  <packaging>war</packaging>

  <properties>
    <camunda.version>7.18.0</camunda.version>
    <spring.version>5.3.22</spring.version>
    <h2.version>2.1.214</h2.version>
    <slf4j.version>1.7.36</slf4j.version>
    <maven.compiler.source>1.8</maven.compiler.source>
    <maven.compiler.target>1.8</maven.compiler.target>
  </properties>

  <dependencyManagement>
    <dependencies>
      <dependency>
        <groupId>org.camunda.bpm</groupId>
        <artifactId>camunda-bom</artifactId>
        <version>${camunda.version}</version>
        <scope>import</scope>
        <type>pom</type>
      </dependency>
      <dependency>
        <groupId>org.springframework</groupId>
        <artifactId>spring-framework-bom</artifactId>
        <version>${spring.version}</version>
        <scope>import</scope>
        <type>pom</type>
      </dependency>
    </dependencies>
  </dependencyManagement>

  <dependencies>
    <dependency>
      <groupId>org.camunda.bpm</groupId>
      <artifactId>camunda-engine</artifactId>
    </dependency>
    <dependency>
      <groupId>org.camunda.bpm</groupId>
      <artifactId>camunda-engine-spring</artifactId>
    </dependency>
    <dependency>
      <groupId>org.springframework</groupId>
      <artifactId>spring-context</artifactId>
    </dependency>
    <dependency>
      <groupId>org.springframework</groupId>
      <artifactId>spring-jdbc</artifactId>
    </dependency>
    <dependency>
      <groupId>org.springframework</groupId>
      <artifactId>spring-tx</artifactId>
    </dependency>
    <dependency>
      <groupId>org.springframework</groupId>
      <artifactId>spring-orm</artifactId>
    </dependency>
    <dependency>
      <groupId>org.springframework</groupId>
      <artifactId>spring-web</artifactId>
    </dependency>
    <dependency>
      <groupId>com.h2database</groupId>
      <artifactId>h2</artifactId>
      <version>${h2.version}</version>
    </dependency>
    <dependency>
      <groupId>org.slf4j</groupId>
      <artifactId>slf4j-jdk14</artifactId>
      <version>${slf4j.version}</version>
    </dependency>
  </dependencies>

  <build>
    <pluginManagement>
      <plugins>
        <plugin>
          <groupId>org.apache.maven.plugins</groupId>
          <artifactId>maven-war-plugin</artifactId>
          <version>3.3.2</version>
        </plugin>
      </plugins>
    </pluginManagement>
  </build>

</project>
Add web.xml File for Bootstrapping the Spring Container
Next, we add a web.xml file for bootstrapping the spring container. In order to do so, first add a folder named WEB-INF to the (preexisting) src/main/webapp folder of your Maven project. Inside the src/main/webapp/WEB-INF folder, add a file named web.xml:
<web-app xmlns="http://java.sun.com/xml/ns/javaee" xmlns:xsi="http://www.w3.org/2001/XMLSchema-instance"
         xsi:schemaLocation="http://java.sun.com/xml/ns/javaee
                    http://java.sun.com/xml/ns/javaee/web-app_3_0.xsd" version="3.0">

  <context-param>
    <param-name>contextClass</param-name>
    <param-value>org.springframework.web.context.support.AnnotationConfigWebApplicationContext</param-value>
  </context-param>
  <context-param>
    <param-name>contextConfigLocation</param-name>
    <param-value>org.camunda.bpm.getstarted.loanapproval.LoanApplicationContext</param-value>
  </context-param>

  <listener>
    <listener-class>org.springframework.web.context.ContextLoaderListener</listener-class>
  </listener>

</web-app>
Now you can perform the first build. Select the pom.xml in the Package Explorer, perform a right-click and select Run As / Maven Install
Add a Spring Application Context XML Configuration File
Next, we add a Spring ApplicationContext configuration class to the project. Create a Java class called LoanApplicationContext in the package org.camunda.bpm.getstarted.loanapproval.
We start with an empty class:
package org.camunda.bpm.getstarted.loanapproval;

import org.springframework.context.annotation.Configuration;

@Configuration
public class LoanApplicationContext {

}
Congratulations, you have completed the project setup. Your project should now look as depicted in the screenshot to the left.

You can now perform a full Maven build and deploy the project to a vanilla Apache Tomcat server. You should see the following log output:
INFORMATION org.apache.catalina.startup.HostConfig.deployWAR
Deploying web application archive [..\webapps\loanapproval-spring-0.1.0-SNAPSHOT.war]
INFORMATION org.springframework.web.context.ContextLoader.initWebApplicationContext
Root WebApplicationContext: initialization started
INFORMATION org.springframework.web.context.support.AnnotationConfigWebApplicationContext.prepareRefresh
Refreshing Root WebApplicationContext: startup date [DATE]; root of context hierarchy
INFORMATION org.springframework.web.context.support.AnnotationConfigWebApplicationContext.loadBeanDefinitions
Successfully resolved class for [org.camunda.bpm.getstarted.loanapproval.LoanApplicationContext]
INFORMATION org.springframework.web.context.ContextLoader.initWebApplicationContext
Root WebApplicationContext: initialization completed in 891 ms
INFORMATION org.apache.catalina.startup.HostConfig.deployWAR
Deployment of web application archive [..\webapps\loanapproval-spring-0.1.0-SNAPSHOT.war] has finished in [6.257] ms
This means that you have set up your Spring web application correctly.
Catch up: Get the Sources of Step-1.
Download as .zip or checkout the corresponding tag with Git.
You can checkout the current state from the GitHub repository.
If you have not cloned the repository yet, please execute the following command:
git clone https://github.com/camunda/camunda-get-started-spring.git
To checkout the current state of the process application please execute the following command:
git checkout -f Step-1Or download as archive from here.