Modeling a BPMN 2.0 Process
In this section we learn how to deploy a process and invoke a Spring Bean from a BPMN 2.0 Service Task.
Deploy and Invoke BPMN Process
Now that we know how to bootstrap the process engine within a Spring Boot Application, we can add a BPMN 2.0 process model and interact with the process from inside our Spring beans. In this section, we will
- Model an executable BPMN 2.0 process.
- Use Spring Boot Starter auto-deployment for BPMN 2.0 processes.
- Create a process application.
- Start a process instance from our process application.
Model an Executable BPMN 2.0 Process and Deploy It
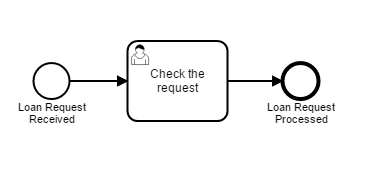
Start by modeling an executable process using the Camunda Modeler. The process should look as depicted in the screenshot below.
Hint
If you are unfamiliar with modeling an executable process, you can read the Model a Process section of the Quick Start tutorial.
When you are done, save the process model in the src/main/resources folder of your Eclipse project. Make sure to refresh the Eclipse project afterwards.
Once it is saved in the application classpath, it will be automatically deployed on engine startup.
Create Process Application
We recommend to declare the process application in your Camunda Spring Boot application, which gives additional configuration possibilities and will help us in the current demo to catch the “post-deploy” event to start the process instance at that point.
To declare the process application, just add the @EnableProcessApplication annotation on your WebappExampleProcessApplication class and put the empty processes.xml file in the
src/main/resources/META-INF folder. The file is required by the Camunda Engine for every process application, but in our case it will stay empty.
Start a Process Instance after Process Application has been Deployed
The next step consists of starting a process instance from our process application class. For this, we will process PostDeployEvent, which is fired as soon as
our process application has been deployed to the Camunda engine.
...
  @Autowired
  private RuntimeService runtimeService;

  @EventListener
  private void processPostDeploy(PostDeployEvent event) {
    runtimeService.startProcessInstanceByKey("loanApproval");
  }
...
Note that we can easily inject the Camunda engine service via the @Autowired annotation.
Rebuild and test
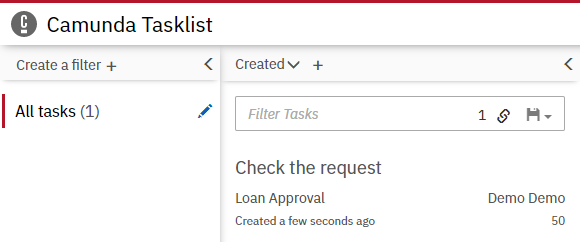
If you rebuild and restart the application, you should see the task “Check the request” in Tasklist under the “All tasks” filter:
Catch up: Get the Sources of Step-3.
Download as .zip or checkout the corresponding tag with Git.
You can checkout the current state from the GitHub repository.
If you have not cloned the repository yet, please execute the following command:
git clone https://github.com/camunda/camunda-get-started-spring-boot.git
To checkout the current state of the process application please execute the following command:
git checkout -f Step-3Or download as archive from here.