Installation & Configuration
After familiarizing yourself with all Requirements, this section will dive deeper into the components involved in RPA Orchestration and how you should set them up. If your setup is already prepared, jump ahead to Orchestrating RPA Bots
RPA Vendor Credentials
To orchestrate RPA bots, we will connect the Camunda Platform Workflow Engine to your RPA vendor via the Camunda RPA Bridge. This component will require configuration parameters to connect to your RPA vendor.
UiPath
The Camunda RPA Orchestration works with the UiPath Orchestrator in either the Cloud or On-Premises (v2019 or v2020.4) distribution. For testing purposes, we recommend using the cloud version.
To prepare the setup of the RPA Bridge, please
- Open the ‘Admin’ view of the UiPath Orchestrator Portal
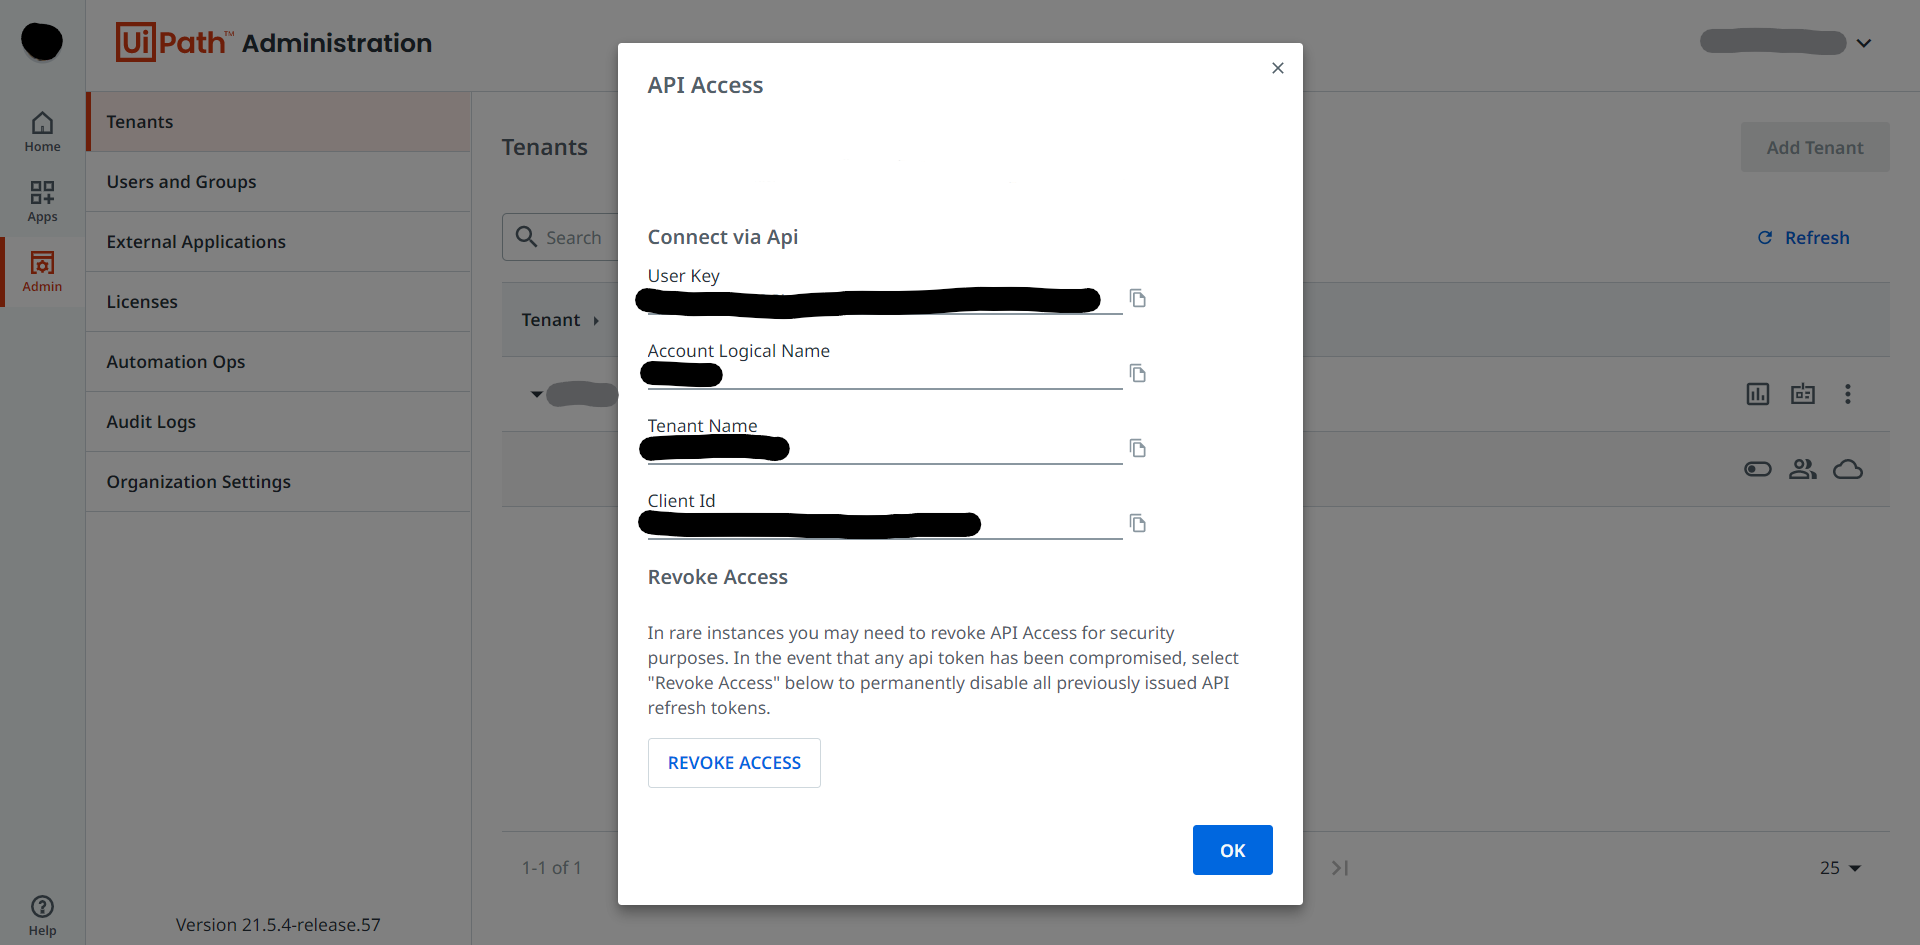
- Open the ‘API Access’ overlay for your tenant (you might need to expand the tenant with the arrow next to it)
- Copy the values for
- User Key
- Organization ID
- Tenant Name
- Client ID

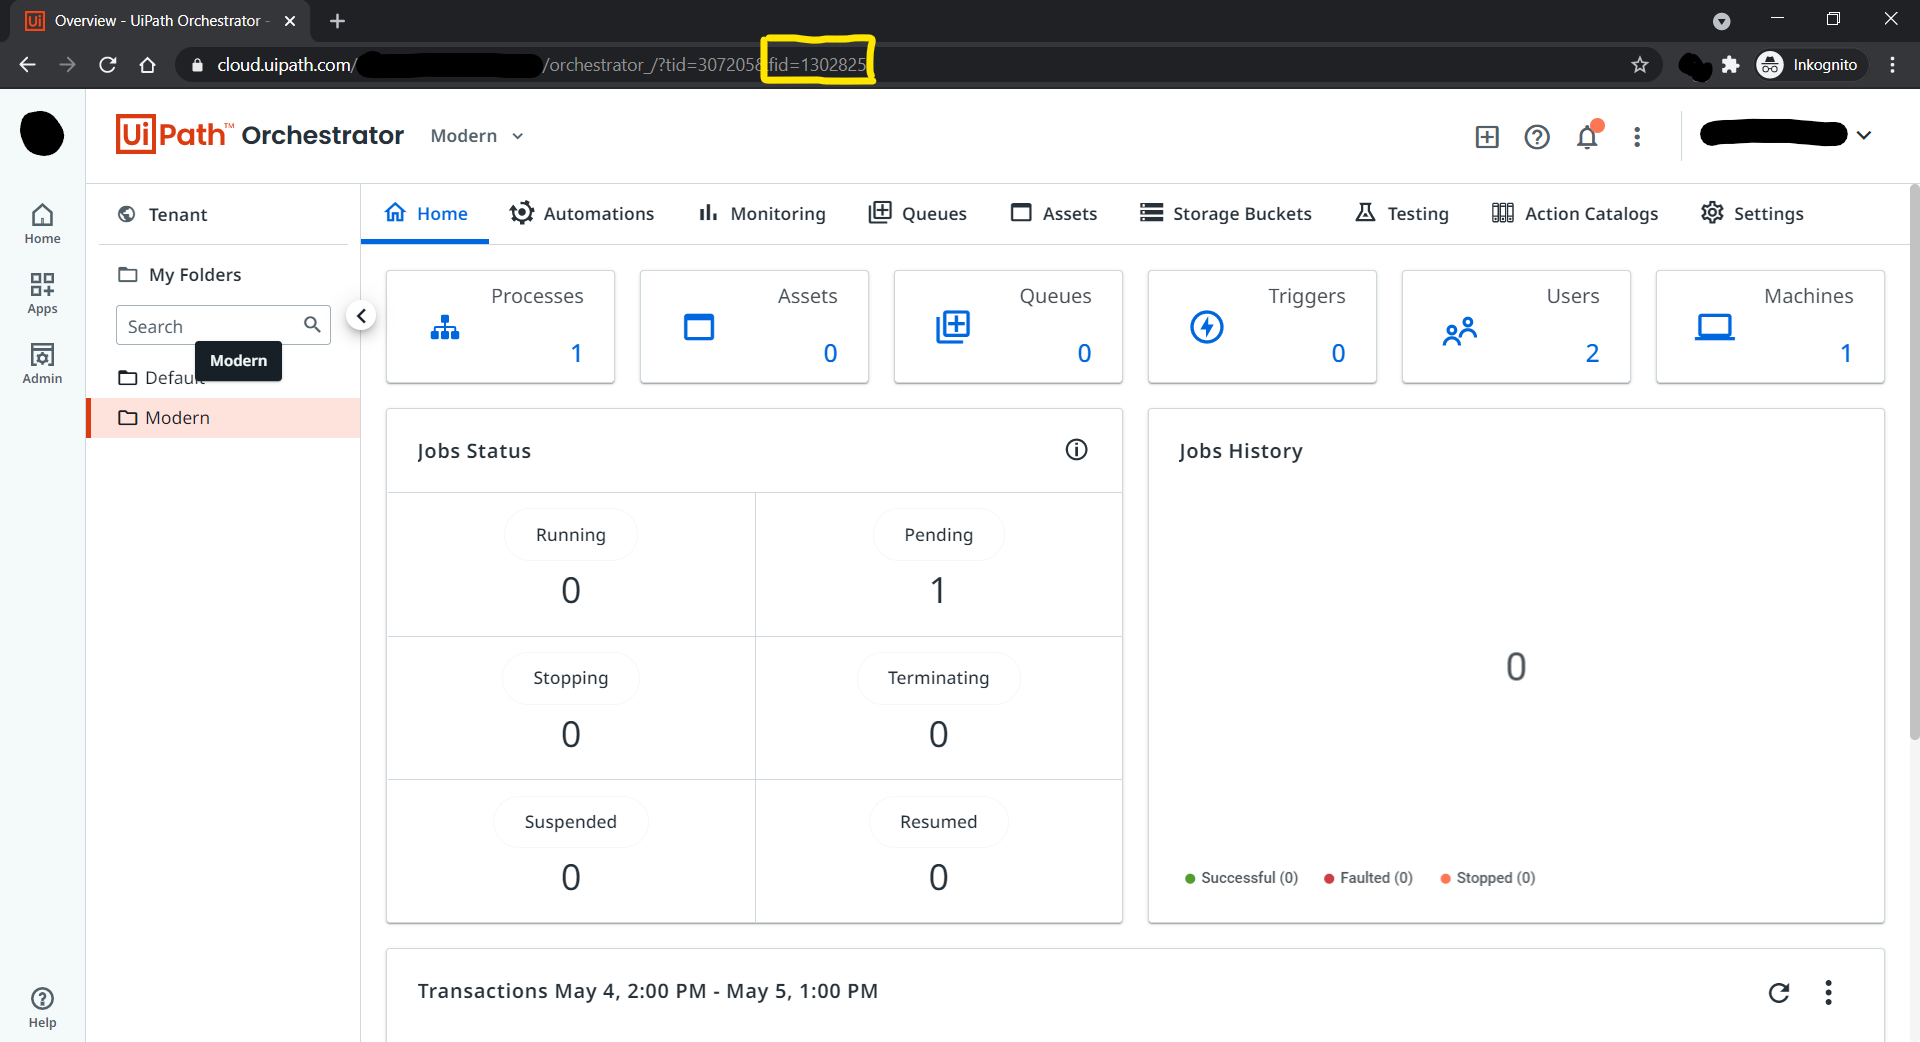
Furthermore, the API of UiPath Orchestrator requires a parameter called organization-unit-id. In short, this id relates to one specific folder in UiPath Orchestrator that contains the RPA bots you want to orchestrate. In order to obtain it, visit your Orchestrator instance, select the folder you want to work with, and fetch the id from the URL’s fid parameter.

You can read more about this id and how to obtain it in the UiPath documentation on Building API Requests. Feel free to also visit the UiPath Forum for further help.
Automation Anywhere
The RPA Bridge integrates with Automation 360 (formerly A2019).
To prepare the setup of the RPA Bridge, please
- Create or choose a user with a bot runner license (bots available to this user can be orchestrated in Camunda and the user will be used to run bots)
- Remember the password of that user or alternatively create an API key and write that down
Camunda Platform Run
Unless you already have a running Camunda Platform 7.14 or later installation, please
You will be asked for a username and password that you have obtained together with your Enterprise license key.
Once you have downloaded Camunda Run, please
- Unzip the archive
- Launch the platform by executing
# Windows
start.bat

# Mac OS or Linux
./start.sh
Learn more about Installing Camunda Platform.
Camunda RPA Bridge
In order to install the RPA Bridge, please:
- Download the RPA Bridge
- Unzip the archive
- Add your Enterprise license key into a file called
license.txtin the same folder as theapplication.ymlfile.
Edit the config file application.yml:
- In general, lines starting with a
#are comments and will not be considered by the Bridge. license-file: Remove the comment character. The property value should befile:///${user.dir}/license.txt.camunda-api: Adjust the URL and credentials to your Camunda Platform instance if necessary.
UiPath Cloud
Edit the config file application.yml:
- add
#to the beginning of each line underautomation-anywhere-api, so it is not considered by the Bridge - under the
uipath-apielement, adjust the followingurl: set tohttps://platform.uipath.com/account-name: the Organization ID from the API Access overlaytenant-name: the Tenant Name from the API Access overlayfolder-path: adjust to the name of the folder you want to work with, in case you do NOT want to work with a folder called “Default”organization-unit-id: see above how to retrieve your organization unit id- under the
authenticationelement, adjust the followingtype: set tocloudauth-url: switch tohttps://account.uipath.com/oauth/tokenuser: the Client ID from the API Access overlaykey: the User Key from the API Access overlay
status-update-method: set topollingwebhook: add#to the beginning of each line underwebhook, so it is not considered by the Bridge
UiPath On-Premises
Edit the config file application.yml:
- Add
#to the beginning of each line underautomation-anywhere-api, so it is not considered by the Bridge. - Please follow the instructions in the config file related to UiPath On-Premises.
- For a quick start, we recommend using
pollingfor thestatus-update-method.
Automation Anywhere
Edit the config file application.yml:
- Add
#to the beginning of each line underuipath-api, so it is not considered by the Bridge - Under the
automation-anywhere-apielement, adjust the following:url: set to the base URL of your Automation Anywhere Controlroom instanceuser: the name of the user with bot runner permissions, this user is starting the bots in your Automation Anywhere instancepassword: the user’s password- If you want to use an API key instead, put a
#in front ofpassword, remove the one in front ofapi-key, and add your API key to that property
Logging configuration
We recommend enabling simple logging by adding this as the last line to application.yml:
logging.level.org.camunda.bpm.rpa.bridge.externaltask: DEBUG
Launch the RPA Bridge
Use the following command to launch the Bridge
java -jar camunda-bpm-rpa-bridge.jar
You should see a log message like
External Task Listener started ----
For troubleshooting, you can switch to extensive logging by adding this as the last line to application.yml:
logging.level.org.camunda.bpm.rpa.bridge: DEBUG
Learn more about configuring the RPA Bridge.
Cawemo Catalog
Please note: You have the choice of Cawemo SaaS or On-Premises.
For testing we recommend the use of Cawemo SaaS. Please sign up and ask for a trial license via the “Provide feedback” form to get started.
When you are using Cawemo SaaS, please open the settings page and verify in the “Details” section that your Enterprise license is active.
In order to use Cawemo On-Premises (version 1.6 or later), please follow this on-premises installation guide.
After logging into Cawemo:
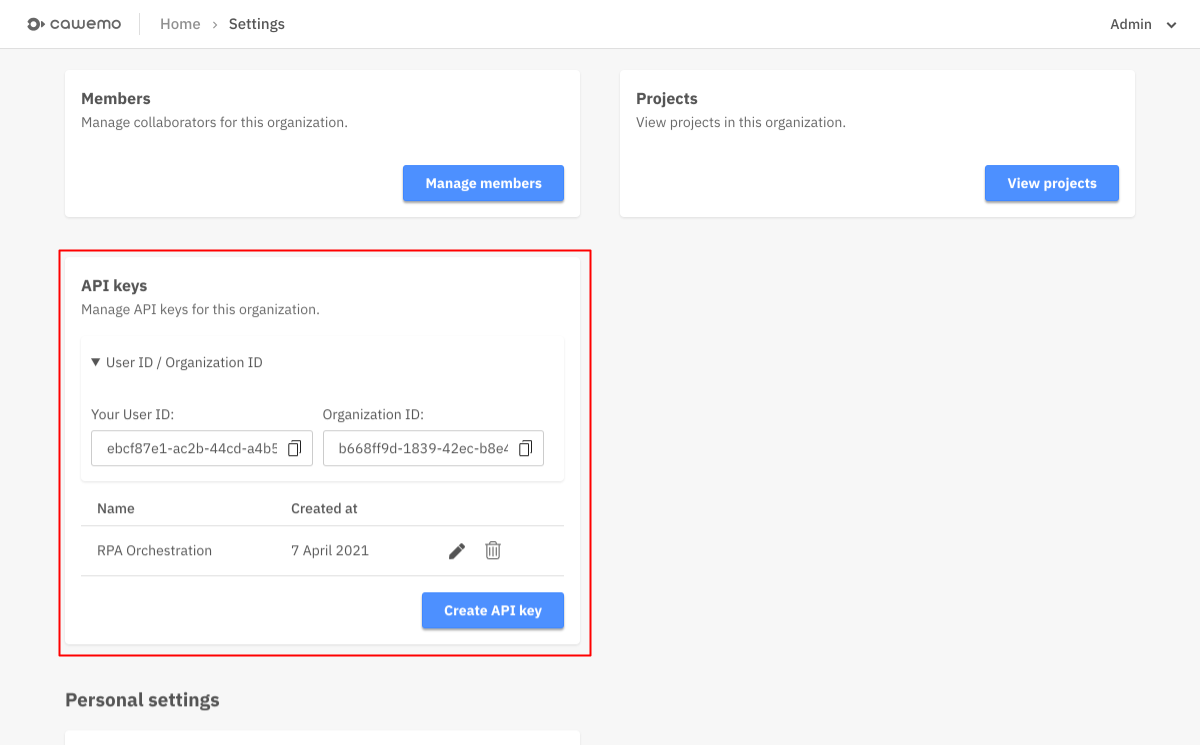
- Open the settings page.
- Create an API Key with the name “RPA Orchestration”.
- Save the key hash for later use in the Camunda Modeler.
- Open the “User ID / Organization ID” panel to retrieve your User ID (which is not your email address).

Camunda Modeler
Please use the Camunda Modeler version 4.7 or later. In case you don’t have it yet, you can download the latest version of Camunda Modeler.
- Download version 3.0 or later of the Cloud Connect plugin for Camunda Modeler
- Extract the archive and move it to the plugins folder
# Windows
%APPDATA%\camunda-modeler\plugins

# Mac OS
~/Library/Application Support/camunda-modeler/plugins

# Linux
~/.config/camunda-modeler/plugins
- Restart the Modeler and verify that the Plugins menu contains an entry “Cloud Connect”.
- Open the configuration of the Cloud Connect plugin via the menu.
- Add the following settings:
- User ID: from the Cawemo settings page
- API Key: from the Cawemo settings page
- Sync Catalog Projects: set to
enabled
- Save the configuration dialog.
In the upper right corner of the Modeler window you should see “Connected to Cawemo”, indicating a successful connection.
Learn more about connecting Camunda Modeler with Cawemo.