Setup a Java EE Application Project
Now you are ready to set up your first process application project in the IDE of your choice, the following description uses Eclipse.
Set up your project
Fancy to save work and use a project template instead?
You don’t have to setup the project manually but can also use a Maven Archetype (which is like a project template), see Maven Archetypes for details. The archetype will create a project according to our best practices.
Now you are ready to set up your Java EE process application project in Eclipse. Setting up a process application project consists of 6 steps:
- Create a new Maven Project in Eclipse
- Add the Maven dependencies
- Add a WEB-INF/beans.xml deployment descriptor
- Add a WEB-INF/faces-config.xml deployment descriptor
- Add a META-INF/persistence.xml deployment descriptor
- Add a META-INF/processes.xml deployment descriptor
In the following sections, we go through this process step by step.
Create a new Maven Project in Eclipse
In Eclipse, go to File / New / Other .... This opens the New Project Wizard. In the New Project Wizard select Maven / Maven Project. Click Next.
On the first page of the New Maven Project Wizard select "Create a simple project (skip archetype selection)". Click Next.
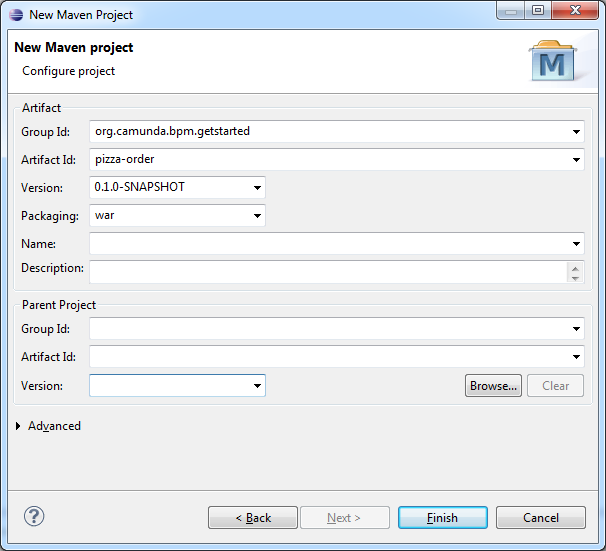
On the second page (see screenshot), configure the Maven coordinates for the project.
As we are setting up a WAR Project, make sure to select Packaging: war.
When you are done, click Finish. Eclipse sets up a new Maven project. The project appears in the Project Explorer view.
Add Maven Dependencies
The next step consists of setting up the Maven dependencies for your new process application. Add the following dependencies to the pom.xml file of your project:
<?xml version="1.0" encoding="UTF-8"?>
<project xmlns="http://maven.apache.org/POM/4.0.0"
         xmlns:xsi="http://www.w3.org/2001/XMLSchema-instance"
         xsi:schemaLocation="http://maven.apache.org/POM/4.0.0 http://maven.apache.org/xsd/maven-4.0.0.xsd">
  <modelVersion>4.0.0</modelVersion>

  <groupId>org.camunda.bpm.getstarted</groupId>
  <artifactId>pizza-order</artifactId>
  <version>0.1.0-SNAPSHOT</version>
  <packaging>war</packaging>

  <properties>
    <camunda.version>7.18.0</camunda.version>
    <maven.compiler.source>1.8</maven.compiler.source>
    <maven.compiler.target>1.8</maven.compiler.target>
  </properties>

  <dependencyManagement>
    <dependencies>
      <dependency>
        <groupId>org.camunda.bpm</groupId>
        <artifactId>camunda-bom</artifactId>
        <version>${camunda.version}</version>
        <scope>import</scope>
        <type>pom</type>
      </dependency>
    </dependencies>
  </dependencyManagement>

  <dependencies>

    <!-- Camunda engine dependency -->
    <dependency>
      <groupId>org.camunda.bpm</groupId>
      <artifactId>camunda-engine</artifactId>
      <scope>provided</scope>
    </dependency>

    <!-- Camunda cdi beans -->
    <dependency>
      <groupId>org.camunda.bpm</groupId>
      <artifactId>camunda-engine-cdi</artifactId>
    </dependency>

    <!-- provides a default EjbProcessApplication -->
    <dependency>
      <groupId>org.camunda.bpm.javaee</groupId>
      <artifactId>camunda-ejb-client</artifactId>
    </dependency>

    <!-- Java EE 7 Specification -->
    <dependency>
      <groupId>org.jboss.spec</groupId>
      <artifactId>jboss-javaee-7.0</artifactId>
      <version>1.0.3.Final</version>
      <type>pom</type>
      <scope>provided</scope>
      <exclusions>
        <exclusion>
          <artifactId>xalan</artifactId>
          <groupId>xalan</groupId>
        </exclusion>
      </exclusions>
    </dependency>
  </dependencies>

  <build>
    <finalName>pizza-order</finalName>
    <plugins>
      <plugin>
        <groupId>org.apache.maven.plugins</groupId>
        <artifactId>maven-war-plugin</artifactId>
        <version>3.3.2</version>
        <configuration>
          <failOnMissingWebXml>false</failOnMissingWebXml>
        </configuration>
      </plugin>
    </plugins>
  </build>

</project>
As dependencies you need the Camunda engine and Camunda engine CDI package. The CDI package provide you with beans to easily interact with the process engine and the ability to resolve CDI beans from inside the BPMN process XML.
We also use the Camunda EJB client to interact with the process engine, which provides a default implementation of the EjbProcessApplication. This dependency is not necessary if you want to implement your own EjbProcessApplication.
The JBoss JavaEE spec dependency helps us to develop the application. It is only necessary during development so the scope is set to provided. The
WildFly already contains this interfaces.
Now you can perform the first build. Select the pom.xml in the Package Explorer, perform a right-click and select Run As / Maven Install
Catch up: Get the Sources of Step-1.
Download as .zip or checkout the corresponding tag with Git.
You can checkout the current state from the GitHub repository.
If you have not cloned the repository yet, please execute the following command:
git clone https://github.com/camunda/camunda-get-started-javaee.git
To checkout the current state of the process application please execute the following command:
git checkout -f Step-1Or download as archive from here.
Add a WEB-INF/beans.xml Deployment Descriptor
After we have all of our maven dependencies configured, we can add our first deployment descriptor. The WEB-INF/beans.xml is used to configure a CDI application. It’s presence is always mandatory but it can be empty, as it is in our case. For further information, please see this explanation.
This file needs to be added to the src/main/webapp/WEB-INF folder of the Maven project.
Add a WEB-INF/faces-config.xml Deployment Descriptor
The next step is to configure the JSF component. This is done by adding the WEB-INF/faces-config.xml to your project. We use the default configuration, so you only have to add the file without any additional configuration.
This file needs to be added to the src/main/webapp/WEB-INF folder of the Maven project.
<?xml version="1.0" encoding='UTF-8'?>
<faces-config version="2.0" xmlns="http://java.sun.com/xml/ns/javaee"
              xmlns:xsi="http://www.w3.org/2001/XMLSchema-instance"
              xsi:schemaLocation="http://java.sun.com/xml/ns/javaee
         http://java.sun.com/xml/ns/javaee/web-facesconfig_2_0.xsd">

</faces-config>
Add a META-INF/persistence.xml Deployment Descriptor
To configure JPA, we add the META-INF/persistence.xml file. We use the same data source as the process engine which is configured inside the standalone.xml of the WildFly distribution.
Additionally, we configure the H2 database to drop the database schema on redeployment and to log SQL queries. This configuration is useful during development.
This file needs to be added to the src/main/resources/META-INF folder of the Maven project.
<?xml version="1.0" encoding="UTF-8"?>
<persistence version="2.0"
  xmlns="http://java.sun.com/xml/ns/persistence" xmlns:xsi="http://www.w3.org/2001/XMLSchema-instance"
  xsi:schemaLocation="
        http://java.sun.com/xml/ns/persistence
        http://java.sun.com/xml/ns/persistence/persistence_2_0.xsd">

  <persistence-unit name="primary">
    <jta-data-source>java:jboss/datasources/ProcessEngine</jta-data-source>
    <properties>
      <!-- Properties for Hibernate -->
      <property name="hibernate.hbm2ddl.auto" value="create-drop" />
      <property name="hibernate.show_sql" value="true" />
    </properties>
  </persistence-unit>

</persistence>
Add a META-INF/processes.xml Deployment Descriptor
The last step for setting up the process application is adding the META-INF/processes.xml deployment descriptor file. This file allows us to provide a declarative configuration of the deployment(s) that this process application makes to the process engine.
This file needs to be added to the src/main/resources/META-INF folder of the Maven project.
<process-application
  xmlns="http://www.camunda.org/schema/1.0/ProcessApplication"
  xmlns:xsi="http://www.w3.org/2001/XMLSchema-instance">

  <process-archive name="pizza-order">
    <process-engine>default</process-engine>
    <properties>
      <property name="isDeleteUponUndeploy">true</property>
      <property name="isScanForProcessDefinitions">true</property>
    </properties>
  </process-archive>

</process-application>
At this point you have successfully set up the process application you can start modeling your process.
Catch up: Get the Sources of Step-2.
Download as .zip or checkout the corresponding tag with Git.
You can checkout the current state from the GitHub repository.
If you have not cloned the repository yet, please execute the following command:
git clone https://github.com/camunda/camunda-get-started-javaee.git
To checkout the current state of the process application please execute the following command:
git checkout -f Step-2Or download as archive from here.