Extending the Eclipse Plugin
You can extend the modeler to ship reusable custom tasks through custom task providers.

The following functionality is exposed to custom task providers and thus usable when implementing custom tasks:
- Add extension to properties panel
- Create task from palette
- Add custom actions to task
- Change color and icon
Creating a Custom Task
By providing custom tasks to the Camunda Modeler Eclipse Plugin, vendors may provide special tasks to users through the Modeler’s palette. Along with these custom tasks, vendors may ship extensions to the properties panel through which task-specific properties can be maintained.
This tutorial guides you through the creation of a custom task extension for the Camunda Modeler Eclipse Plugin.
The source of custom task extension that is developed in this tutorial is available as a sample application.
Before You Start
In this tutorial, we take a deeper look at Eclipse extension points and plug-in development. Please refer to the Extending the Eclipse IDE - Plug-in development and Eclipse Extension Points and Extensions tutorials on the matter if you would like to learn more.
Make sure you have the development environment for the Camunda Modeler set up. This typically involves setting up the Eclipse instance with the necessary dependencies, checking out the Modeler sources and importing the project(s) into a workspace.
Creating a Plug-in Project
To extend the Modeler, you need to create an Eclipse plug-in project. Do so via New > Project > Plug-in Project.

The next steps ask you for the location of the project

as well as vendor and versioning information.

You may optionally choose to generate an activator for your project to hook into the plug-ins life cycle.
Building a Custom Task Plug-in
The Modeler gives you the ability to contribute custom task types via the
org.camunda.bpm.modeler.plugin.customtask extension point. Via this extension point you must provide information about the custom task through the ICustomTaskProvider interface.
Configure Project Dependencies
Add the following entry to your META-INF/MANIFEST.MF file to enable commonly used dependencies:
Require-Bundle: org.eclipse.emf,
 org.eclipse.core.runtime,
 org.eclipse.ui,
 org.eclipse.ui.ide,
 org.eclipse.ui.workbench,
 org.eclipse.ui.views.properties.tabbed,
 org.camunda.bpm.modeler;bundle-version="2.3.0",
 org.eclipse.bpmn2,
 org.eclipse.graphiti,
 org.eclipse.graphiti.ui
Hook into the Extension Point
Create or edit the plugin.xml in your project root with the following contents:
<?xml version="1.0" encoding="UTF-8"?>
<?eclipse version="3.4"?>
<plugin>
  <extension point="org.camunda.bpm.modeler.plugin.customtask">
    <provider class="com.mycompany.modeler.tasks.MyCustomTaskProvider">
    </provider>
  </extension>
</plugin>
This tells Eclipse you are going to implement the custom task extension point using the class com.mycompany.modeler.tasks.MyCustomTaskProvider.
You are ready to write your custom task provider. Go ahead and create the class with the following contents:
public class MyCustomTaskProvider extends AbstractCustomTaskProvider {

  @Override
  public String getId() {
    return "mycompany.myCustomTask";
  }

  @Override
  public String getTaskName() {
    return PluginConstants.getMyCustomTaskName();
  }

  @Override
  public boolean appliesTo(EObject eObject) {
    return PluginConstants.isMyCustomTask(eObject);
  }
}
Additionally, create the utility class com.mycompany.modeler.tasks.PluginConstants as shown below
public class PluginConstants {

  public static final EStructuralFeature CLASS_STRUCTURAL_FEATURE = ModelPackage.eINSTANCE.getDocumentRoot_Class();

  public static final String CLASS_VALUE = "com.mycompany.services.MyService";

  public static boolean isMyCustomTask(EObject eObject) {
    return eObject instanceof ServiceTask && CLASS_VALUE.equals(eObject.eGet(CLASS_STRUCTURAL_FEATURE));
  }

  public static String getMyCustomTaskName() {
    return "My Custom Task";
  }
}
Resolve missing dependencies via Add XXX to imported packages. In case dependencies are unresolvable, you may have problems in your build path. Check the project requirements to work around the issue.
What did we do? The class MyCustomTaskProvider provides the basic implementation of the custom task. It exposes the following method:
#getId(): provides a unique id of the custom task#getName(): provides the task name#appliesTo(EObject): tells the modeler whether a givenEObjectrepresents a custom task
The utility PluginConstants provides reusable utilities such as the implementation of the custom task check as well as the task name.
Activation of the extension
The behavior shipped with a custom task provider will automatically activate whenever ICustomTaskProvider#appliesTo(EObject) returns as true. This means that our implementation MyCustomTaskProvider activates for all objects of type ServiceTask that have a class property set to com.mycompany.services.MyService (cf. PluginConstants#isMyCustomTask(EObject)).
In other words: It is all plain old BPMN 2.0 with Camunda extensions and any service task with an XML definition like
<serviceTask camunda:class="com.mycompany.services.MyService" />
will be recognized as a custom task once opened with the Camunda Modeler and our installed plug-in.
Adding a Property Tab
To show a special property section for a custom task, we must implement the method ICustomTaskProvider#getTabSection(). The method must return an instance of ISection that gets added to the property tabs for a task.
Add the following lines to our MyCustomTaskProvider class:
  @Override
  public ISection getTabSection() {
    return new MyCustomTaskTabSection();
  }
We implement the tab section via the class MyCustomTaskTabSection.
public class MyCustomTaskTabSection extends AbstractTabSection {

  @Override
  protected Composite createCompositeForObject(Composite parent, EObject businessObject) {
    return new MyCustomTaskTabSectionFactory(this, parent).createCompositeForBusinessObject((BaseElement) businessObject);
  }

  private static class MyCustomTaskTabSectionFactory extends AbstractTabCompositeFactory<BaseElement> {

    public MyCustomTaskTabSectionFactory(GFPropertySection section, Composite parent) {
      super(section, parent);
    }

    @Override
    public Composite createCompositeForBusinessObject(BaseElement baseElement) {

      Text endpointText = FieldInjectionUtil.createLongStringText(
        section, parent, "Endpoint", "endpoint", baseElement);

      PropertyUtil.attachNoteWithLink(section, endpointText,
        "For more information search <a href=\"http://google.com\">google</a>");

      return parent;
    }
  }
}
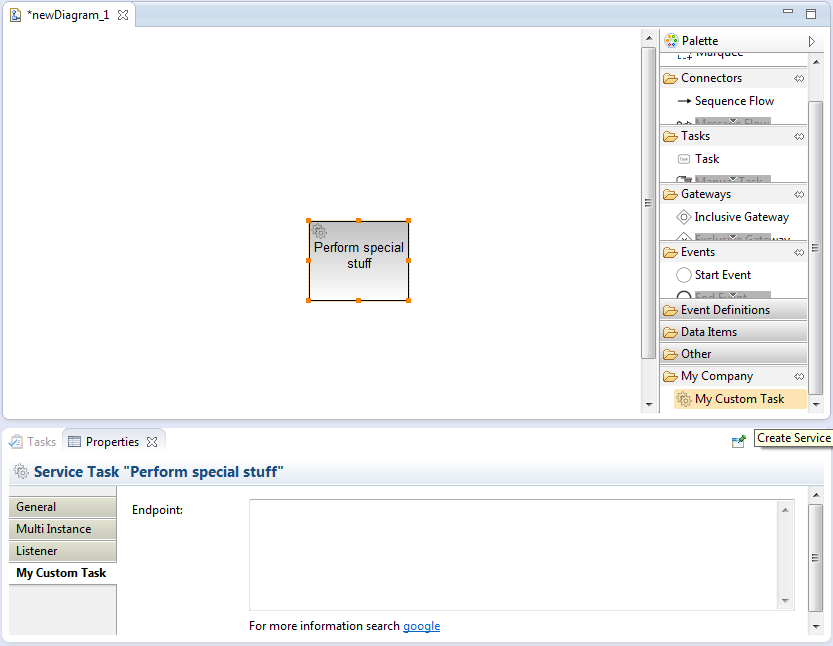
The MyCustomTaskTabSection delegates creating the tab contents to an instance of AbstractTabCompositeFactory. It creates the contents of the tab in #createCompositeForBusinessObject(EObject). Our implementation adds a text area with the label Endpoint that maps to a field injection of type text with the name endpoint. Additionally, it renders the note For more information search google right below the text.
We may now start Eclipse with the extension installed via Run > Run As > Eclipse Application.
After we assigned the class com.mycompany.services.MyService to a service task and refreshed the properties panel (i.e. deselect and select the task again) we should see our property tabs extension in action.

When editing the input field labeled Endpoint and saving the file, the BPMN 2.0 diagram file should reflect the changes.
Helpers Available in Property Tabs
There are two helpers that aid you in the creation of property sections:
FieldInjectionUtiloffers static helpers that create input elements that map to<camunda:field />injection declarations.PropertyUtiloffers static helpers for creating various kinds of input elements, including help texts.
To learn more about what else is possible in property panels, browse the subclasses of AbstractTabCompositeFactory.
Palette Integration
The way a custom task is integrated into the new element palette may be configured via ICustomTaskProvider#getPaletteIntegration().
To enable palette integration for our service task, add the following lines to the MyCustomTaskProvider class
  @Override
  public IPaletteIntegration getPaletteIntegration() {
    return PaletteIntegration.intoCompartmentNamed("My Company");
  }
This specifies that a create handle for our custom task should be shown in a category My Company in the palette. Alternatively, we may choose to integrate the task into already existing categories by returning PaletteIntegration.intoCompartmentForCategory(Category.TASKS).
Now we must tell the Modeler how to create the custom task.
This is done by exposing a custom set of modeling features, including a create feature via an IFeatureContainer.
Defining Custom Task Features
Feature containers, implementing the interface IFeatureContainer, tell the Modeler how certain modeling operations are implemented on diagram elements.
These operations include:
- Creating an element
- Moving, resizing or removing an element
- Decorating an element
Custom task providers may ship their own feature containers by publishing them via ICustomTaskProvider#getFeatureContainer().
You must configure a feature container in your custom task provider as soon as you want to be able to create a custom task via the palette or want to change its graphical representation.
Expose a Feature Container
Create the class MyCustomTaskFeatureContainer with the following definition
public class MyCustomTaskFeatureContainer extends ServiceTaskFeatureContainer {

  @Override
  public boolean canApplyTo(Object o) {
    return o instanceof EObject && PluginConstants.isMyCustomTask((EObject) o);
  }
The feature container inherits the behavior provided to service tasks (extends ServiceTaskFeatureContainer) and only applies to instances of the custom service (cf. MyCustomTaskFeatureContainer#canApplyTo(Object).
Now expose it through the custom task provider by adding the following lines to the MyCustomTaskProvider class:
  @Override
  public IFeatureContainer getFeatureContainer() {
    return new MyCustomTaskFeatureContainer();
  }
If you enabled the palette integration, you should now see the custom service task entry in the palette as shown below

Add a Custom Create Feature
To be detected as a custom task, a newly created element must have the class attribute set to com.mycompany.services.MyService.
We can achieve this by overriding the create feature provided by the ServiceTaskFeatureContainer with custom behavior that explicitly sets the attribute when the task is being created.
To do so, add the following lines to the MyCustomTaskFeatureContainer class:
  @Override
  public ICreateFeature getCreateFeature(IFeatureProvider fp) {
    String taskName = PluginConstants.getMyCustomTaskName();
    String createDescription = "A task that talks to an endpoint";

    return new AbstractCreateTaskFeature<ServiceTask>(fp, taskName, createDescription) {

      @Override
      protected String getStencilImageId() {
        return Images.IMG_16_SERVICE_TASK;
      }

      @Override
      public ServiceTask createBusinessObject(ICreateContext context) {
        ServiceTask serviceTask = super.createBusinessObject(context);

        serviceTask.eSet(PluginConstants.CLASS_STRUCTURAL_FEATURE, PluginConstants.CLASS_VALUE);

        return serviceTask;
      }

      @Override
      public EClass getBusinessObjectClass() {
        return Bpmn2Package.eINSTANCE.getServiceTask();
      }
    };
  }
Note that you can also specify the image, the task name displayed in the palette as well as a description for the create feature.
After restarting Eclipse, the palette entry should now display the name of your custom task.

Building a Customized Modeler Distribution
As a final step we need to build a customized Eclipse that contains the Camunda Modeler and our custom task plug-in. One of the various ways to do this is via a product configuration that allows you to generate Eclipse applications as well as update sites.
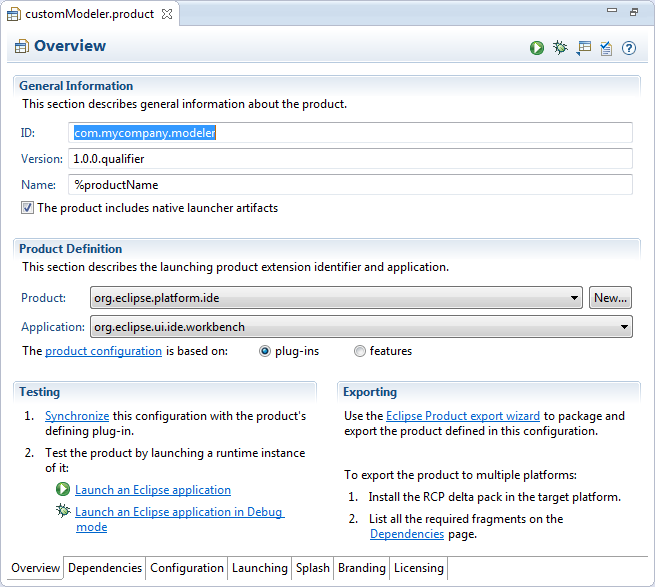
To start, create a new product configuration named customModeler.product via New > Other... > Plug-in Configuration and specify that you would like to create a configuration using basic settings.
Configure the resulting view similar to the following screenshot
Now add the Camunda Modeler as well as the custom task plug-in to the list of dependencies (Dependencies tab).
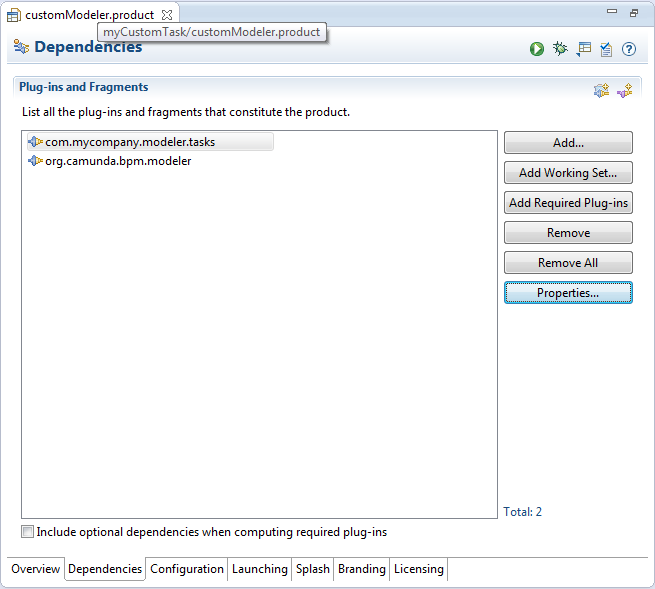
Finally resolve the required dependencies via Add Required Plug-ins.
You may now start, verify and export the product configuration using the handles at the top right.
Summary
In this how-to we created a simple custom task extension for the Camunda Modeler. This involved creating a plug-in project and writing a custom task extension for the Camunda Modeler. Through the extension we were able to add a property panel tab as well as a palette entry for the custom task. Finally, we saw how an Eclipse distribution can be built that ships the Camunda Modeler, including the custom task extension.
Advanced Topics
There are a number of further topics we did not touch yet. These include:
- Color custom tasks on the diagram
- Change the icon
- Provide additional actions via the context pad
Check out the advanced custom task example project that showcases these features.