camunda BPM Installation Guide (IBM WebSphere)
Introduction
Overview
This document will guide you through the installation of camunda BPM and its components on a IBM WebSphere Application Server.
- IBM WebSphere Application Server v 8.0.x
- IBM WebSphere Application Server v 8.5.x
Enterprise Feature
Please note, that this feature is included only in the enterprise edition of the camunda BPM platform, it is not available in the community edition.Check the camunda product homepage for more information or to get your free trial version.
Reading the Guide
Throughout this guide we will use a number of variables to denote common path names and constants.$WAS_HOME points to the WebSphere application server main directory (typically something like /opt/IBM/WebSphere/AppServer). $PLATFORM_VERSION denotes the version of the camunda BPM platform you want to or have installed, e.g. 7.0.0. $WAS_DISTRIBUTION represents the downloaded camunda BPM distribution for the WAS, e.g. camunda-ee-ibm-was-$PLATFORM_VERSION.zip.
The distribution is available at the camunda enterprise release page. You will be asked to enter the credentials you received during the trial or subscription process.
BPM Platform
Resource Configuration
The camunda platform requires a set of resources that need to be configured at the application server level: one or multiple datasources to be used by the engine and a work manager for the job executor.
Define resources in the node scope
In order to perform the steps listed in this guide, make sure you understand the concept of management scopes introduced by the websphere application server. We assume that resources are defined at the "Node" scope. 
JDBC / Datasource Configuration
The camunda BPM engine uses one or multiple process engines. Use your application server management tooling for configuring the datasources. The JNDI name of the datasource must be equal to the name used in the datasource-Element of the process engine(s) configured in the bpm-platform.xml file.
Default JNDI Name
The default JNDI name is jdbc/ProcessEngine
The following screenshot shows the configuration of an XA datasource:

Note that you may configure multiple datasources used by different process engine instances. See the User Guide for details.
Configure a WorkManager to be used by the camunda platform jobexecutor
This section explains how you can use the WebShere Integrated Solutions Console for configuring a work manager to be used by the camunda BPM platform jobexecutor. It is recommended to check the manual of the application server for additional details.
Select the appropriate server under Resources / Asynchronous Beans / Work Managers and open the configuration page. Example: server1
Create a new work manager using the Button New....
Configure the new Work Manager. The following is a selection of sensible default values:
General Properties
| Property | Default Value | Explanation |
|---|---|---|
| Name | camunda-platform-jobexecutor-WM | The name of the Work Manager. You can choose a different name if you reference it when installing the camunda platform jobexecutor resource adapter (see below). |
| JNDI name |
Default JNDI name for WorkManager:
This setting value is mandatory. |
|
| Description | "The work manager used by the camunda platform job executor" | Describes the work manager. Any value can be used. |
| Work Request Queue Size | 5 | Specifies the size of the work request queue. The work request queue is a buffer that holds scheduled work objects and may be a value of 1 or greater. The thread pool pulls work from this queue. If you do not specify a value or the value is 0, the queue size is managed automatically. Large values can consume significant system resources. |
| Work request queue full action | FAIL | Specifies the action that is taken when the thread pool is exhausted, and the work request queue is full. This action starts when you submit non-daemon work to the work manager. The default value is block but should be changed to "Fail". |
Thread Pool Properties
| Property | Default Value | Explanation |
|---|---|---|
| Number of alarm threads | 2 | Specifies the desired maximum number of threads that are used for alarms. The default value is 2. |
| Maximum number of threads | 4 | Specifies the maximum number of threads that are available in this work manager used by the jobexecutor. Should be greater than "Minimum Size". |
| Minimum number of threads | 2 | Specifies the minimum number of threads that are available in this work manager. Should not be below "2" since one thread is blocked by the job acquisition. If you configure multiple job acquisitions, the Minimal Size should not be below Nr. of Acquisitions + 1. |
| Thread Priority | 5 | Specifies the priority of the threads that are available in this work manager. |
| Growable | False | Specifies whether the number of threads in this work manager can be increased automaically when maximum number of threads is reached.The default value is true, but should be changed to "False" |
The following screenshot shows an example configuration of the work manager and its thread pool properties.

Install the camunda platform shared libraries
Install the camunda platform modules
The camunda platform includes two modules in the modules folder of the distribution:
camunda-ee-ibm-was-$PLATFORM_VERSION.zip
|-- modules/
      |-- camunda-ibm-websphere-ear-$PLATFORM_VERSION.ear
      |-- camunda-ibm-websphere-rar-$PLATFORM_VERSION.rar
The camunda-ibm-websphere-rar module is a JCA Resource Adapter providing the jobexecutor service to the camunda BPM platform. The camunda-ibm-websphere-ear is a Java EE application providing the camunda BPM platform services.
Both modules must be installed to your IBM WebSphere Application Server in the correct order. You must first install the camunda-ibm-websphere-rar module and then install the camunda-ibm-websphere-ear module.
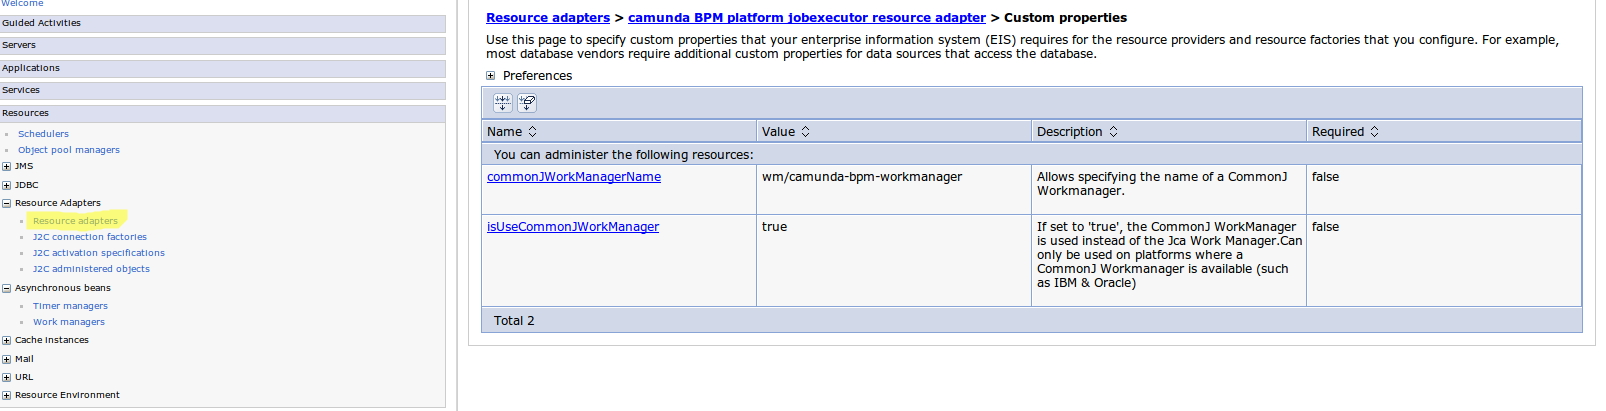
Install the camunda BPM platform jobexecutor resource adapter
In this section, we explain how the camunda-ibm-websphere-rar module can be installed using the WebShere Integrated Solutions Console.
The installation process is composed of three steps:
- Install and configure the
camunda-ibm-websphere-rar-$PLATFORM_VERSION.rarRAR file. - Define a Managed Connection Facotry for accessing the jobexecutor.
- Define an Activation Policy for JobHandler MDBs.
Installing and configuring the RAR file
First, the camunda-ibm-websphere-rar-$PLATFORM_VERSION.rar RAR file must be installed:
- Navigate to the Resource Adapters page located under Resources / Resource Adapters / Resource Adapters.
- Select as Scope "Node".
- Select the Install RAR button.
- Select the
camunda-ibm-websphere-rar-$PLATFORM_VERSION.rarfrom the modules folder of the camunda BPM platform for IBM WebShpere Application Server distribution. Click Next to go to the Properties page. - Fill in the properties form. As a name for the resource adapter, we propose
camunda-ibm-websphere-rar. - Click on the new entry
camunda-ibm-websphere-rar, if you choose the same name in the previous step.
Defining a Managed Connection Factory
- Select "J2C Connection Factories".
- Select "New"
- Fill in the "General Properties" Form.
- As the Name property, we propose "camunda BPM platform jobexecutor CF".
- As a JNDI Name we propose "eis/JcaExecutorServiceConnectionFactory"
- No authentication is necessary.
Defining an Activation Specification
- Select "J2C activation specifications".
- Select "New"
- Fill in the "General Properties" Form.
- As the Name property, we propose "camunda BPM platform jobexecutor SPEC".
- As a JNDI Name we propose "eis/PlatformJobExecutorActivation"
Save your settings. This completes the installation of the resource adapter.
Install the camunda BPM platform Application
In this section, we explain how the camunda-ibm-websphere-ear module can be installed using the WebShere Integrated Solutions Console.
- Navigate to the Enterprise Applications page using the navigation path Applications / Application Types / WebSphere enterprise applications.
- Click the "Install" Button.
- Select the
camunda-ibm-websphere-ear-$PLATFORM_VERSION.earfile from the modules folder of the camunda BPM platform for IBM WebShpere Application Server distribution. Click Next. - Select the "Detailed" Path.
In Step 1 Under application-name, type "camunda-bpm-platform". This setting is mandatory.
Manadatory Application Name
The camunda BPM platform application MUST be installed with the application name "camunda-bpm-platform".- Perform Steps 2-4 according to your requirements.
In Step 5,
- Under "Listener Bindings" select the radio button "Activation Specification".
- Under "Target Resource JNDI Name", provide the configured activation name for the jobexecutor (see Section "Defining an Activation Specification" above). The default is "eis/PlatformJobExecutorActivation".
- Destination and authentication must be left blank.

- In Step 6-8,
- Do not override the default JNDI Names
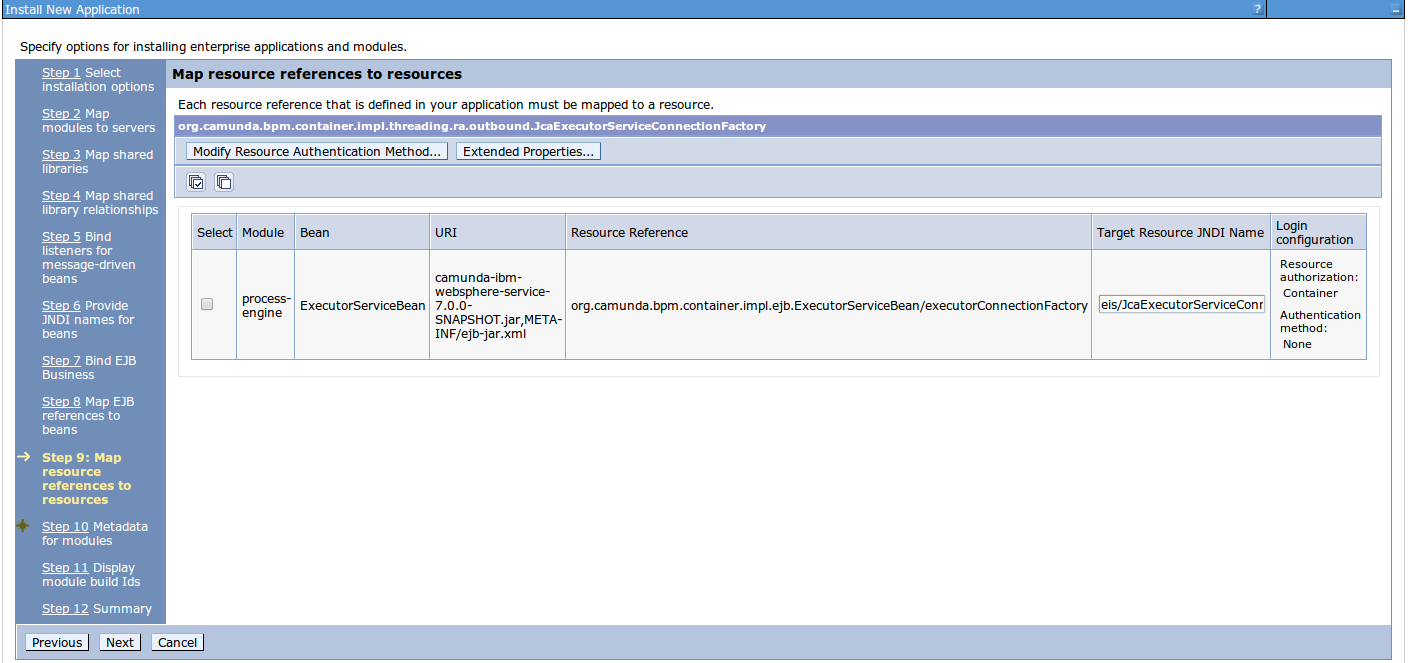
In Step 9,
- Set the Target Resource JNDI Name to the name of the managed connection factory provided for the jobexecutor (see Section "Defining a Managed Connection Factory" above). The default setting is "eis/JcaExecutorServiceConnectionFactory".
In Steps 10-12, go with the default settings.
- Click "Finish".
- Save the configuration.
- Start the camunda-bpm-platform application. If this fails initially, try to restart the server. The resource adapter references are not always resolved properly. It will be fine after a restart.
Troubleshootings
Defining WebShere Resources in the right scope
When installing the camunda BPM platform Application, you may see error messages indicating that you are referencing resources from the wrong scope. Make sure you define the jobexecutor resources in the right scope. Make sure you understand the IBM WebSphere management concepts "Cell", "Node" and "Server".
Known Issue - Exception when creating an initial user profile
At cycle login you may get an error when trying to setup an initial user profile. The Exception contains the following error message: java.lang.VerifyError in class org/springframework/aop/aspectj/MethodInvocationProceedingJoinPoint. This is a known bug in WebSphere v. 8.5.5. Download the fix package 8.5.5.0-WS-WASProd-IFPM90932 from the IBM support center and install it via the IBM Installation Manager.
Web Applications
Install the REST API web application
The camunda REST API WAR file resides under webapps/camunda-engine-rest-$PLATFORM_VERSION-was.war in the WAS distribution archive.
In the following we explain how to install the WAR file using the Websphere enterprise application Wizard provided inside the Websphere Integrated Solutions Console:
- Open the Websphere Integrated Solutions Console.
- Navigate to the Applications / Application Types / WebSphere enterprise applications Page.
- Click the Install Button
- The first page of the Wizard opens. Using the File Browser, select the
camunda-engine-rest-VERSION-was.warfile from the distribution and upload it. - Continue to the next page.
- Select the "Fast Path" on the next page.
- Step 1. Usually, no changes are required.
- Step 2. Usually, no changes are required.
- Step 3. Usually, no changes are required.
- Step 4. Define a context root for the REST API. We propose to use /engine-rest
- Step 5. Usually, no changes are required.
After completing the wizard, REST API should be successfully installed on the application server. Don't forget to save your changes to the master configuration. In some situations, you also have to start the web application manually from the Applications / Application Types / WebSphere enterprise applications Page.
Install camunda Cycle
Note: We do not recommend to install camunda Cycle together with the other platform components (webapps, engine, REST Api) on the same runtime environment. Such a combined installation is not supported.
Create the database schema for camunda Cycle
The next step consists in creating a database schema for camunda Cycle. The camunda platform distribution ships with a set of SQL create scripts that can be executed by a database administrator.
The SQL create scripts reside in the camunda platform distribution in the sql/create folder, like sql/create/*_cycle_VERSION.sql.
There is an individual SQL script for each supported database. Select the script appropriate for your database and run it with your database administration tool. (e.g. SqlDeveloper for Oracle).
We recommend to create a separate database or database schema for camunda Cycle.
Create a datasource
Now you must define a datasource in IBM Websphere Application Server. We assume here that you are familiar with the procedure. If in doubt, check the appropriate sections in the manual of your application server.
Note
In the default configuration, Cycle will lookup a datasource named jdbc/CycleDS.
The datasource should be named jdbc/CycleDS.
In order to use a custom datasource name, you have to edit the file named Cycle-persistence.xml residing at
Cycle-was-VERSION.war/WEB-INF/classes/META-INF/cycle-persistence.xmlInstallation
The camunda Cycle WAR file resides under webapps/cycle-was-$PLATFORM_VERSION.war in the WAS distribution archive.
In the following we explain how to install the WAR file using the Websphere enterprise application Wizard provided inside the Websphere Integrated Solutions Console:
- Open the Websphere Integrated Solutions Console.
- Navigate to the Applications / Application Types / WebSphere enterprise applications Page.
- Click the Install Button
- The first page of the Wizard opens. Using the File Browser, select the
cycle-was-VERSION.warfile from the distribution and upload it. - Continue to the next page.
- Select the "Fast Path" on the next page.
- Step 1. Usually, no changes are required.
- Step 2. Usually, no changes are required.
- Step 3. Usually, no changes are required.
- Step 4. Define a context root for Cycle. We propose to use /cycle
- Step 5. Usually, no changes are required.
After completing the wizard, Cycle should be successfully installed on the application server. Don't forget to save your changes to the master configuration. In some situations, you also have to start the web application manually from the Applications / Application Types / WebSphere enterprise applications Page.
Note
In some configurations, Cycle might prevent other web applications to work properly due to classloading issues and the bundled JAX-RS implementation in Cycle.
To fix this, go to Applications / Application Types / WebSphere enterprise applications. Click on the Cycle application link and go the the Startup Behaviour view.
You should increase the startup order to a value higher than the one of the application(s) Cycle is conflicting with. The default value is 1, so you should be fine with 2 for Cycle
You need to reboot the server after doing this.
Using SaaS Signavio / camunda webmodeler over HTTPS
Note
When you want to use the SaaS offer by Signavio or internally using the camunda webmodeler over the HTTPS protocol and Cycle is deployed on WAS, then you have to install the `IBM Unrestricted JCE policy` files provided by IBM.
You can download them here with an valid IBM ID account. Just choose the version which fits your JDK Version + Service Release your WAS is running on.
After you have downloaded them, drop the extracted jar files into your `$WAS_HOME/AppServer/java/jre/lib/security` folder and restart the server afterwards.
Install camunda Cockpit and Tasklist
The web application archive that contains camunda Cockpit and Tasklist resides under webapps/camunda-was-$PLATFORM_VERSION.war in the WAS distribution archive.
In the following we explain how to install the WAR file using the Websphere enterprise application Wizard provided by the Websphere Integrated Solutions Console:
- Open the Websphere Integrated Solutions Console.
- Navigate to the Applications / Application Types / WebSphere enterprise applications Page.
- Click the Install Button
- The first page of the Wizard opens. Using the File Browser, select the
camunda-was-VERSION.warfile from the distribution and upload it. - Continue to the next page.
- Select the "Fast Path" on the next page.
- Step 1. Usually, no changes are required.
- Step 2. Usually, no changes are required.
- Step 3. Usually, no changes are required.
- Step 4. Define a context root for the applications. We propose to use /camunda
- Step 5. Usually, no changes are required.
After completing the wizard, the applications should be successfully installed on the application server. Don't forget to save your changes to the master configuration. In some situations, you also have to start the web application manually from the Applications / Application Types / WebSphere enterprise applications Page.
You can check whether everything went well by accessing Cockpit and Tasklist via /camunda/app/cockpit and /camunda/app/tasklist or under the context path you configured.
LDAP Configuration
Configuring LDAP for camunda Cockpit and Tasklist
In order to setup LDAP for the websphere distribution, you have to perform the following steps:
1. Add LDAP Library
Make sure the camunda-identity-ldap-$PLATFORM_VERSION.jar is present in the
$WAS_HOME/lib/ext folder.
2. Adjust Process Engine Configuration
Edit the file bpm-platform.xml located inside the folder camunda-ibm-websphere-ear-$VERSION/camunda-ibm-websphere-service-$VERSION/META-INF/ and add the LDAP Identity Provider Plugin and the Administrator Authorization Plugin.
<?xml version="1.0" encoding="UTF-8"?>
<bpm-platform xmlns="http://www.camunda.org/schema/1.0/BpmPlatform"
  xmlns:xsi="http://www.w3.org/2001/XMLSchema-instance"
  xsi:schemaLocation="http://www.camunda.org/schema/1.0/BpmPlatform http://www.camunda.org/schema/1.0/BpmPlatform ">
  ...
  <process-engine name="default"> ...
    <properties>...</properties>
    <plugins>
      <plugin>
        <class>org.camunda.bpm.identity.impl.ldap.plugin.LdapIdentityProviderPlugin</class>
        <properties>

          <property name="serverUrl">ldap://localhost:4334/</property>
          <property name="managerDn">uid=jonny,ou=office-berlin,o=camunda,c=org</property>
          <property name="managerPassword">s3cr3t</property>

          <property name="baseDn">o=camunda,c=org</property>

          <property name="userSearchBase"></property>
          <property name="userSearchFilter">(objectclass=person)</property>

          <property name="userIdAttribute">uid</property>
          <property name="userFirstnameAttribute">cn</property>
          <property name="userLastnameAttribute">sn</property>
          <property name="userEmailAttribute">mail</property>
          <property name="userPasswordAttribute">userpassword</property>

          <property name="groupSearchBase"></property>
          <property name="groupSearchFilter">(objectclass=groupOfNames)</property>
          <property name="groupIdAttribute">ou</property>
          <property name="groupNameAttribute">cn</property>

          <property name="groupMemberAttribute">member</property>

        </properties>
      </plugin>
      <plugin>
        <class>org.camunda.bpm.engine.impl.plugin.AdministratorAuthorizationPlugin</class>
        <properties>
          <property name="administratorUserName">admin</property>
        </properties>
      </plugin>
    </plugins>
  </process-engine>
</bpm-platform>
The administratorUserName property should contain the user id of the LDAP user you want to grant administrator authorizations to. You can then use this user to log into the webapplication and grant authorizations to additional users.
See userguide for complete documentation on the LDAP Identity Provider Plugin and the Administrator Authorization Plugin.