Tutorials & How-Tos
Introduction
Overview
Disclaimer
Please note that some of the tutorials and how-tos listed here use internal API. Please be aware that these may change in future releases and therefore may be unstable. This is due to the fact that we do not guarantee backward compatibility for internal API.On this page we have listed several tutorials and how-tos. Our goal in providing these is to ease your development efforts and help you understand some concepts that we apply.
Concepts
Error Handling
Error Handling Strategies
There are a couple of basic strategies to handle errors and exceptions within processes. The decision which strategy to use depends on:
- Technical vs. Business Errors: Does the error have some business meaning and causes an alternative process flow (like item not on stock) or is it some technical malfunction (like network currently down)?
- Explicit error handling or generic approach: For some situations you want to explicitly model what should happen in case of an error (typically for business errors). For a lot of situations you don't want to do that but have some generic mechanism which applies for errors, simplyfying your process models (typical for technical errors, imagine you would have to model network outtage on every task were it might possibly occur? You woldn't recognize your business process any more).
In the context of the fox engine, errors are normally raised as Java exceptions you have to handle. Let's have a look on how to handle them.
Transaction Rollbacks
The standard handling strategy is that exceptions are thrown to the client, meaning the current transaction is rolled back. This means the process state is rolled back to the last wait state. This behavior is described in detail in Transactions in Processes. The error handling is delegated to the client of the engine.
As a concrete example this would mean, that the user gets an error dialog on the frontend, that the stock management software is currently not reachable due to network errors. To retry the user might have to click the same button again. Even if this is often not desired it is still a simple strategy applicable in a lot of situations.
Async and Failed Jobs
If you don't want the exception being show to the user one option is to make service calls which might cause an error async as described in Transactions in Processes. In this case the exception is stored in the process engine database and The Job in the background is marked as failed (to be more precise, the exception is stored and some retry counter is decremented).
In the example above this means that the user will not see an error but an "everything successful" dialog. The exception is stored on the job. Now either a clever retry strategy will automatically re-trigger the job later on (when the network is available again) or some operator needs to have a look at the error and trigger an additional retry. This is shown later in more details.
This strategy is pretty powerful and applied often in real-life projects, however, it still hides the error from the BPMN diagram, so for business errors which you want to be visible in the process diagram, you better use error events as described below.
Catch Exception and use data based XOR-Gateway
If you call Java Code which can throw an exception you can catch the exception within the Java Delegate, CDI Bean or whatsoever. Maybe it is already sufficient to log some information and go on, meaning to ignore the error. More often you write the result into some process variable and model an XOR-Gateway later in the process flow to take a different path if that error occurred.
In this case you model the error handling explicitly in the process model but let it look like a normal result and not like an error. From a business perspective it is not an error but a result, so the decision should not be made lightly. A rule of thumb is that results can be handled this way, exceptional errors should not. However the BPMN perspective does not always have to match the technical implementation.
Example:
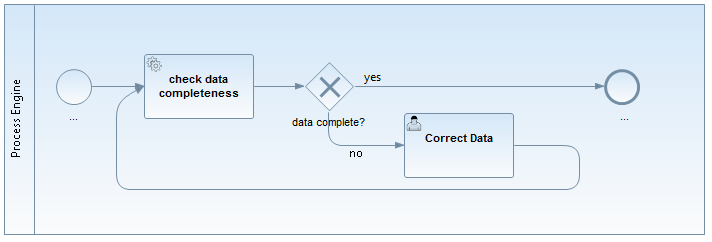
We trigger a "check data completeness" task. The Java Service might throw an "DataIncompleteException". However, if we check for completeness, incomplete data is not a exception, but an expected result, so we prefer using an XOR-Gateway in the process flow, evaluation a process variable, e.g. "#{dataComplete==false}".
BPMN 2.0 Error Event
The BPMN 2.0 error event gives you a possibility to explicitly model errors, tackling the use case of business errors. The most prominent example is the "intermediate catching error event", which can be attached to the boundary of an activity. Defining a boundary error event makes most sense on an embedded subprocess, a call activity or a Service Task. An error will cause the alternative process flow to be triggered:
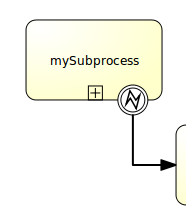
See BPMN Error Events and Throwing Errors from Delegation Code for more information.
BPMN 2.0 Compensation and Business Transactions
BPMN 2.0 transactions and compensations allow you to model business transaction boundaries, but not in a technical ACID manner, and make sure already executed actions are compensated during rollback. Compensation means, to make the effect of the action invisible, e.g. book in goods if you have booked out goods before, see BPMN Compensation event and BPMN Transaction Subprocess for details.
Monitoring and Recovery Strategies
In case the error occurred different recovery strategies can be applied.
Let the user retry
As mentioned above, the simplest error handling strategy is to throw the exception to the client, meaning the user has to retry the aciton himself. How he does that is up to the user, normally reloading the page or clicking again.
Retry failed Jobs
If you use Jobs (async) you can leverage Cockpit as monitoring too to handle failed jobs, in this case no end user sees the exception. Then you normally see failures in cockpit when the retries are used up (see Failed Jobs).
See Failed Jobs in Cockpit for more details.
If you don't want to use cockpit you could find the failed jobs via the API yourself as well:
List<Job> failedJobs = processEngine.getManagementService().createJobQuery().withException().list();
for (Job failedJob : failedJobs) {
  processEngine.getManagementService().setJobRetries(failedJob.getId(), 1);
}
Explicit Modeling
Of course you can always model explicitly some retry mechanism as pointed out in Where is the retry in BPMN 2.0:

We would recommend to limit it to cases where you either want to see it in the process diagram for a good reason. We prefer asynchronous continuation, since it doesn't bloat your process diagram and basically can do the same thing with even less runtime overhead, since "walking" through the modeled loop involves e.g. writing an audit log.
User Tasks for Operations
We often see something like this in projects:
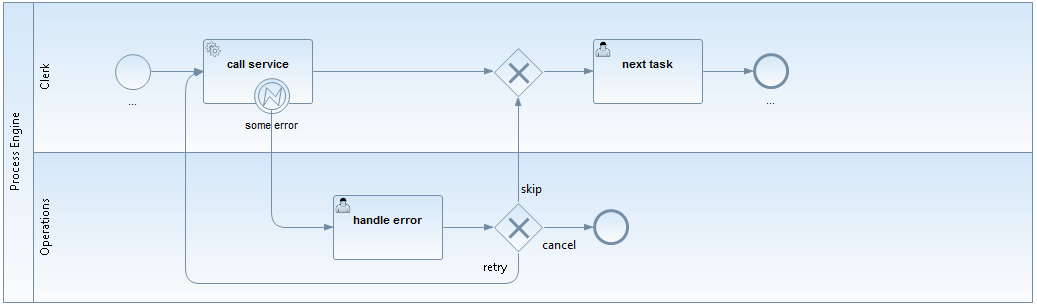
Actually this is a valid approach where you assign errors as User Tasks to some operator and model what possibilities he has to solve the problem. However, this is a strange mixture: We want to handle some technical error but add it to our business process model. Where do we stop? Don't we have to model it on every Service Task now?
Having a failed jobs list instead of using the "normal" task list feels like a more natural approach for this situation, that's why we normally recommend the other possibility and do not consider this to be best practice.
Process Engine
Custom Queries
Why custom queries?
The process engine offers a pretty straightforward and easy to use Java Query API, if you want to build a task list you just write something like this:
@Inject
private TaskService taskService;

public List<Task> getAllTasks() {
  return taskService.createTaskQuery().taskAssignee("bernd").list();
}
Easy as it is, there are basically two catches:
- can only build queries the API supports.
- You cannot add constraints on your domain objects.
Let me give you a simple use case example, which we implemented in the custom-queries example:
- You have a process variable "customer" holding the customerId
- You have your own entity "Customer" with all the details
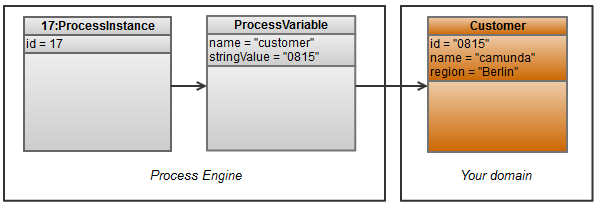
So far a pretty common situation (please note that the object diagram was simplified to show the relevant aspects and doesn't correspond one to one to the implementation classes). What would be easy now is to query all process instances for a customer:
@Inject
private TaskService taskService;

public List<Task> getTasks() {
  return taskService.createTaskQuery().processVariableValueEquals("customer", "0815").list();
}
But imagine you want to query
- All tasks for a certain region (which is part of your domain, not the fox engine database)
- All tasks for customer 0815 or 4711 (the Query API always assumes AND and does not support OR)
How to do this?
The "naive" implementation
Something we see very often is what we call the "naive" implementation, the easiest way you can think of: Use the existing query capabilities and add an filter of its own into your Java code. This is easy to write for every Java developers. However, it normally queries too much information from the Process Engine's database and therefore might cause serious performance issues - so please check the alternatives below first.
For the two example queries above we might write the following code:
public List<Task> getTasks(String region) {
  ArrayList<Task> resultingList = new ArrayList<Task>();
  // customer Id = 0815
  List<Task> list = taskService.createTaskQuery().processVariableValueEquals("customer", "0815").list();
  for (Task task : list) {
    String customerId = (String) runtimeService.getVariable(task.getExecutionId(), "customer");
    Customer customer = customerService.getCustomer(customerId);
    if (region.equals(customer.getRegion())) {
      resultingList.add(task);
    }
  }
  // OR customer Id = 4711
  list = taskService.createTaskQuery().processVariableValueEquals("customer", "4711").list();
  for (Task task : list) {
    String customerId = (String) runtimeService.getVariable(task.getExecutionId(), "customer");
    Customer customer = customerService.getCustomer(customerId);
    if (region.equals(customer.getRegion())) {
      resultingList.add(task);
    }
  }
  return resultingList;
}
Think about what this does:
- Query all tasks
- Create their own query for the process variable "customer" for every task
- Create another query for the customer entity for every task
- throw away almost all of the information, because we only need a couple of tasks (the region is a rather restrictive condition)
Hence the code above might work in small environments, but can cause serious performance problems.
Given this, what are the alternatives? To show you other solution approaches, we want to have a quick look at some persistence internals first.
Background: Persistence in the process engine
The process engine uses MyBatis for persistence: "The MyBatis data mapper framework makes it easier to use a relational database with object-oriented applications. MyBatis couples objects with stored procedures or SQL statements using a XML descriptor. Simplicity is the biggest advantage of the MyBatis data mapper over object relational mapping tools.".
In a nutshell, we parse an XML mapping file with all the SQL statements we need and setup a so called SessionFactory to talk to MyBatis (which then talks to the database via JDBC). The used mapping file can be found in the sources of the camunda BPM platform: mappings.xml. Basically, it "just" includes the other mapping files.
When creating a query via the Query API it is executed as Command object, which then delegates to MyBatis with the right query and the correct parameters. Not much magic involved here.
Possible Solution Approaches
In order to solve the requirements stated in the introduction, we can think of a couple of possible solution approaches:
- The naive implementation as already explained: not recommended.
- Write custom SQL code to do your own queries: possible, but you have to mess around with SQL yourself, not recommended.
- Leverage MyBatis for your custom queries: That is actually a really powerful approach and our recommendation, see the example below.
- Use JPA: We experimented with JPA mappings for the core engine entities to allow JPA queries. If these mappings exist and you can use that in your own application combined with your own JPA stuff. However you have to maintain the JPA mappings yourself which involves a lot of work and we already experiences problems with that in the past, so we basically do not recommended it.
- Add redundant information, an easy, but often sufficient, approach to improve queries, which doesn't need a lot of understanding of the persistence implementation:
- Add process variables for all query parameters. In our example that would mean to add the region as its own process variable. This approach is recommend.
- Add process information to the domain mode. In our example this could mean to add an seperate entity task which is synchronized with the process engine task management. This is possible but requires some work which must be done carefully to make sure that the process engine and your domain objects are always in sync.
Custom MyBatis Queries
Precondition: In order to use your own MyBatis (or all types of SQL) queries your domain data and the process engine data must be stored in the same database. Otherwise you cannot technically construct a single SQL query, which is our goal in terms of performance optimization. If you have separate databases, discuss if you really need them (which is less often the case than you think). If the answer is 'yes' or you even work with entities only over remote service interfaces, you have to "fall back" to the redundant information approach. Maybe you can use your own entities for that redundant information.
Warning: Writing your own MyBatis Queries means you rely on the internal entity / database structure of the process engine. This is considered quite stable (since otherwise we have to provide extensive migration scripts), but there is no guarantee. Therefore, please check your MyBatis queries on any version migration you do. This can be skipped if you have a good test coverage from automated unit tests.
The following solution is implemented in the custom-queries example, where you will find a complete working example. The code snippets in this article are taken from this example.
In order to add your own MyBatis Queries, you have to provide a MyBatis XML configuration file. This file can not only contain SQL commands but also mappings from relational data to Java Objects. The question is how to make MyBatis use our own configuration file, when MyBatis is already set up during the process engine startup? The easiest solution is described here. This approach leverages the existing infrastructure to access MyBatis, including connection and transaction handling, but starts up a completely separate MyBatis Session within the Process Application. This has two big advantages (and not a real disadvantage):
- No extensions in the engine configuration necessary (this improves maintainability)
- The MyBatis Session is handled completely within the Process Application, which means that e.g. classloading works out-of-the-box. And this ensures that the configuration doesn't intervene with any other Process Application.
In order to this we start up a very special Process Engine which only does the MyBatis handling, we can insure this by overwriting the init method. And we overwrite a hook which gets the name of the MyBatis configuration file:
public class MyBatisExtendedSessionFactory extends StandaloneProcessEngineConfiguration {
  private String resourceName;
  protected void init() {
    throw new IllegalArgumentException("Normal 'init' on process engine only used for extended MyBatis mappings is not allowed.");
  }
  public void initFromProcessEngineConfiguration(ProcessEngineConfigurationImpl processEngineConfiguration, String resourceName) {
    this.resourceName = resourceName;
    setDataSource(processEngineConfiguration.getDataSource());
    initDataSource();
    initVariableTypes();
    initCommandContextFactory();
    initTransactionFactory();
    initTransactionContextFactory();
    initCommandExecutors();
    initSqlSessionFactory();
    initIncidentHandlers();
    initIdentityProviderSessionFactory();
    initSessionFactories();
  }
  @Override
  protected InputStream getMyBatisXmlConfigurationSteam() {
    return ReflectUtil.getResourceAsStream(resourceName);
  }
}
This allows us to access our own queries (we will show this in a minute) from our MyBatis session by constructing an Command object:
Command<List<TaskDTO>> command = new Command<List<TaskDTO>>() {
  public List<TaskDTO> execute(CommandContext commandContext) {
    // select the first 100 elements for this query
    return (List<TaskDTO>) commandContext.getDbSqlSession().selectList("selectTasksForRegion", "Berlin", 0, 100);
  }
};
MyBatisExtendedSessionFactory myBatisExtendedSessionFactory = new MyBatisExtendedSessionFactory();
myBatisExtendedSessionFactory.initFromProcessEngineConfiguration(processEngineConfiguration, "/ourOwnMappingFile.xml");
myBatisExtendedSessionFactory.getCommandExecutorTxRequired().execute(command);
This is already everything you need, see a fully working solution in MyBatisExtendedSessionFactory.java, MyBatisQueryCommandExecutor.java and the example usage in TasklistService.java.
Now let's get back to the example from the beginning. We want to query all tasks of customers for a certain region. First of all we have to write a SQL for this. Let's assume that we have the following Entity stored in the same Data-Source as the fox engine:
@Entity
@Table(name="CUSTOMER")
public class Customer {
  @Id
  @Column(name="ID_")
  private long id;
  @Column(name="REGION_")
  private String region;
  ...
Now the SQL has to join the CUSTOMER with the VARIABLES table from the fox engine. Here we do an additional trick as once used for another standard problem: We join in ALL process variables to receive them together with the Tasks in one query. Maybe this is not your use case, but it might show you how powerful this approach can be. The full MyBastis Mapping can be found in customTaskMappings.xml.
<select id="selectTasksForRegion" resultMap="customTaskResultMap" parameterType="org.camunda.bpm.engine.impl.db.ListQueryParameterObject">
    ${limitBefore}
    select distinct
      T.ID_ as tID_,
      T.NAME_ as tNAME_,
      T.DESCRIPTION_ as tDESCRIPTION_,
      T.DUE_DATE_ as tDUE_DATE_,
      ...
      CUST.ID_ as CUSTOMER_ID_,
      CUST.NAME_ as CUSTOMER_NAME_,
      CUST.REGION_ as CUSTOMER_REGION_,
      VAR.ID_ as VID_,
      VAR.TYPE_ as VTYPE_,
      VAR.NAME_ as VNAME_
      ...
    from ${prefix}ACT_RU_TASK T
    left outer join (select * from ${prefix}ACT_RU_VARIABLE where NAME_= 'customerId' ) VAR_CUSTOMER on VAR_CUSTOMER.EXECUTION_ID_ = T.EXECUTION_ID_
    left outer join CUSTOMER CUST on CUST.ID_ = VAR_CUSTOMER.LONG_
    right outer join ${prefix}ACT_RU_VARIABLE VAR on VAR.EXECUTION_ID_ = T.EXECUTION_ID_
    <where>
      <if test="parameter != null">
        CUST.REGION_ = #{parameter}
      </if>
    </where>
  ${limitAfter}
</select>
We will explain the joins briefly: The first two joins check if there is a process variable named "customerId" and join it to the CUSTOMER table, which allows it to add CUSTOMER columns in the select as well as in the where clause. And the last right outer join joins in all existing process variables. There is one catch in that last statement: We now get one row per process variable, let's assume we have 10 tasks with 10 variables each, then our result set has 100 rows. This is no problem for MyBatis, it can map this to a Collection as we will see in a minute, but in this case the LIMIT statement we use for paging is applied on the overall result set. So if we tell MyBatis to get the first 50 tasks, we only get 5 tasks, because we have 50 rows for this. This is not a general problem of the approach described here but a glitch in the SQL provided, maybe you can think of smarter way to write this?
This brings us to the last piece of code we want to draw your attention on: The Mapping. In order to get the customer data together with the Task information we defined a seperate DTO object (DTO stands for Data Transfer Object, it basically means a Java object used as value container). This DTO holds a List of the process variables as well:
public class TaskDTO {
  private String id;
  private String nameWithoutCascade;
  private String descriptionWithoutCascade;
  private Date dueDateWithoutCascade;
  private Customer customer;
  private List<ProcessVariableDTO> variables = new ArrayList<ProcessVariableDTO>();
  ...
Filling these objects with the result set from our Query is now an easy task for MyBatis with this mapping:
<resultMap id="customTaskResultMap" type="org.camunda.demo.custom.query.TaskDTO">
  <id property="id" column="tID_" />
  <result property="nameWithoutCascade" column="tNAME_" />
  <result property="descriptionWithoutCascade" column="tDESCRIPTION_" />
  <result property="dueDateWithoutCascade" column="tDUE_DATE_" />
  <association property="customer" javaType="com.camunda.fox.quickstart.tasklist.performance.Customer">
   <id property="id" column="CUSTOMER_ID_"/>
   <result property="name" column="CUSTOMER_NAME_"/>
   <result property="region" column="CUSTOMER_REGION_" />
  </association>
  <collection ofType="org.camunda.demo.custom.query.ProcessVariableDTO" property="variables" column="tPROC_INST_ID_" resultMap="customVariableResultMap"/>
</resultMap>
<resultMap id="customVariableResultMap" type="org.camunda.demo.custom.query.ProcessVariableDTO">
  <id property="id" column="VID_" />
  <result property="name" column="VNAME_" />
  <result property="value" column="VTEXT_" />
</resultMap>
We hope that this is somehow self explanatory, otherwise best have a look at the MyBatis XML configuration reference.
This is all you have to do. Please check out the full code in the example, you are able to run it directly on the JBoss distribution. You can easily play around with it to check if it serves your needs or to compare query performance to an implementation you had until now, maybe something similar to the naive implementation we mentioned at the beginning (and be assured: We see that really often out there ;-)).
Performance Experiences
It really mattered to us to write this article, because we sometimes hear that the process engine performs badly and this is almost every time related to wrong designed queries. One customer had his project status turned to "dark yellow" (which is close to red) because of these performance issues. This solution improved performance by a factor greater than 10 and fixed paging and sorting issues, hence bringing the project back to track. So we think everybody should know about it!
User Interface
JSF Task Forms
Adding JSF Forms to your process application
If you add JSF forms as decribed below you can easily use them as external task forms.
A working example can be found in the examples repository.
The BPMN process used for this example is shown in the following picture:
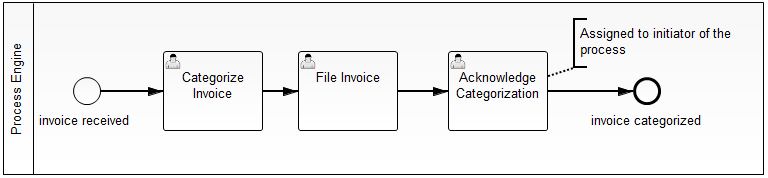
In this process model we added so called form keys to
- the Start Event "invoice received". This is the form the user has to complete for starting a new process instance.
- the User Tasks. These are the forms the user has to complete when completing user tasks that are assigned to him.
This is how it looks like in the BPMN 2.0 XML:
<startEvent id="start" camunda:formKey="sample-start-form" name="invoice received" />
<userTask id="file-invoice" camunda:assignee="kermit" camunda:formKey="sample-task-form-2" name="File Invoice" />
<userTask id="categorize-invoice" camunda:assignee="kermit" camunda:formKey="sample-task-form-1" name="Categorize Invoice" />
<endEvent id="end" name="invoice categorized" />
...
Creating Simple User Task Form
Create a normal JSF page in src/main/webapp/WEB_INF representing a form used for User Tasks. Shown below is a very simple task form:
<!DOCTYPE HTML>
<html lang="en" xmlns="http://www.w3.org/1999/xhtml"
  xmlns:ui="http://java.sun.com/jsf/facelets"
  xmlns:h="http://java.sun.com/jsf/html"
  xmlns:f="http://java.sun.com/jsf/core">
<h:head>
  <f:metadata>
    <f:viewParam id="taskId" name="taskId" />
    <f:viewParam id="callbackUrl" name="callbackUrl" />
    <f:event type="preRenderView" listener="#{camunda.taskForm.startTask(taskId, callbackUrl)}" />
  </f:metadata>
  <title>Task Form: #{task.name}</title>
</h:head>
<h:body>
  <h1>#{task.name}</h1>
  <h:form id="someForm">
    <p>Here you would see the actual form to work on the task in some design normally either matching you task list or your business application (or both in the best case).</p>
    <h:commandButton id="submit_button" value="task completed" action="#{camunda.taskForm.completeTask()}" />
  </h:form>
</h:body>
</ui:composition>
Note that you need camunda-engine-cdi in order to have the camunda.taskForm bean available.
How does this work?
If the user clicks on "work on task" in the tasklist, he will follow a link to this form, including the taskId and the callback URL (the URL to access the central tasklist) as GET-Parameters. Accessing this form will trigger the special CDI bean camunda.taskForm which
- starts a conversation,
- remembers the callback URL
- starts the User Task in the process engine, meaning the bean sets the start date and assingns the task to the CDI business process scope (see CDI Integration for details).
Therefor you just need this code block:
<f:metadata>
  <f:viewParam id="taskId" name="taskId" />
  <f:viewParam id="callbackUrl" name="callbackUrl" />
  <f:event type="preRenderView" listener="#{camunda.taskForm.startTask(taskId, callbackUrl)}" />
</f:metadata>
Submit the form by calling the camunda.taskForm bean again which
- completes the task in the process engine, causing the current token to advance in the process,
- ends the conversation,
triggers a redirect to the callback URL of the tasklist.
<h:commandButton id="submit_button" value="task completed" action="#{camunda.taskForm.completeTask()}" />
Note that the command button doesn't have to be contained on the same form, you might have a whole wizard containing multiple forms in a row before having the completeTask button. This will work because of the conversation running in the background.
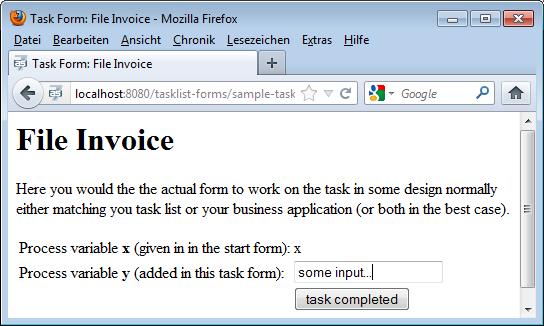
Access process variables
In the forms you can access your own CDI beans as usual and also access the camunda CDI beans. This makes it easy to access process variables, e.g. via the processVariables CDI bean:
<h:form id="someForm">
  <p>Here you would see the actual form to work on the task in some design normally either matching you task list or your business application (or both in the best case).</p>
  <table>
    <tr>
      <td>Process variable <strong>x</strong> (given in in the start form):</td><td><h:outputText value="#{processVariables['x']}" /></td>
    </tr>
    <tr>
      <td>Process variable <strong>y</strong> (added in this task form):</td><td><h:inputText value="#{processVariables['y']}" /></td>
    </tr>
    <tr>
      <td></td><td><h:commandButton id="submit_button" value="task completed" action="#{camunda.taskForm.completeTask()}" /></td>
    </tr>
  </table>
</h:form>
This is rendered to a simple form
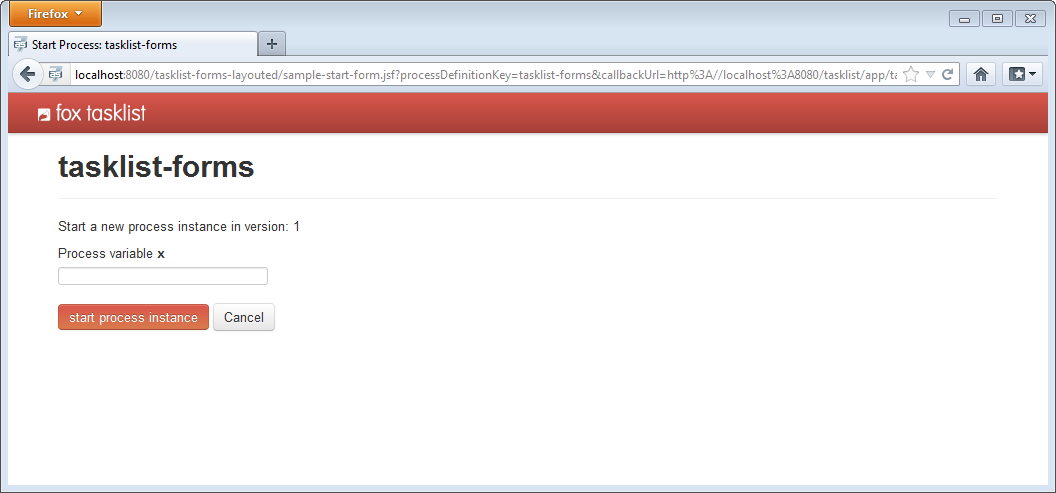
The same mechanism can be used to start a new process instance.
<?xml version="1.0" encoding="UTF-8"?>
<ui:composition xmlns="http://www.w3.org/1999/xhtml"
  xmlns:ui="http://java.sun.com/jsf/facelets"
  xmlns:f="http://java.sun.com/jsf/core"
  xmlns:h="http://java.sun.com/jsf/html">

<h:head>
  <f:metadata>
    <f:viewParam id="processDefinitionKey" name="processDefinitionKey" />
    <f:viewParam id="callbackUrl" name="callbackUrl" />
    <f:event type="preRenderView" listener="#{camunda.taskForm.startProcessInstanceByKeyForm(processDefinitionKey, callbackUrl)}" />
  </f:metadata>
  <title>Start Process: #{camunda.taskForm.processDefinition.name}</title>
</h:head>
<h:body>
  <h1>#{camunda.taskForm.processDefinition.name}</h1>
  <p>Start a new process instance in version: #{camunda.taskForm.processDefinition.version}</p>
  <h:form id="someForm">
    <p>Here you see the actual form to start a new process instance, normally this would be in some design  either matching you task list or your business application (or both in the best case).</p>
    <table>
      <tr>
        <td>Process variable <strong>x</strong>:</td><td><h:inputText value="#{processVariables['x']}" /></td>
      </tr>
      <tr>
        <td></td><td><h:commandButton id="submit_button" value="start process instance" action="#{camunda.taskForm.completeProcessInstanceForm()}" /></td>
      </tr>
    </table>
  </h:form>
</h:body>
</ui:composition>
```xml

<center>
  <img src="ref:asset:/assets/img/real-life/jsf-task-forms/startFormExample.png" class="img-responsive"/>
</center>

If the user clicks on "Start Process" in the tasklist and chooses the process your start form is assigned to, he will follow a link to this form, including the processDefinitionKey and the callback URL (the URL to access the central tasklist) as GET-Parameters. Accessing this form will trigger the special CDI bean "camunda.taskForm" which

*   starts a conversation,
*   remembers the callback URL to the centralized tasklist.

You need this code block in your JSF page:

```xml
<f:metadata>
  <f:viewParam id="processDefinitionId" name="processDefinitionId" />
  <f:viewParam id="callbackUrl" name="callbackUrl" />
  <f:event type="preRenderView" listener="#{camunda.taskForm.startProcessInstanceByIdForm(processDefinitionId, callbackUrl)}" />
</f:metadata>
Submiting the start form now
- starts the process instance in the process engine,
- ends the conversation,
- triggers a redirect to the callback URL of the tasklist.
<h:commandButton id="submit_button" value="start process instance" action="#{camunda.taskForm.completeProcessInstanceForm()}" />Note that the command button doesn't have to be contained on the same form, you might have a whole wizard containing multiple forms in a row before having the completeProcessInstanceForm button. This will work because of the conversation running in the background.
Styling your task forms
We use Twitter Bootstrap in our tasklist - so best add this to your Process Application as well and you can easily polish your UI:
Just include the needed CSS and Javascript libraries in the header part of your forms. If you have several forms, it may be helpful to create a template you can refer to from your forms to avoid redundancies.
<h:head>
  <title>your title</title>
  <meta http-equiv="Content-Type" content="text/html; charset=utf-8" />

  <!-- CSS Stylesheets -->
  <h:outputStylesheet name="css/bootstrap.css" />
  <h:outputStylesheet name="css/responsive.css" />

  <!-- Javascript Libraries -->
  <h:outputScript name="js/jquery.js"/>
  <h:outputScript name="js/bootstrap.js"/>
</h:head>
Calling Services
Communication among Processes using Web Services
Let's assume you have two processes running on different Process Engines on different servers. This could e.g. be a system with a central process engine that orchestrates several application-specific process engines:
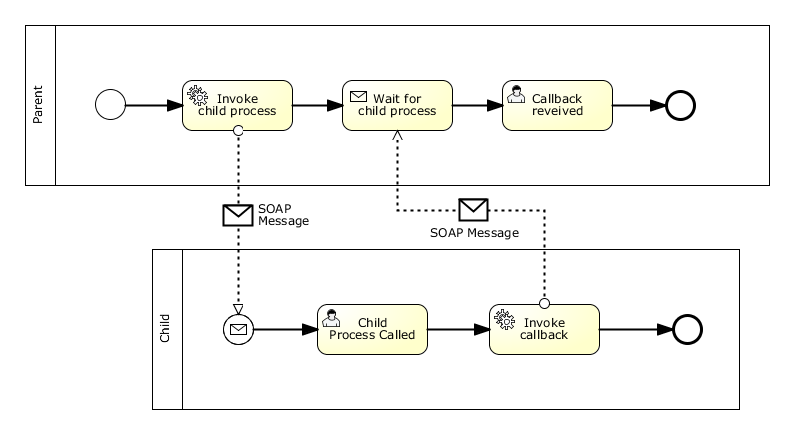
The collaboration above contains two processes: The parent and the child.
The communication is done conceptually via messages, technologically by SOAP Messages via Web Services. This means
- The parent process uses a Service Task to invoke a Web Service that starts the child process.
- The parent waits for completion of the child using a Receive Task.
- At the end of the child process a Service Task performs the callback to the parent by calling another Web Service provided by the parent. The callback URL can be a parameter of the communication.
- A unique id is generated for this communication and sent to and returned by the child as a correlation key that identifies the process instance that is to be called back.
There is one related example available demonstrating two process engines communicating via web services: https://github.com/camunda/camunda-consulting/tree/master/snippets/inter-process-communication-ws. It implements the whole communication within one Maven project including a proper automated test case.
Web Services for Invocation and Callback
The scenario requires two Web Services to be provided – one on each side:
- Invocation Service: The first service is provided on the server where the child is deployed and will be called by the parent to start the child.
- Callback Service: The second service is provided on the server where the parent process is deployed and will be called by the child to signal its completion to the parent.
A common way to implement Web Services in Java is to use JAX-WS annotations on a POJO and use a Web Service framework like Apache Axis or Apache CXF as a provider for the underlying protocols and tools. The examples below use Apache CXF, which is available out of the box in JBoss AS 7.
Process Invocation Web Service
The Process Invocation Service has four parameters: The process to be started, a URL to call back when the process completed, a correlation id to identify the process instance to call back, and a String payload. The latter three are stored as process variables into the new process instance. The payload could of course use more complex types. We just use String here for simplicity of the example.
@WebService(name = "ProcessInvocationService")
public class ProcessInvocation {
  public static final String CALLBACK_URL = "callbackURL";
  public static final String CALLBACK_CORRELATION_ID = "callbackCorrelationId";
  public static final String PAYLOAD = "payload";

  @Inject
  private RuntimeService runtimeService;

  public void invokeProcess(String processDefinitionKey, String callbackUrl, String correlationId, String payload) {
    Map<String, Object> variables = new HashMap<String, Object>();
    variables.put(CALLBACK_URL, callbackUrl);
    variables.put(CALLBACK_CORRELATION_ID, correlationId);
    variables.put(PAYLOAD, payload);
    runtimeService.startProcessInstanceByKey(processDefinitionKey, variables);
  }
}
Process Callback Web Service
The Process Callback Service takes three arguments: The process that has completed, the correlation id that has been assigned during the invocation of that process, and a payload, which is again just a String for simplicity. With the first two arguments the process instance waiting for that callback is located and resumed while storing the payload as a process variable.
@WebService(name = "ProcessCallbackService")
public class ProcessCallback {
  public static final String PAYLOAD_RECEIVED_FROM_CALLBACK = "payloadReceivedFromCallback";
  @Inject
  private RuntimeService runtimeService;

  public void invokeProcessCallback(String calledProcess, String correlationId, String payload) {
    Execution execution = runtimeService
            .createExecutionQuery()
            .variableValueEquals(ProcessInvocationClient.CORRELATION_ID_PREFIX + calledProcess, correlationId)
            .singleResult();

    Map<String, Object> variables = new HashMap<String, Object>();
    variables.put(PAYLOAD_RECEIVED_FROM_CALLBACK, payload);
    runtimeService.signal(execution.getId(), variables);
  }
}
Generation of WSDL and Web Service Clients
When a Java class with an @WebService annocation is deployed, the application server automatically generates a WSDL description an provides the according Web Service, on a default JBoss AS 7 installation you will find the two WSDL's here:
- http://localhost:8080/inter-process-communication-ws/ProcessInvocation?wsdl
- http://localhost:8080/inter-process-communication-ws/ProcessCallback?wsdl
A Maven plugin provided by CXF can then be used to generate a Java client out of the WSDL, just add this to your pom.xml:
...
<build>
  <plugins>
    <plugin>
      <groupId>org.apache.cxf</groupId>
      <artifactId>cxf-codegen-plugin</artifactId>
      <version>2.5.2</version>
      <executions>
        <execution>
          <id>generate-sources</id>
          <phase>generate-sources</phase>
          <configuration>
            <sourceRoot>${project.build.directory}/generated/cxf</sourceRoot>
            <wsdlOptions>
              <wsdlOption>
                <wsdl>${basedir}/src/main/resources/ProcessInvocationService.wsdl</wsdl>
              </wsdlOption>
              <wsdlOption>
                <wsdl>${basedir}/src/main/resources/ProcessCallbackService.wsdl</wsdl>
              </wsdlOption>
            </wsdlOptions>
          </configuration>
          <goals>
            <goal>wsdl2java</goal>
          </goals>
        </execution>
      </executions>
    </plugin>
  </plugins>
</build>
...
Integration of Web Services into Processes
The Web Services clients generated by CXF are wrapped into CDI beans that are called by the processes using expressions.
<serviceTask id="ServiceTask_1" activiti:expression="#{processInvocationClient.invokeProcess('inter-process-communication-ws-child', execution)}" name="Invoke child process" />@Named
public class ProcessInvocationClient {
public static final String CORRELATION_ID_PREFIX = "correlationIdForInvocationOf_";
public static final String SAMPLE_PAYLOAD_PREFIX = "sample-payload-";
@Inject
ServiceRegistry serviceRegistry;
public void invokeProcess(String processDefinitionKey, DelegateExecution execution) {
// lookup service URL
URL wsdlLocation = serviceRegistry.getWsdlLocation(processDefinitionKey);
// prepare CXF client
ProcessInvocationService service = new ProcessInvocationService_Service(wsdlLocation)
.getProcessInvocationServicePort();
// generate callback URL and correlation ID
String callbackUrl = serviceRegistry.getWsdlLocation("inter-process-communication-ws-parent").toString();
String correlationId = UUID.randomUUID().toString();
// store correlation ID
execution.setVariable(CORRELATION_ID_PREFIX + processDefinitionKey, correlationId);
// call service
service.invokeProcess(processDefinitionKey, callbackUrl , correlationId, SAMPLE_PAYLOAD_PREFIX + correlationId);
}
}You can see that we used a simple "ServiceRegistry" to query the right WSDL, This is basically a simple Java Map, but could be exchanged by any existing Registry. In a customer project we for example used WSO2 for this purpose.
<serviceTask id="ServiceTask_1" activiti:expression="#{processCallbackClient.invokeProcessCallback(payload, execution)};" name="Invoke callback">@Named
public class ProcessCallbackClient {
public void invokeProcessCallback(String payload, DelegateExecution execution) throws MalformedURLException {
// lookup service URL
URL wsdlLocation = new URL((String) execution.getVariable(ProcessInvocation.CALLBACK_URL));
// prepare CXF client
ProcessCallbackService service = new ProcessCallbackService_Service(wsdlLocation)
.getProcessCallbackServicePort();
// restore correlation information
String calledProcess = "inter-process-communication-ws-child";
String correlationId = (String) execution.getVariable(ProcessInvocation.CALLBACK_CORRELATION_ID);
// call service
service.invokeProcessCallback(calledProcess, correlationId, payload);
}
}Cockpit
How to develop a cockpit plugin
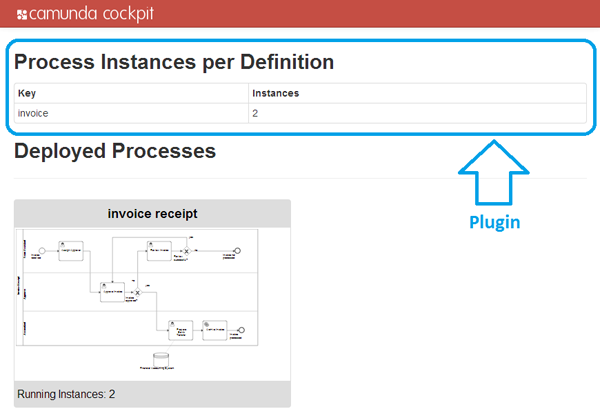
In this how to we will walk through the steps needed to develop a cockpit plugin. In the course we will develop a simple plugin that displays the number of process instances per deployed process definition on the dashboard page of cockpit:
Please have a look at [Cockpit Plugins](ref:/guides/user-guide/#cockpit-plugins) for the basics first.
Server side
We will walk through the important aspects of developing the server-side parts of the plugin, creating a plugin jar, defining a custom query and exposing that query via a JAX-RS resource.
Plugin archive
As a first step we create a maven jar project that represents our plugin library. Inside the projects pom.xml we must declare a dependency to the cockpit core with the maven coordinates org.camunda.bpm.cockpit:camunda-cockpit-core. The project contains all the infrastructure to create and test the server-side parts of a plugin.
<project xmlns="http://maven.apache.org/POM/4.0.0" xmlns:xsi="http://www.w3.org/2001/XMLSchema-instance"
  xsi:schemaLocation="http://maven.apache.org/POM/4.0.0 http://maven.apache.org/xsd/maven-4.0.0.xsd">
  <modelVersion>4.0.0</modelVersion>

  <groupId>org.camunda.bpm.cockpit.plugin</groupId>
  <artifactId>cockpit-sample-plugin</artifactId>
  <version>1.0-SNAPSHOT</version>
  <packaging>jar</packaging>

  <name>cockpit-sample-plugin</name>

  <dependencies>
    <dependency>
      <groupId>org.camunda.bpm.webapp</groupId>
      <artifactId>camunda-webapp-core</artifactId>
      <version>7.0.0-Final</version>
    </dependency>
    <dependency>
      <groupId>junit</groupId>
      <artifactId>junit</artifactId>
      <version>4.11</version>
      <scope>test</scope>
    </dependency>
  </dependencies>
</project>
Plugin main class
The main entry point for a plugin is the service provide interface (SPI) org.camunda.bpm.cockpit.plugin.spi.CockpitPlugin. Each plugin must provide an implementation of this class and register it via META-INF/services.
We will go ahead and create a implementation of that API called SampleCockpitPlugin.
package org.camunda.bpm.cockpit.plugin.sample;

import org.camunda.bpm.cockpit.plugin.spi.impl.AbstractCockpitPlugin;

public class SamplePlugin extends AbstractCockpitPlugin {

  public static final String ID = "sample-plugin";

  public String getId() {
    return ID;
  }
}
By inheriting from org.camunda.bpm.cockpit.plugin.spi.impl.AbstractCockpitPlugin we make sure that the plugin is initialized with reasonable defaults.
To register the plugin with cockpit, we must put its class name into a file called org.camunda.bpm.cockpit.plugin.spi.CockpitPlugin that resides in the directory META-INF/services. That will publish the plugin via the Java ServiceLoader facilities.
Test case
We will go ahead and write a test case that makes sure the plugin gets properly discovered.
Before we do so, we need to add test dependencies to our project pom.xml.
<dependencies>
  ...

  <!-- test dependencies -->
  <dependency>
    <groupId>org.camunda.bpm</groupId>
    <artifactId>camunda-engine</artifactId>
    <version>7.0.0-Final</version>
    <scope>test</scope>
  </dependency>
  <dependency>
    <groupId>com.h2database</groupId>
    <artifactId>h2</artifactId>
    <version>1.3.171</version>
    <scope>test</scope>
  </dependency>
  <dependency>
    <groupId>junit</groupId>
    <artifactId>junit</artifactId>
    <version>4.11</version>
    <scope>test</scope>
  </dependency>
  ...
The class org.camunda.bpm.cockpit.plugin.test.AbstractCockpitPluginTest can work as a basis for cockpit plugin tests. It initializes the cockpit environment around each test and bootstraps a single process engine that is made available to cockpit and the plugin.
A first test may look as follows:
package org.camunda.bpm.cockpit.plugin.sample;

import org.camunda.bpm.cockpit.Cockpit;
import org.camunda.bpm.cockpit.plugin.spi.CockpitPlugin;
import org.camunda.bpm.cockpit.plugin.test.AbstractCockpitPluginTest;
import org.junit.Assert;
import org.junit.Test;

public class SamplePluginsTest extends AbstractCockpitPluginTest {

  @Test
  public void testPluginDiscovery() {
    CockpitPlugin samplePlugin = Cockpit.getRuntimeDelegate().getPluginRegistry().getPlugin("sample-plugin");

    Assert.assertNotNull(samplePlugin);
  }
}
In the test #testPluginDiscovery we use the internal cockpit API to check whether the plugin was recognized.
Before we can actually run the test, we need to create a camunda.cfg.xml to be present on the class path (usually under src/test/resources). That file configures the process engine to be bootstrapped.
We go ahead and create the file.
<?xml version="1.0" encoding="UTF-8"?>

<beans xmlns="http://www.springframework.org/schema/beans"
       xmlns:xsi="http://www.w3.org/2001/XMLSchema-instance"
       xsi:schemaLocation="http://www.springframework.org/schema/beans   http://www.springframework.org/schema/beans/spring-beans.xsd">

  <bean id="processEngineConfiguration" class="org.camunda.bpm.engine.impl.cfg.StandaloneInMemProcessEngineConfiguration">

    <property name="jdbcUrl" value="jdbc:h2:mem:camunda;DB_CLOSE_DELAY=1000" />
    <property name="jdbcDriver" value="org.h2.Driver" />
    <property name="jdbcUsername" value="sa" />
    <property name="jdbcPassword" value="" />

    <!-- Database configurations -->
    <property name="databaseSchemaUpdate" value="true" />

    <!-- job executor configurations -->
    <property name="jobExecutorActivate" value="false" />

    <property name="history" value="full" />

  </bean>
</beans>
Custom query
The plugin mechanism allows us to provide additional SQL queries that may be run against the process engine database. Those queries must be defined via MyBatis mapping files.
To implement a custom query, we will create a file sample.xml in the directory org/camunda/bpm/cockpit/plugin/sample/queries:
<?xml version="1.0" encoding="UTF-8" ?>

<!DOCTYPE mapper PUBLIC "-//mybatis.org//DTD Mapper 3.0//EN" "http://mybatis.org/dtd/mybatis-3-mapper.dtd">

<mapper namespace="cockpit.sample">

  <resultMap id="processInstanceCountMap" type="org.camunda.bpm.cockpit.plugin.sample.db.ProcessInstanceCountDto">
    <result property="key" column="KEY_" jdbcType="VARCHAR" />
    <result property="instanceCount" column="INSTANCES_" jdbcType="INTEGER" />
  </resultMap>

  <select id="selectProcessInstanceCountsByProcessDefinition" resultMap="processInstanceCountMap">
    select d.KEY_, count(d.KEY_) INSTANCES_
      from ACT_RU_EXECUTION e JOIN ACT_RE_PROCDEF d ON e.PROC_DEF_ID_ = d.ID_
      group by d.KEY_
  </select>

</mapper>
Note both the usage of a custom namespace (cockpit.sample) as well as the result mapping to the plugin provided class org.camunda.bpm.cockpit.plugin.sample.db.ProcessInstanceCountDto.
We need to define the class to which the result is mapped:
package org.camunda.bpm.cockpit.plugin.sample.db;

public class ProcessInstanceCountDto {

  private String key;

  private int instanceCount;

  public String getKey() {
    return key;
  }

  public void setKey(String key) {
    this.key = key;
  }

  public int getInstanceCount() {
    return instanceCount;
  }

  public void setInstanceCount(int instanceCount) {
    this.instanceCount = instanceCount;
  }
}
Additionally we need to publish the mapping file by overriding the method #getMappingFiles() in our plugin class:
public class SamplePlugin extends AbstractCockpitPlugin {

  // ...

  @Override
  public List<String> getMappingFiles() {
    return Arrays.asList("org/camunda/bpm/cockpit/plugin/sample/queries/sample.xml");
  }
}
Test case
To test that the plugin defined query actually works, we extend our testcase. By using the cockpit provided service QueryService we can verify that the query can be executed:
public class SamplePluginsTest extends AbstractCockpitPluginTest {

  // ...

  @Test
  public void testSampleQueryWorks() {

    QueryService queryService = getQueryService();

    List<ProcessInstanceCountDto> instanceCounts =
      queryService
        .executeQuery(
          "cockpit.sample.selectProcessInstanceCountsByProcessDefinition",
          new QueryParameters<ProcessInstanceCountDto>());

    Assert.assertEquals(0, instanceCounts.size());
  }
}
Note that #getQueryService() is merely a shortcut the service that may also be accessed via cockpit's main entry point, the org.camunda.bpm.cockpit.Cockpit class.
Defining and publishing plugin services
Plugins publish their services via APIs defined through JAX-RS resources.
First, we need to add the JAX-RS API to our projects pom.xml. That is best done by including the following dependency:
<dependencies>
  ...

  <!-- provides jax-rs (among other APIs) -->
  <dependency>
    <groupId>org.jboss.spec</groupId>
    <artifactId>jboss-javaee-6.0</artifactId>
    <type>pom</type>
    <scope>provided</scope>
    <version>3.0.2.Final</version>
  </dependency>
  ...
A server-side plugin API consists of a root resource and a number of sub resources that are provided by the root resource. A root resource may inherit from org.camunda.bpm.cockpit.plugin.resource.AbstractPluginRootResource to receive some basic traits. It must publish itself on the path plugin/$pluginName via a @Path annotation.
A root resource for our plugin may look as follows:
package org.camunda.bpm.cockpit.plugin.sample.resources;

import javax.ws.rs.Path;
import javax.ws.rs.PathParam;
import org.camunda.bpm.cockpit.plugin.resource.AbstractPluginRootResource;
import org.camunda.bpm.cockpit.plugin.sample.SamplePlugin;

@Path("plugin/" + SamplePlugin.ID)
public class SamplePluginRootResource extends AbstractPluginRootResource {

  public SamplePluginRootResource() {
    super(SamplePlugin.ID);
  }

  @Path("{engineName}/process-instance")
  public ProcessInstanceResource getProcessInstanceResource(@PathParam("engineName") String engineName) {
    return subResource(new ProcessInstanceResource(engineName), engineName);
  }
}
Note that a sub resource gets initialized by the plugin when requests to {engineName}/process-instance are being made. That ensures that a cockpit service is multi-tenancy ready out of the box (i.e. capable to work with all process engines provided by the camunda BPM platform).
A sub-resource may extend org.camunda.bpm.cockpit.plugin.resource.AbstractPluginResource to get initialized with the correct process engine mappings. The resource shown below exposes our custom SQL query to the client when accessing the resource via GET.
package org.camunda.bpm.cockpit.plugin.sample.resources;

import java.util.List;
import javax.ws.rs.GET;

import org.camunda.bpm.cockpit.db.QueryParameters;
import org.camunda.bpm.cockpit.plugin.resource.AbstractPluginResource;
import org.camunda.bpm.cockpit.plugin.sample.db.ProcessInstanceCountDto;

public class ProcessInstanceResource extends AbstractPluginResource {

  public ProcessInstanceResource(String engineName) {
    super(engineName);
  }

  @GET
  public List<ProcessInstanceCountDto> getProcessInstanceCounts() {

    return getQueryService()
        .executeQuery(
          "cockpit.sample.selectProcessInstanceCountsByProcessDefinition",
          new QueryParameters<ProcessInstanceCountDto>());
  }
}
In order to include plugin resources into the cockpit application those resources must be published in the plugin main file by overriding #getResourceClasses():
import org.camunda.bpm.cockpit.plugin.sample.SamplePlugin;

public class SamplePlugin extends AbstractCockpitPlugin {

  // ...

  @Override
  public Set<Class<?>> getResourceClasses() {
    Set<Class<?>> classes = new HashSet<Class<?>>();

    classes.add(SamplePluginRootResource.class);

    return classes;
  }

  // ...
}
Given the above setup the resource class extends the cockpit API with the following paths
GET $cockpit_api_root/plugin/sample/$engine/process-instanceTest case
To test your JAX-RS resources you can instantiate them directly during a plugin test case. Alternatively you can write a real API test using arquillian. See PluginApiTest for an example.
Server-side parts of the plugin? Done. We will now go ahead and write the client-side extension that exposes the functionality to the user.
Client side
The client-side part of a cockpit plugin consists of an extension to the cockpit webapp client application. It is served through the plugins server site extension as a static plugin asset.
Static plugin assets
When using AbstractPluginRootResource as the plugin resources base class, serving static assets is already built in. The root resource accepts GET request under /static to serve plugin provided client-side resources. Per convention, these resources must reside in a /assets directory relative to the plugin main class.
So let's create a file org/camunda/bpm/cockpit/plugin/sample/assets/info.txt in the src/main/resources directory of our project. We can give it the following content (optional):
FOO BARTest case
To test that the assets are served, we can either implement a test case or test the matter manually after we integrated the plugin into the cockpit webapp.
Integration into cockpit
Before integrating the plugin into cockpit, make sure you have built the plugin at least once using mvn clean install (or however your IDE calls it). Furthermore, make sure that you have the camunda BPM platform checked out on your local file system.
To integrate the plugin, we need to add it to the dependencies of the cockpit web project (located in the webapps/cockpit/cockpit-webapp).
<dependencies>
  ...
  <dependency>
    <groupId>org.camunda.bpm.cockpit.plugin</groupId>
    <artifactId>cockpit-sample-plugin</artifactId>
    <version>1.0-SNAPSHOT</version>
  </dependency>
Now run the cockpit application using mvn clean tomcat:run -Pdev. It will boot an embedded tomcat and make the webapplication available at http://localhost:8080/cockpit.
You can navigate to http://localhost:8080/cockpit/api/cockpit/plugin/sample-plugin/static/info.txt to assert that the client assets is correctly loaded.
plugin.js main file
Each plugin must contain a file app/plugin.js in the plugins assets directory. That file bootstraps the client-side plugin and registers it with cockpit. To do so it must declare a angular module named cockpit.plugin.$plugin_id using ngDefine.
Without going in all the details here, our plugins plugin.js may look like this:
ngDefine('cockpit.plugin.sample-plugin', function(module) {

  var DashboardController = function($scope, $http, Uri) {

    $http.get(Uri.appUri("plugin://sample-plugin/default/process-instance"))
      .success(function(data) {
        $scope.processInstanceCounts = data;
      });
  };

  DashboardController.$inject = ["$scope", "$http", "Uri"];

  var Configuration = function Configuration(ViewsProvider) {

    ViewsProvider.registerDefaultView('cockpit.dashboard', {
      id: 'process-definitions',
      label: 'Deployed Processes',
      url: 'plugin://sample-plugin/static/app/dashboard.html',
      controller: DashboardController,

      // make sure we have a higher priority than the default plugin
      priority: 12
    });
  };

  Configuration.$inject = ['ViewsProvider'];

  module.config(Configuration);
});
The file defines the angular module cockpit.plugin.sample-plugin and registers a plugin with the cockpit plugin service (ViewsProvider#registerDefaultView()).
HTML view
To complete the example, we need to define the HTML file app/dashboard.html as a plugin asset:
<div>
  <h1>Process Instances per Definition</h1>
  <table class="table table-bordered table-hover table-condensed">
    <thead>
      <tr>
        <th>Key</th>
        <th>Instances</th>
      </tr>
    </thead>
    <tbody>
      <tr data-ng-repeat="count in processInstanceCounts">
        <td>{{ count.key }}</td>
        <td>{{ count.instanceCount }}</td>
      </tr>
    </tbody>
  </table>
</div>
That file provides the actual view to the user.
When deploying the extended cockpit webapplication on the camunda BPM platform, we can see the plugin in action.
Summary
You made it! In this how to we walked through all important steps required to build a cockpit plugin, from creating a plugin skeleton over defining server-side plugin parts up to implementing the client-side portions of the plugin.
Additional resources
Appendix
How client-side plugins work
The client-side plugin infrastructure provides extensions to the cockpit core application through views that expose data provided by a plugins' server-side API. We quickly expand on how the interaction between a plugin and the cockpit webapplication happeness.
A plugin is defined in a app/plugin.js file that gets served as static plugin asset:
ngDefine('cockpit.plugin.myPlugin', [
  'jquery',
  'angular',
  'http://some-url/some-library.js',
  'module:some.other.angularModule:./someOtherModule.js'
], function(module, $, angular) {

  var ViewController = function($scope, Uri) {
    // perform logic

    // uris to plugin assets and apis may be resolved via Uri#appUri
    // by prefixing those apis with 'plugin://'
    var pluginServiceUrl = Uri.appUri('plugin://myPlugin/default/process-definition');

  };

  ViewController.$inject = ['$scope'];

  // publish the plugin to cockpit
  module.config(function(ViewsProvider) {

    ViewsProvider.registerDefaultView('cockpit.some-view', {
      id: 'some-view-special-plugin',
      label: 'Very Special Plugin',
      url: 'plugin://myPlugin/static/app/view.html',
      controller: ViewController
    });
  });
});
As the file is loaded as a RequireJS module (read more about the mechanism here), dependencies (in terms of other RequireJS modules) may be specified.
The plugin must register itself with the ViewsProvider via a module configuration hook.
From within cockpit, views are included using the view directive:
<view provider="viewProvider" vars="viewProviderVars" />The actual provider that defines the view as well as the published variables are defined by the responsible controller in the surrounding scope:
function SomeCockpitController($scope, Views) {
  $scope.viewProvider = Views.getProvider({ component: 'cockpit.some-view'});

  // variable 'foo' will be available in the view provider scope
  $scope.viewProviderVars = { read: [ 'foo' ]};
}