User Guide
Introduction
Overview
Welcome to the Camunda BPM user guide! Camunda BPM is a Java-based framework for process automation. This document contains information about the features provided by the Camunda BPM platform.
Camunda BPM is built around the process engine component. The following illustration shows the most important components of Camunda BPM along with some typical user roles.
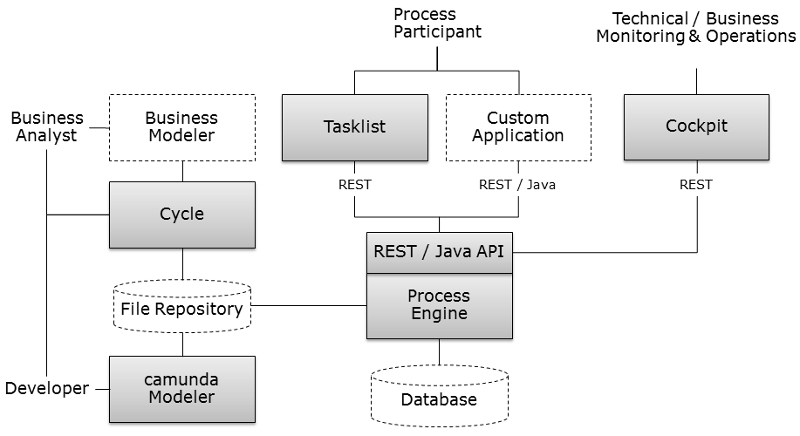
Process Engine & Infrastructure
- Process Engine The process engine is a java library responsible for executing BPMN 2.0 processes and workflows. It has a lightweight POJO core and uses a relational database for persistence. ORM mapping is provided by the mybatis mapping framework.
- Spring Framework Integration
- CDI / Java EE Integration
- Runtime Container Integration (Integration with application server infrastructure.)
Web Applications
- REST API The REST API allows you to use the process engine from a remote application or a JavaScript application. (Note: The documentation of the REST API is factored out into an own document.)
- Camunda Tasklist A web application for human workflow management and user tasks that allows process participants to inspect their workflow tasks and navigate to task forms in order to work on the tasks and provide data input.
- Camunda Cockpit A web application for process monitoring and operations that allows you to search for process instances, inspect their state and repair broken instances.
- Camunda Admin A web application for user management that allows you to manage users, groups and authorizations.
- Camunda Cycle A web application for synchronizing BPMN 2.0 process models between different modeling tools and modelers.
Additional Tools
- Camunda Modeler: Eclipse plugin for process modeling.
- bpmn.io: BPMN web modeler which is used in our web applications Cockpit and Tasklist for rendering BPMN 2.0 process models in a browser. Although bpmn.io is still under development, its API is rather stable.
Download
Prerequisites
Before downloading Camunda, make sure you have a JRE (Java Runtime Environment) or better a JDK (Java Development Kit) installed. We recommend using Java 8 unless your container / application server does not support Java 8 (like JBoss Application Server 7).
Download the Runtime
Camunda is a flexible framework which can be used in different contexts. See Architecture Overview for more details. Based on how you want to use camunda, you can choose a different distribution.
Community vs. Enterprise Edition
Camunda provides separate runtime downloads for community users and enterprise subscription customers:
Full Distribution
Download the full distribution if you want to use a shared process engine or if you want to get to know camunda quickly, without any additional setup or installation steps required*.
The full distribution bundles
- Process Engine configured as shared process engine,
- Runtime Web Applications (Tasklist, Cockpit, Admin),
- Rest Api,
- Container / Application Server itself*.
* Note that if you download the full distribution for an open source application server/container, the container itself is included. For example, if you download the tomcat distribution, tomcat itself is included and the camunda binaries (process engine and webapplications) are pre-installed into the container. This is not true for the the Oracle Weblogic and IBM WebSphere downloads. These downloads do not include the application servers themselves.
See Installation Guide for additional details.
Standalone Web Application Distribution
Download the standalone web application distribution if you want to use Cockpit, Tasklist, Admin applications as a self-contained WAR file with an embedded process engine.
The standalone web application distribution bundles
- Process engine configured as embedded process engine,
- Runtime Web Applications (Tasklist, Cockpit, Admin),
- Rest Api,
The standalone web application can be deployed to any of the supported application servers.
The Process engine configuration is based on the Spring Framework. If you want to change the
database configuration, edit the WEB_INF/applicationContext.xml file inside the WAR file.
See Installation Guide for additional details.
Download Camunda Modeler
Camunda Modeler is an Eclipse based modeling Tool for BPMN 2.0. Camunda Modeler can be downloaded from the community download page.
Download Camunda Cycle
Camunda Cycle is a tool for BPMN 2.0 interchange and Roundtrip. Camunda Cycle can be downloaded from the community download page.
Getting Started
The getting started tutorials can be found at http://docs.camunda.org/guides/getting-started-guides/.
Architecture Overview
Camunda BPM is a Java-based framework. The main components are written in Java and we have a general focus on providing Java developers with the tools they need for designing, implementing and running business processes and workflows on the JVM. Nevertheless, we also want to make the process engine technology available to Non-Java developers. This is why Camunda BPM also provides a REST API which allows you to build applications connecting to a remote process engine.
Camunda BPM can be used both as a standalone process engine server or embedded inside custom Java applications. The embeddability requirement is at the heart of many architecture decisions within Camunda BPM. For instance, we work hard to make the process engine component a lightweight component with as little dependencies on third-party libraries as possible. Furthermore, the embeddability motivates programming model choices such as the capabilities of the process engine to participate in Spring Managed or JTA transactions and the threading model.
Process Engine Architecture
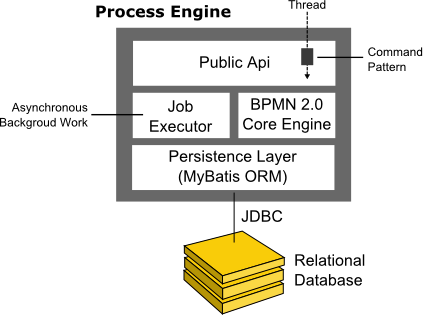
- Process Engine Public API: Service-oriented API allowing Java applications to interact with the process engine. The different responsibilities of the process engine (i.e., Process Repository, Runtime Process Interaction, Task Management, ...) are separated into individual services. The public API features a command-style access pattern: Threads entering the process engine are routed through a Command Interceptor which is used for setting up Thread Context such as Transactions.
- BPMN 2.0 Core Engine: this is the core of the process engine. It features a lightweight execution engine for graph structures (PVM - Process Virtual Machine), a BPMN 2.0 parser which transforms BPMN 2.0 XML files into Java Objects and a set of BPMN Behavior implementations (providing the implementation for BPMN 2.0 constructs such as Gateways or Service Tasks).
- Job Executor: the Job Executor is responsible for processing asynchronous background work such as Timers or asynchronous continuations in a process.
- The Persistence Layer: the process engine features a persistence layer responsible for persisting process instance state to a relational database. We use the MyBatis mapping engine for object relational mapping.
Required third-party libraries
See section on third-party libraries.
Camunda BPM platform architecture
Camunda BPM platform is a flexible framework which can be deployed in different scenarios. This section provides an overview of the most common deployment scenarios.
Embedded Process Engine
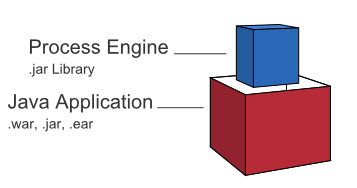
In this case the process engine is added as an application library to a custom application. This way the process engine can easily be started and stopped with the application lifecycle. It is possible to run multiple embedded process engines on top of a shared database.
Shared, container-managed Process Engine
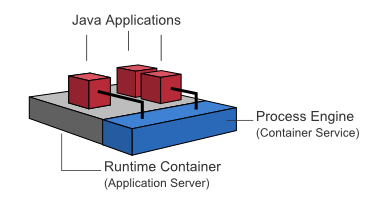
In this case the process engine is started inside the runtime container (Servlet Container, Application Server, ...). The process engine is provided as a container service and can be shared by all applications deployed inside the container. The concept can be compared to a JMS Message Queue which is provided by the runtime and can be used by all applications. There is a one-to-one mapping between process deployments and applications: the process engine keeps track of the process definitions deployed by an application and delegates execution to the application in question.
Standalone (Remote) Process Engine Server
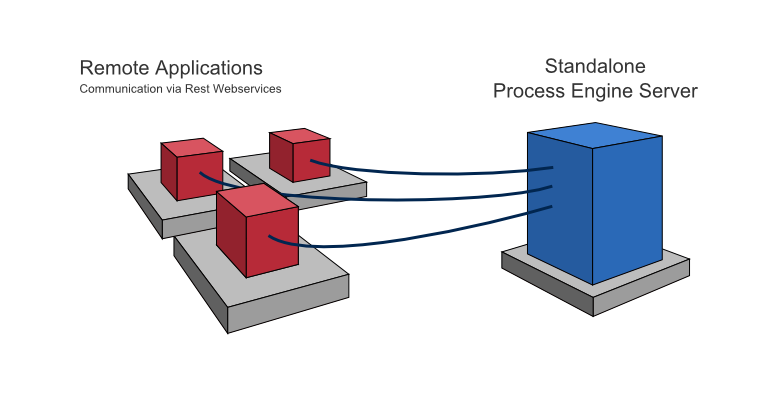
In this case the process engine is provided as a network service. Different applications running on the network can interact with the process engine through a remote communication channel. The easiest way for making the process engine accessible remotely is to use the built-in REST API. Different communication channels such as SOAP Webservices or JMS are possible but need to be implemented by users.
Clustering Model
In order to provide scale-up or fail-over capabilities, the process engine can be distributed to different nodes in a cluster. Each process engine instance must then connect to a shared database.
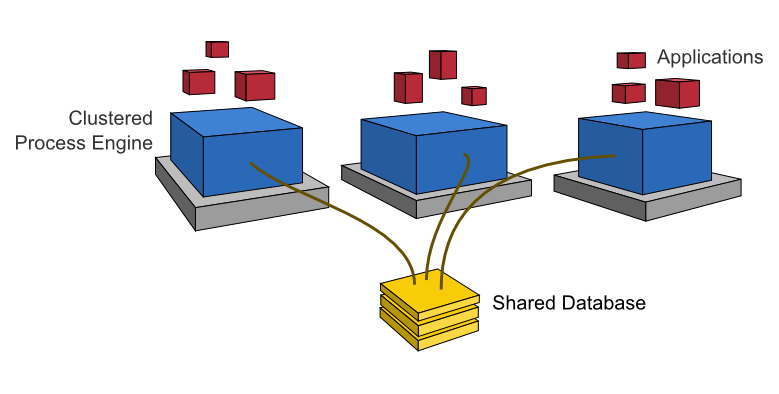
The individual process engine instances do not maintain session state across transactions. Whenever the process engine runs a transaction, the complete state is flushed out to the shared database. This makes it possible to route subsequent requests which do work in the same process instance to different cluster nodes. This model is very simple and easy to understand and imposes limited restrictions when it comes to deploying a cluster installation. As far as the process engine is concerned there is also no difference between setups for scale-up and setups for fail-over (as the process engine keeps no session state between transactions).
The process engine job executor is also clustered and runs on each node. This way, there is no single point of failure as far as the process engine is concerned. The job executor can run in both homogeneous and heterogeneous clusters.
Multi-Tenancy Model

To serve multiple, independent parties with one Camunda installation, the process engine supports multi-tenancy. The following multi tenancy models are supported:
- Table-level data separation by using different database schemas or databases,
- Row-level data separation by using a tenant marker.
Users should choose the model which fits their data separation needs. Camunda's APIs provide access to processes and related data specific to each tenant. More details can be found in the multi-tenancy section.
Web Application Architecture
The Camunda BPM web applications are based on a RESTful architecture.
Frameworks used:
- JAX-RS based Rest API
- AngularJS
- RequireJS
- jQuery
- Twitter Bootstrap
Additional custom frameworks developed by camunda hackers:
- camunda-bpmn.js: Camunda BPMN 2.0 JavaScript libraries
- ngDefine: integration of AngularJS into RequireJS powered applications
- angular-data-depend: toolkit for implementing complex, data heavy AngularJS applications
Supported Environments
You can run the camunda BPM platform in every Java-runnable environment. camunda BPM is supported with our QA infrastructure in the following environments. Here you can find more information about our enterprise support.
Please find the supported environments for version 7.0 and the supported environments for version 7.1 here.
Container / Application Server for runtime components (excluding camunda Cycle)
- Apache Tomcat 6 / 7
- JBoss Application Server 7.2 and JBoss EAP 6.1 / 6.2 / 6.3 / 6.4
- Wildfly 8.1 / 8.2 Application Server
- GlassFish 3.1
- IBM WebSphere Application Server 8.0 / 8.5 (Enterprise Edition only)
- Oracle WebLogic Server 12c (Enterprise Edition only)
Container for camunda Cycle
- Apache Tomcat 7
Databases
- MySQL 5.1 / 5.5 / 5.6
- MariaDB 10.0
- Oracle 10g / 11g / 12c
- IBM DB2 9.7 / 10.1 / 10.5 (excluding IBM z/OS for all versions)
- PostgreSQL 9.1 / 9.3 / 9.4
- Microsoft SQL Server 2008 R2 / 2012 / 2014 (see Configuration Note)
- H2 1.3
Database Clustering & Replication
Clustered or Replicated databases are not supported unless they behave exactly like the corresponding non-clustered / non-replicated configuration. The configuration needs to guarantee READ-COMMITTED isolation level.
The MySQL/MariaDB based Galera Cluster is not supported.
Webbrowser
- Google Chrome latest
- Mozilla Firefox latest
- Internet Explorer 9 / 10 / 11
Java
- Java 6 / 7
- Java 8 (if supported by your application server / container)
Java Runtime
- Sun / Oracle Hot Spot 6 / 7 / 8
- IBM® J9 virtual machine (JVM) 6 / 7 / 8
- OpenJDK 6 / 7
- Oracle JRockit 6 - R28.2.7
Eclipse (for camunda modeler)
- Eclipse Indigo / Juno / Kepler
Community Extensions
Camunda BPM is developed by Camunda as an open source project in collaboration with the community. The "core project" (namely "Camunda BPM platform") is the basis for the Camunda BPM product which is provided by Camunda as a commercial offering. The commercial Camunda BPM product contains additional (non-open source) features and is provided to Camunda BPM customers with service offerings such as enterprise support and bug fix releases.
Camunda supports the community in its effort to build additional community extensions under the Camunda BPM umbrella. Such community extensions are maintained by the community and are not part of the commercial Camunda BPM product. Camunda does not support community extensions as part of its commercial services to enterprise subscription customers.
List of Community Extensions
The following is a list of current (unsupported) community extensions:
- Apache Camel Integration
- AssertJ Testing Library
- Grails Plugin
- Needle Testing Library
- OSGi Integration
- Elastic Search Extension
- PHP SDK
- Tasklist Translations
- Cycle Connectors
- Single Sign On for JBoss
- Camunda BPM Platform Docker Images
- Camunda Process Test Coverage
Building a Community Extension
Do you have a great idea around open source BPM you want to share with the world? Awesome! Camunda will support you in building your own community extension. Have a look at our contribution guidelines to find out how to propose a community project.
Enterprise Extensions
XSLT extension
The XSLT extension depends on the following third-party libraries:
Third-Party Libraries
In the following section all third-party libraries are listed on which components of the camunda platform depend.
Process Engine
The process engine depends on the following third-party libraries:
- MyBatis mapping framework (Apache License 2.0) for object-relational mapping.
- Joda Time (Apache License 2.0) for parsing date formats.
- Java Uuid Generator (JUG) (Apache License 2.0) Id Generator. See documentation on Id-Generators.
Additional optional dependencies:
- Apache Commons Email (Apache License 2.0) for mail task support.
- Spring Framework Spring-Beans (Apache License 2.0) for configuration using camunda.cfg.xml.
- Spring Framework Spring-Core (Apache License 2.0) for configuration using camunda.cfg.xml.
- Spring Framework Spring-ASM (Apache License 3.0) for configuration using camunda.cfg.xml.
- Groovy (Apache License 2.0) for groovy script task support.
- Jython (Python License) for Python script task support.
- JRuby (Ruby License or GPL) for Ruby script task support.
REST API
The REST API depends on the following third-party libraries:
- Jackson JAX-RS provider for JSON content type (Apache License 2.0)
- Apache Commons FileUpload (Apache License 2.0)
Additional optional dependencies:
- RESTEasy (Apache License 2.0) on Apache Tomcat only.
Spring Support
The Spring support depends on the following third-party libraries:
- Apache Commons DBCP (Apache License 2.0)
- Apache Commons Lang (Apache License 2.0)
- Spring Framework Spring-Beans (Apache License 2.0)
- Spring Framework Spring-Core (Apache License 2.0)
- Spring Framework Spring-ASM (Apache License 2.0)
- Spring Framework Spring-Context (Apache License 2.0)
- Spring Framework Spring-JDBC (Apache License 2.0)
- Spring Framework Spring-ORM (Apache License 2.0)
- Spring Framework Spring-TX (Apache License 2.0)
camunda Wepapp
The camunda Webapp (Cockpit, Tasklist, Admin) depends on the following third-party libraries:
- AngularJS (MIT)
- AngularUI (MIT)
- bpmn-js (Custom license)
- domReady (MIT or new BSD)
- Placeholder.js (MIT)
- jQuery (MIT)
- jQuery UI (MIT)
- RequireJS (MIT)
- Snap.svg (Apache License 2.0)
- Twitter Bootstrap (Apache License 2.0)
Most of those libraries are used in the Camunda commons UI library which is aimed to ease the development of browser based user interfaces.
camunda Cycle
Cycle depends on the following third-party libraries:
Javascript dependencies:
Java dependencies:
- Hibernate (GNU Lesser General Public License)
- Apache Commons Codec (Apache License 2.0)
- NekoHTML (Apache License 2.0)
- SAXON (Mozilla Public License 1.0)
- Apache Commons Virtual File System (Apache License 2.0)
- AspectJ runtime (Eclipse Public License 1.0)
- AspectJ weaver (Eclipse Public License 1.0)
- Jasypt (Apache License 2.0)
- SLF4J JCL (MIT)
- Spring Framework Spring-AOP (Apache License 2.0)
- Spring Framework Spring-ORM (Apache License 2.0)
- Spring Framework Spring-Web (Apache License 2.0)
- Thymeleaf (Apache License 2.0)
- Thymeleaf-Spring3 (Apache License 2.0)
- Tigris SVN Client Adapter (Apache License 2.0)
- SVNKit (TMate Open Source License)
- SVNKit JavaHL (TMate Open Source License)
- Gettext Commons (Apache License 2.0)
camunda Modeler
The camunda Modeler depends on the following third-party libraries:
- Eclipse Modeling Framework Project (EMF) (Eclipse Public License 1.0)
- Eclipse OSGi (Eclipse Public License 1.0)
- Eclipse Graphiti (Eclipse Public License 1.0)
- Eclipse Graphical Editing Framework (GEF) (Eclipse Public License 1.0)
- Eclipse XSD (Eclipse Public License 1.0)
- Eclipse UI (Eclipse Public License 1.0)
- Eclipse Core (Eclipse Public License 1.0)
- Eclipse Java development tools (JDT) (Eclipse Public License 1.0)
- Eclipse JFace (Eclipse Public License 1.0)
- Eclipse BPMN2 (Eclipse Public License 1.0)
- Eclipse WST (Eclipse Public License 1.0)
- Apache Xerces (Eclipse Public License 1.0)
- Eclipse WST SSE UI (Eclipse Public License 1.0)
Public API
The camunda platform provides a public API. This section covers the definition of the public API and backwards compatibility for version updates.
Definition of Public API
camunda BPM public API is limited to the following items:
Java API:
camunda-engine: all non implementation Java packages (package name does not containimpl)camunda-engine-spring: all non implementation Java packages (package name does not containimpl)camunda-engine-cdi: all non implementation Java packages (package name does not containimpl)
HTTP API (REST API):
camunda-engine-rest: HTTP interface (set of HTTP requests accepted by the REST API as documented in REST API reference). Java classes are not part of the public API.
Backwards Compatibility for Public API
The camunda versioning scheme follows the MAJOR.MINOR.PATCH pattern put forward by Semantic Versioning. camunda will maintain public API backwards compatibility for MINOR version updates. Example: Update from version 7.1.x to 7.2.x will not break the public API.
Process Engine
Process Engine Bootstrapping
You have a number of options to configure and create a process engine depending on whether you use a application managed or a shared, container managed process engine.
Application Managed Process Engine
You manage the process engine as part of your application. The following ways exist to configure it:
Shared, Container Managed Process Engine
A container of your choice (e.g., Tomcat, JBoss, GlassFish or IBM WebSphere) manages the process engine for you. The configuration is carried out in a container specific way, see Runtime Container Integration for details.
ProcessEngineConfiguration bean
The camunda engine uses the ProcessEngineConfiguration bean to configure and construct a standalone Process Engine. There are multiple subclasses available that can be used to define the process engine configuration. These classes represent different environments, and set defaults accordingly. It's a best practice to select the class that matches (most of) your environment to minimize the number of properties needed to configure the engine. The following classes are currently available:
org.camunda.bpm.engine.impl.cfg.StandaloneProcessEngineConfigurationThe process engine is used in a standalone way. The engine itself will take care of the transactions. By default the database will only be checked when the engine boots (an exception is thrown if there is no database schema or the schema version is incorrect).org.camunda.bpm.engine.impl.cfg.StandaloneInMemProcessEngineConfigurationThis is a convenience class for unit testing purposes. The engine itself will take care of the transactions. An H2 in-memory database is used by default. The database will be created and dropped when the engine boots and shuts down. When using this, probably no additional configuration is needed (except, for example, when using the job executor or mail capabilities).org.camunda.bpm.engine.spring.SpringProcessEngineConfigurationTo be used when the process engine is used in a Spring environment. See the Spring integration section for more information.org.camunda.bpm.engine.impl.cfg.JtaProcessEngineConfigurationTo be used when the engine runs in standalone mode, with JTA transactions.
Bootstrap a Process Engine using Java API
You can configure the process engine programmatically by creating the right ProcessEngineConfiguration object or by using some pre-defined one:
ProcessEngineConfiguration.createStandaloneProcessEngineConfiguration();
ProcessEngineConfiguration.createStandaloneInMemProcessEngineConfiguration();
Now you can call the buildProcessEngine() operation to create a Process Engine:
ProcessEngine processEngine = ProcessEngineConfiguration.createStandaloneInMemProcessEngineConfiguration()
  .setDatabaseSchemaUpdate(ProcessEngineConfiguration.DB_SCHEMA_UPDATE_FALSE)
  .setJdbcUrl("jdbc:h2:mem:my-own-db;DB_CLOSE_DELAY=1000")
  .setJobExecutorActivate("true")
  .buildProcessEngine();
Configure Process Engine using Spring XML
The easiest way to configure your Process Engine is through an XML file called camunda.cfg.xml. Using that you can simply do:
ProcessEngine processEngine = ProcessEngines.getDefaultProcessEngine()The camunda.cfg.xml must contain a bean that has the id processEngineConfiguration, select the best fitting ProcessEngineConfiguration class suiting your needs:
<bean id="processEngineConfiguration" class="org.camunda.bpm.engine.impl.cfg.StandaloneProcessEngineConfiguration">This will look for an camunda.cfg.xml file on the classpath and construct an engine based on the configuration in that file. The following snippet shows an example configuration:
<beans xmlns="http://www.springframework.org/schema/beans"
       xmlns:xsi="http://www.w3.org/2001/XMLSchema-instance"
       xsi:schemaLocation="http://www.springframework.org/schema/beans http://www.springframework.org/schema/beans/spring-beans.xsd">

  <bean id="processEngineConfiguration" class="org.camunda.bpm.engine.impl.cfg.StandaloneProcessEngineConfiguration">

    <property name="jdbcUrl" value="jdbc:h2:mem:camunda;DB_CLOSE_DELAY=1000" />
    <property name="jdbcDriver" value="org.h2.Driver" />
    <property name="jdbcUsername" value="sa" />
    <property name="jdbcPassword" value="" />

    <property name="databaseSchemaUpdate" value="true" />

    <property name="jobExecutorActivate" value="false" />

    <property name="mailServerHost" value="mail.my-corp.com" />
    <property name="mailServerPort" value="5025" />
  </bean>

</beans>
Note that the configuration XML is in fact a Spring configuration. This does not mean that the camunda engine can only be used in a Spring environment! We are simply leveraging the parsing and dependency injection capabilities of Spring internally for building up the engine.
The ProcessEngineConfiguration object can also be created programmatically using the configuration file. It is also possible to use a different bean id:
ProcessEngineConfiguration.createProcessEngineConfigurationFromResourceDefault();
ProcessEngineConfiguration.createProcessEngineConfigurationFromResource(String resource);
ProcessEngineConfiguration.createProcessEngineConfigurationFromResource(String resource, String beanName);
ProcessEngineConfiguration.createProcessEngineConfigurationFromInputStream(InputStream inputStream);
ProcessEngineConfiguration.createProcessEngineConfigurationFromInputStream(InputStream inputStream, String beanName);
It is also possible to not use a configuration file and create a configuration based on defaults (see the different supported classes for more information).
ProcessEngineConfiguration.createStandaloneProcessEngineConfiguration();
ProcessEngineConfiguration.createStandaloneInMemProcessEngineConfiguration();
All these ProcessEngineConfiguration.createXXX() methods return a ProcessEngineConfiguration that can further be tweaked if needed. After calling the buildProcessEngine() operation, a ProcessEngine is created as explained above.
Configure Process Engine in bpm-platform.xml
The bpm-platform.xml file is used to configure the camunda BPM platform in the following distributions:
- Apache Tomcat
- GlassFish Application Server
- IBM WebSphere Application Server
- Oracle WebLogic Application Server
The <process-engine ... /> xml tag allows you to define a process engine:
<?xml version="1.0" encoding="UTF-8"?>
<bpm-platform xmlns="http://www.camunda.org/schema/1.0/BpmPlatform"
              xmlns:xsi="http://www.w3.org/2001/XMLSchema-instance"
              xsi:schemaLocation="http://www.camunda.org/schema/1.0/BpmPlatform http://www.camunda.org/schema/1.0/BpmPlatform">

  <job-executor>
    <job-acquisition name="default" />
  </job-executor>

  <process-engine name="default">
    <job-acquisition>default</job-acquisition>
    <configuration>org.camunda.bpm.engine.impl.cfg.StandaloneProcessEngineConfiguration</configuration>
    <datasource>java:jdbc/ProcessEngine</datasource>

    <properties>
      <property name="history">full</property>
      <property name="databaseSchemaUpdate">true</property>
      <property name="authorizationEnabled">true</property>
    </properties>

  </process-engine>
</bpm-platform>
See Deployment Descriptor Reference for complete documentation of the syntax of the bpm-platform.xml file.
Configure Process Engine in processes.xml
The process engine can also be configured and bootstrapped using the META-INF/processes.xml file. See Section on processes.xml file for details.
See Deployment Descriptor Reference for complete documentation of the syntax of the processes.xml file.
Process Engine API
Services API
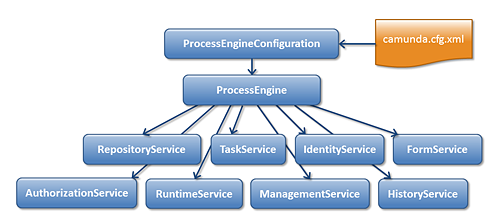
The Java API is the most common way of interacting with the engine. The central starting point is the ProcessEngine, which can be created in several ways as described in the configuration section. From the ProcessEngine, you can obtain the various services that contain the workflow/BPM methods. ProcessEngine and the services objects are thread safe. So you can keep a reference to 1 of those for a whole server.
ProcessEngine processEngine = ProcessEngines.getDefaultProcessEngine();

RuntimeService runtimeService = processEngine.getRuntimeService();
RepositoryService repositoryService = processEngine.getRepositoryService();
TaskService taskService = processEngine.getTaskService();
ManagementService managementService = processEngine.getManagementService();
IdentityService identityService = processEngine.getIdentityService();
HistoryService historyService = processEngine.getHistoryService();
FormService formService = processEngine.getFormService();
ProcessEngines.getDefaultProcessEngine() will initialize and build a process engine the first time it is called and afterwards always returns the same process engine. Proper creation and closing of all process engines can be done with ProcessEngines.init() and ProcessEngines.destroy().
The ProcessEngines class will scan for all camunda.cfg.xml and activiti.cfg.xml files. For all camunda.cfg.xml files, the process engine will be built in the typical way: ProcessEngineConfiguration.createProcessEngineConfigurationFromInputStream(inputStream).buildProcessEngine(). For all activiti.cfg.xml files, the process engine will be built in the Spring way: First the Spring application context is created and then the process engine is obtained from that application context.
All services are stateless. This means that you can easily run Camunda BPM on multiple nodes in a cluster, each going to the same database, without having to worry about which machine actually executed previous calls. Any call to any service is idempotent regardless of where it is executed.
The RepositoryService is probably the first service needed when working with the Camunda engine. This service offers operations for managing and manipulating deployments and process definitions. Without going into much detail here, a process definition is a Java counterpart of BPMN 2.0 process. It is a representation of the structure and behavior of each of the steps of a process. A deployment is the unit of packaging within the engine. A deployment can contain multiple BPMN 2.0 xml files and any other resource. The choice of what is included in one deployment is up to the developer. It can range from a single process BPMN 2.0 xml file to a whole package of processes and relevant resources (for example the deployment 'hr-processes' could contain everything related to hr processes). The RepositoryService allows to deploy such packages. Deploying a deployment means it is uploaded to the engine, where all processes are inspected and parsed before being stored in the database. From that point on, the deployment is known to the system and any process included in the deployment can now be started.
Furthermore, this service allows to
- Query on deployments and process definitions known to the engine.
- Suspend and activate process definitions. Suspending means no further operations can be done on them, while activation is the opposite operation.
- Retrieve various resources such as files contained within the deployment or process diagrams that were automatically generated by the engine.
While the RepositoryService is about static information (i.e., data that doesn't change, or at least not a lot), the RuntimeService is quite the opposite. It deals with starting new process instances of process definitions. As said above, a process definition defines the structure and behavior of the different steps in a process. A process instance is one execution of such a process definition. For each process definition there typically are many instances running at the same time. The RuntimeService is also the service which is used to retrieve and store process variables. This is data specific to the given process instance and can be used by various constructs in the process (e.g., an exclusive gateway often uses process variables to determine which path is chosen to continue the process). The RuntimeService also allows to query on process instances and executions. Executions are a representation of the 'token' concept of BPMN 2.0. Basically an execution is a pointer pointing to where the process instance currently is. Lastly, the RuntimeService is used whenever a process instance is waiting for an external trigger and the process needs to be continued. A process instance can have various wait states and this service contains various operations to 'signal' the instance that the external trigger is received and the process instance can be continued.
Tasks that need to be performed by actual human users of the system are core to the process engine. Everything around tasks is grouped in the TaskService, such as
- Querying tasks assigned to users or groups.
- Creating new standalone tasks. These are tasks that are not related to a process instances.
- Manipulating to which user a task is assigned or which users are in some way involved with the task.
- Claiming and completing a task. Claiming means that someone decided to be the assignee for the task, meaning that this user will complete the task. Completing means 'doing the work of the tasks'. Typically this is filling in a form of sorts.
The IdentityService is pretty simple. It allows the management (creation, update, deletion, querying, ...) of groups and users. It is important to understand that the core engine actually doesn't do any checking on users at runtime. For example, a task could be assigned to any user, but the engine does not verify if that user is known to the system. This is because the engine can also used in conjunction with services such as LDAP, active directory, etc.
The FormService is an optional service. Meaning that the Camunda engine can perfectly be used without it, without sacrificing any functionality. This service introduces the concept of a start form and a task form. A start form is a form that is shown to the user before the process instance is started, while a task form is the form that is displayed when a user wants to complete a form. You can define these forms in the BPMN 2.0 process definition. This service exposes this data in an easy way to work with. But again, this is optional as forms don't need to be embedded in the process definition.
The HistoryService exposes all historical data gathered by the engine. When executing processes, a lot of data can be kept by the engine (this is configurable) such as process instance start times, who did which tasks, how long it took to complete the tasks, which path was followed in each process instance, etc. This service exposes mainly query capabilities to access this data.
The ManagementService is typically not needed when coding custom applications. It allows to retrieve information about the database tables and table metadata. Furthermore, it exposes query capabilities and management operations for jobs. Jobs are used in the engine for various things such as timers, asynchronous continuations, delayed suspension/activation, etc. Later on, these topics will be discussed in more detail.
For more detailed information on the service operations and the engine API, see the Javadocs.
Query API
To query data from the engine there are multiple possibilities:
- Java Query API: Fluent Java API to query engine entities (like ProcessInstances, Tasks, ...).
- REST Query API: REST API to query engine entities (like ProcessInstances, Tasks, ...).
- Native Queries: Provide own SQL queries to retrieve engine entities (like ProcessInstances, Tasks, ...) if the Query API lacks the possibilities you need (e.g. OR conditions).
- Custom Queries: Use completely customized queries and an own MyBatis mapping to retrieve own value objects or join engine with domain data.
- SQL Queries: Use database SQL queries for use cases like Reporting.
The recommended way is to use one of the Query APIs.
The Java Query API allows to program completely typesafe queries with a fluent API. You can add various conditions to your queries (all of which are applied together as a logical AND) and precisely one ordering. The following code shows an example:
List<Task> tasks = taskService.createTaskQuery()
  .taskAssignee("kermit")
  .processVariableValueEquals("orderId", "0815")
  .orderByDueDate().asc()
  .list();
You can find more information on this in the Javadocs.
REST Query API
The Java Query API is exposed as REST service as well, see REST documentation for details.
Native Queries
Sometimes you need more powerful queries, e.g. queries using an OR operator or restrictions you can not express using the Query API. For these cases, we introduced native queries, which allow you to write your own SQL queries. The return type is defined by the Query object you use and the data is mapped into the correct objects, e.g. Task, ProcessInstance, Execution, etc. Since the query will be fired at the database you have to use table and column names as they are defined in the database, this requires some knowledge about the internal data structure and it is recommended to use native queries with care. The table names can be retrieved via the API to keep the dependency as small as possible.
List<Task> tasks = taskService.createNativeTaskQuery()
  .sql("SELECT count(*) FROM " + managementService.getTableName(Task.class) + " T WHERE T.NAME_ = #{taskName}")
  .parameter("taskName", "aOpenTask")
  .list();

long count = taskService.createNativeTaskQuery()
  .sql("SELECT count(*) FROM " + managementService.getTableName(Task.class) + " T1, "
         + managementService.getTableName(VariableInstanceEntity.class) + " V1 WHERE V1.TASK_ID_ = T1.ID_")
  .count();
Custom Queries
For performance reasons it might sometimes be desirable not to query the engine objects but some own value or DTO objects collecting data from different tables - maybe including your own domain classes.

SQL Queries
The table layout is pretty straightforward - we focused on making it easy to understand. Hence it is OK to do SQL queries for e.g. reporting use cases. Just make sure that you do not mess up the engine data by updating the tables without exactly knowing what you are doing.
Process Engine Concepts
This section explains some core process engine concepts that are used in both the process engine API and the internal process engine implementation. Understanding these fundamentals makes it easier to use the process engine API.
Process Definitions
A process definition defines the structure of a process. You could say that the process definition is the process. Camunda BPM uses BPMN 2.0 as its primary modeling language for modeling process definitions.
Camunda BPM comes with two BPMN 2.0 References:
- The BPMN 2.0 Modeling Reference introduces the fundamentals of BPMN 2.0 and helps you to get started modeling processes. (Make sure to read the Tutorial as well.)
- The BPMN 2.0 Implementation Reference covers the implementation of the individual BPMN 2.0 constructs in Camunda BPM. You should consult this reference if you want to implement and execute BPMN processes.
In Camunda BPM you can deploy processes to the process engine in BPMN 2.0 XML format. The XML files are parsed and transformed into a process definition graph structure. This graph structure is executed by the process engine.
Querying for Process Definitions
You can query for all deployed process definitions using the Java API and the ProcessDefinitionQuery made available through the RepositoryService. Example:
List<ProcessDefinition> processDefinitions = repositoryService.createProcessDefinitionQuery()
    .processDefinitionKey("invoice")
    .orderByProcessDefinitionVersion()
    .asc()
    .list();
The above query returns all deployed process definitions for the key invoice ordered by their version property.
You can also query for process definitions using the REST API.
Keys and Versions
The key of a process definition (invoice in the example above) is the logical identifier of the process. It is used throughout the API, most prominently for starting process instances (see section on process instances). The key of a process definition is defined using the id property of the corresponding <process ... > element in the BPMN 2.0 XML file:
<process id="invoice" name="invoice receipt" isExecutable="true">
  ...
</process>
If you deploy multiple processes with the same key, they are treated as individual versions of the same process definition by the process engine.
Suspending Process Definitions
Suspending a process definition disables it temporarily, i.e., it cannot be instantiated while it is suspended. The RuntimeService Java API can be used to suspend a process definition. Similarly, you can activate a process definition to undo this effect.
Process Instances
A process instance is an individual execution of a process definition. The relation of the process instance to the process definition is the same as the relation between Object and Class in Object Oriented Programming (the process instance playing the role of the object and the process definition playing the role of the class in this analogy).
The process engine is responsible for creating process instances and managing their state. If you start a process instance which contains a wait state, for example a user task, the process engine must make sure that the state of the process instance is captured and stored inside a database until the wait state is left (the user task is completed).
Starting a Process Instance
The simplest way to start a process instance is by using the startProcessInstanceByKey(...) method offered by the RuntimeService:
ProcessInstance instance = runtimeService.startProcessInstanceByKey("invoice");
You may optionally pass in a couple of variables:
Map<String, Object> variables = new HashMap<String,Object>();
variables.put("creditor", "Nice Pizza Inc.");
ProcessInstance instance = runtimeService.startProcessInstanceByKey("invoice", variables);
Process variables are available to all tasks in a process instance and are automatically persisted to the database in case the process instance reaches a wait state.
It is also possible to start a process instance using the REST API.
Starting a Process Instance at Any Set of Activities
The startProcessInstanceByKey and startProcessInstanceById methods start the process instance at their default initial activity, which is typically the single blank start event of the process definition. It is also possible to start anywhere in a process instance by using the fluent builder for process instances. The fluent builder can be accessed via the RuntimeService methods createProcessInstanceByKey and createProcessInstanceById.
The following starts a process instance before the activity SendInvoiceReceiptTask and the embedded sub process DeliverPizzaSubProcess:
ProcessInstance instance = runtimeService.createProcessInstanceByKey("invoice")
  .startBeforeActivity("SendInvoiceReceiptTask")
  .setVariable("creditor", "Nice Pizza Inc.")
  .startBeforeActivity("DeliverPizzaSubProcess")
  .setVariableLocal("destination", "12 High Street")
  .execute();
The fluent builder allows to submit any number of so-called instantiation instructions. When calling execute, the process engine performs these instructions in the order they are specified. In the above example, the engine first starts the task SendInvoiceReceiptTask and executes the process until it reaches a wait state and then starts DeliverPizzaTask and does the same. After these two instructions, the execute call returns.
Querying for Process Instances
You can query for all currently running process instances using the ProcessInstanceQuery offered by the RuntimeService:
runtimeService.createProcessInstanceQuery()
    .processDefinitionKey("invoice")
    .variableValueEquals("creditor", "Nice Pizza Inc.")
    .list();
The above query would select all process instances for the invoice process where the creditor is Nice Pizza Inc..
You can also query for process instances using the REST API.
Interacting with a Process Instance
Once you have performed a query for a particular process instance (or a list of process instances), you may want to interact with it. There are multiple possibilities to interact with a process instance, most prominently:
- Triggering it (make it continue execution):
- Through a Message Event
- Through a Signal Event
- Canceling it:
- Using the
RuntimeService.deleteProcessInstance(...)method.
- Using the
- Starting/Canceling any activity:
- Using the process instance modification feature
If your process uses at least one User Task, you can also interact with the process instance using the TaskService API.
Suspending Process Instances
Suspending a process instance is helpful, if you want ensure that it is not executed any further. For example, if process variables are in an undesired state, you can suspend the instance and change the variables safely.
In detail, suspension means to disallow all actions that change token state (i.e., the activities that are currently executed) of the instance. For example, it is not possible to signal an event or complete a user task for a suspended process instance, as these actions will continue the process instance execution subsequently. Nevertheless, actions like setting or removing variables are still allowed, as they do not change the token state.
Also, when suspending a process instance, all tasks belonging to it will be suspended. Therefore, it will no longer be possible to invoke actions that have effects on the task's lifecycle (i.e., user assignment, task delegation, task completion, ...). However, any actions not touching the lifecycle like setting variables or adding comments will still be allowed.
A process instance can be suspended by using the suspendProcessInstanceById(...) method of the RuntimeService. Similarly it can be reactivated again.
If you would like to suspend all process instances of a given process definition, you can use the method suspendProcessDefinitionById(...) of theRepositoryService and specify the suspendProcessInstances option.
Executions
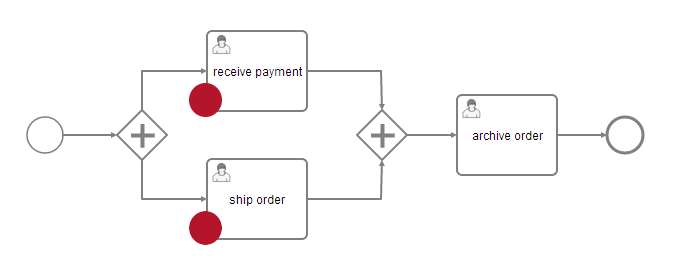
If your process instance contains multiple execution paths (like for instance after a parallel gateway), you must be able to differentiate the currently active paths inside the process instance. In the following example, two user tasks receive payment and ship order can be active at the same time.
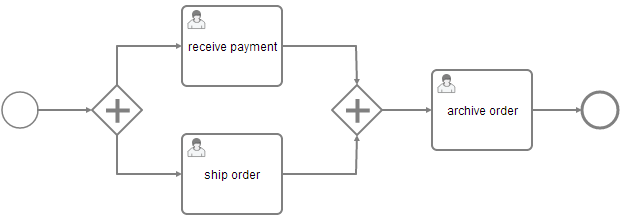
Internally, the process engine creates two concurrent executions inside the process instance, one for each concurrent path of execution. Executions are also created for scopes, for example if the process engine reaches a Embedded Sub Process or in case of Multi Instance.
Executions are hierarchical and all executions inside a process instance span a tree, the process instance being the root-node in the tree. Note: the process instance itself is an execution. Executions are variable scopes, meaning that dynamic data can be associated with them.
Querying for executions
You can query for executions using the ExecutionQuery offered by the RuntimeService:
runtimeService.createExecutionQuery()
    .processInstanceId(someId)
    .list();
The above query returns all executions for a given process instance.
You can also query for executions using the REST API.
Activity Instances
The activity instance concept is similar to the execution concept but takes a different perspective. While an execution can be imagined as a token moving through the process, an activity instance represents an individual instance of an activity (task, subprocess, ...). The concept of the activity instance is thus more state-oriented.
Activity instances also span a tree, following the scope structure provided by BPMN 2.0. Activities that are "on the same level of subprocess" (i.e., part of the same scope, contained in the same subprocess) will have their activity instances at the same level in the tree
Examples:
- Process with two parallel user tasks after parallel Gateway: in the activity instance tree you will see two activity instances below the root instance, one for each user task.
- Process with two parallel Multi Instance user tasks after parallel Gateway: in the activity instance tree, all instances of both user tasks will be listed below the root activity instance. Reason: all activity instances are at the same level of subprocess.
- Usertask inside embedded subprocess: the activity instance tree will have 3 levels: the root instance representing the process instance itself, below it an activity instance representing the instance of the embedded subprocess, and below this one, the activity instance representing the usertask.
Retrieving an Activity Instance
Currently activity instances can only be retrieved for a process instance:
ActivityInstance rootActivityInstance = runtimeService.getActivityInstance(processInstance.getProcessInstanceId());
You can retrieve the activity instance tree using the REST API as well.
Identity & Uniqueness
Each activity instance is assigned a unique ID. The ID is persistent, if you invoke this method multiple times, the same activity instance IDs will be returned for the same activity instances. (However, there might be different executions assigned, see below)
Relation to Executions
The Execution concept in the process engine is not completely aligned with the activity instance concept because the execution tree is generally not aligned with the activity / scope concept in BPMN. In general, there is a n-1 relationship between Executions and ActivityInstances, i.e., at a given point in time, an activity instance can be linked to multiple executions. In addition, it is not guaranteed that the same execution that started a given activity instance will also end it. The process engine performs several internal optimizations concerning the compacting of the execution tree which might lead to executions being reordered and pruned. This can lead to situations where a given execution starts an activity instance but another execution ends it. Another special case is the process instance: if the process instance is executing a non-scope activity (for example a user task) below the process definition scope, it will be referenced by both the root activity instance and the user task activity instance.
Note: If you need to interpret the state of a process instance in terms of a BPMN process model, it is usually easier to use the activity instance tree as opposed to the execution tree.
Jobs and Job Definitions
The Camunda process engine includes a component named the Job Executor. The Job Executor is a scheduling component, responsible for performing asynchronous background work. Consider the example of a Timer Event: whenever the process engine reaches the timer event, it will stop execution, persist the current state to the database and create a job to resume execution in the future. A job has a due date which is calculated using the timer expression provided in the BPMN XML.
When a process is deployed, the process engine creates a Job Definition for each activity in the process which will create jobs at runtime. This allows you to query information about timers and asynchronous continuations in your processes.
Querying for jobs
Using the management service, you can query for jobs. The following selects all jobs which are due after a certain date:
managementService.createJobQuery()
  .duedateHigherThan(someDate)
  .list()
It is possible to query for jobs using the REST API.
Querying for Job Definitions
Using the management service, you can also query for job definitions. The following selects all job definitions from a specific process definition:
managementService.createJobDefinitionQuery()
  .processDefinitionKey("orderProcess")
  .list()
The result will contain information about all timers and asynchronous continuations in the order process.
It is also possible to query for job definitions using the REST API.
Suspending and Activating Job Execution
Job suspension prevents jobs from being executed. Suspension of job execution can be controlled on different levels:
- Job Instance Level: individual Jobs can be suspended either directly through the
managementService.suspendJob(...)API or transitively when suspending a Process Instance or a Job Definition. - Job Definition Level: all instances of a certain Timer or Activity can be suspended.
Job suspension by Job Definition allows you to suspend all instances of a certain timer or an asynchronous continuation. Intuitively, this allows you to suspend a certain activity in a process in a way that all process instances will advance until they have reached this activity and then not continue since the activity is suspended.
Let's assume there is a process deployed with key orderProcess, which contains a service task named processPayment. The service task has an asynchronous continuation configured which causes it to be executed by the job executor. The following example shows how you can prevent the processPayment service from being executed:
List<JobDefinition> jobDefinitions = managementService.createJobDefinitionQuery()
        .processDefinitionKey("orderProcess")
        .activityIdIn("processPayment")
        .list();

for (JobDefinition jobDefinition : jobDefinitions) {
  managementService.suspendJobDefinitionById(jobDefinition.getId(), true);
}
Process Variables
This section describes the concepts of variables in processes. Variables can be used to add data to process runtime state or, more particular, variable scopes. Various API methods that change the state of these entities allow updating of the attached variables. In general, a variable consists of a name and a value. The name is used for identification across process constructs. For example, if one activity sets a variable named var, a follow-up activity can access it by using this name. The value of a variable is a Java object.
Variable Scopes and Variable Visibility
All entities that can have variables are called variable scopes. These are executions (which include process instances) and tasks. As described in the Concepts section, the runtime state of a process instance is represented by a tree of executions. Consider the following process model where the red dots mark active tasks:
The runtime structure of this process is as follows:
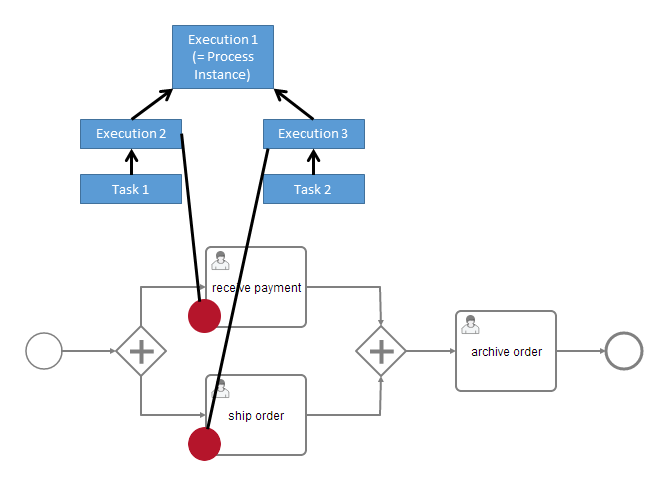
There is a process instance with two child executions, each of which has created a task. All these five entities are variable scopes and the arrows mark a parent-child relationship. A variable that is defined on a parent scope is accessible in every child scope unless a child scope defines a variable of the same name. The other way around, child variables are not accessible from a parent scope. Variables that are directly attached to the scope in question are called local variables. Consider the following assignment of variables to scopes:
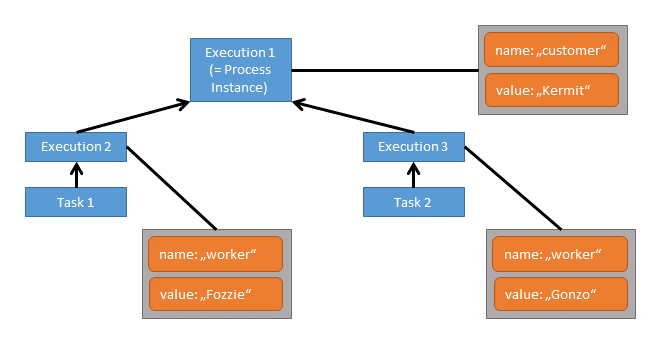
In this case, when working on Task 1 the variables worker and customer are accessible. Note that due to the structure of scopes, the variable worker can be defined twice, so that Task 1 accesses a different worker variable than Task 2. However, both share the variable customer which means that if that variable is updated by one of the tasks, this change is also visible to the other.
Both tasks can access two variables each while none of these is a local variable. All three executions have one local variable each.
Now let's say, we set a local variable customer on Task 1:
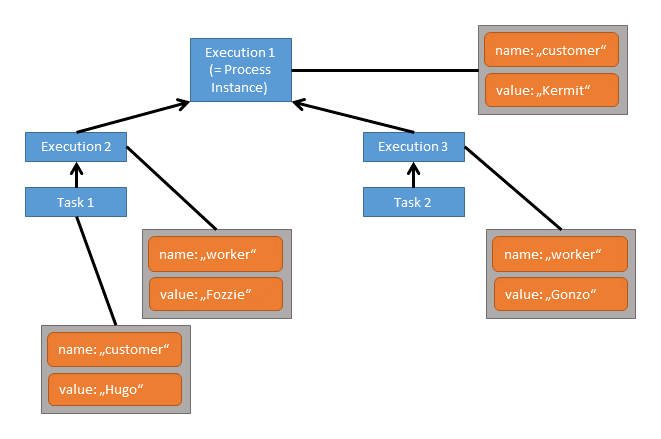
While two variables named customer and worker can still be accessed from Task 1, the customer variable on Execution 1 is hidden, so the accessible customer variable is the local variable of Task 1.
In general, variables are accessible in the following cases:
- Instantiating processes
- Delivering messages
- Task lifecycle transitions, such as completion or resolution
- Setting/getting variables from outside
- Setting/getting variables in a Delegate
- Expressions in the process model
- Scripts in the process model
- (Historic) Variable queries
Setting and Retrieving Variables - Overview
To set and retrieve variables, the process engine offers a Java API that allows setting of variables from Java objects and retrieving them in the same form. Internally, the engine persists variables to the database and therefore applies serialization. For most applications, this is a detail of no concern. However, sometimes, when working with custom Java classes, the serialized value of a variable is of interest. Imagine the case of a monitoring application that manages many process applications. It is decoupled from those applications' classes and therefore cannot access custom variables in their Java representation. For these cases, the process engine offers a way to retrieve and manipulate the serialized value. This boils down to two APIs:
- Java Object Value API: Variables are represented as Java objects. These objects can be directly set as values and retrieved in the same form. This is the more simple API and is the recommended way when implementing code as part of a process application.
- Typed Value API: Variable values are wrapped in so-called typed values that are used to set and retrieve variables. A typed value offers access to meta data such as the way the engine has serialized the variable and, depending on the type, the serialized representation of the variable.
As an example, the following code retrieves and sets two integer variables using both APIs:
// Java Object API: Get Variable
Integer val1 = (Integer) execution.getVariable("val1");

// Typed Value API: Get Variable
IntegerValue typedVal2 = execution.getVariableTyped("val2");
Integer val2 = typedVal2.getValue();

Integer diff = val1 - val2;

// Java Object API: Set Variable
execution.setVariable("diff", diff);

// Typed Value API: Set Variable
IntegerValue typedDiff = Variables.integerValue(diff);
execution.setVariable("diff", typedDiff);
The specifics of this code are described in more detail in the sections on the Java Object Value API and the Typed Value API.
Supported Variable Values
The process engine supports the following variable value types:
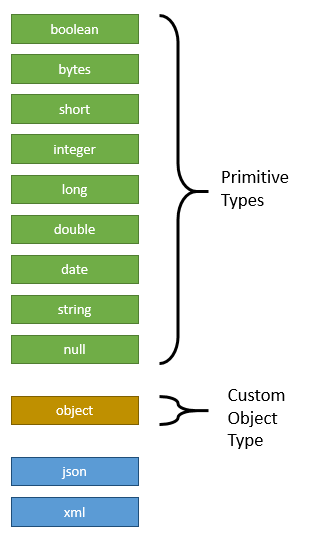
Depending on the actual value of a variable, a different type is assigned. Out of the available types, there are nine primitive value types, meaning that they correspond to standard JDK classes:
boolean: Instances ofjava.lang.Booleanbytes: Instances ofbyte[]short: Instances ofjava.lang.Shortinteger: Instances ofjava.lang.Integerlong: Instances ofjava.lang.Longdouble: Instances ofjava.lang.Doubledate: Instances ofjava.util.Datestring: Instances ofjava.lang.Stringnull:nullreferences
Furthermore, the value type object represents custom Java objects. When such a variable is persisted, its value is serialized according to a serialization procedure. These procedures are configurable and exchangeable.
If you prefer to store your variables in XML or JSON format you can use the types xml or json. Both are special because the engine provides constants for them in the enumeration SerializationDataFormats but doesn't provide any serializers out of the box. You could either write your own TypedValueSerializers for those types and register them in your process engine configuration or you could use camunda Spin, which provides support for the two types (see here).
Object Value Serialization
When an object value is passed to the process engine, a serialization format can be specified to tell the process engine to store the value in a specific format. Based on this format, the engine looks up a serializer. The serializer is able to serialize a Java object to the specified format and deserialize it from a representation in that format. That means, there may be different serializers for different formats and it is possible to implement custom serializers in order to store custom objects in a specific format.
The process engine ships one built-in object serializer for the format application/x-java-serialized-object. It is able to serialize Java objects that implement the interface java.io.Serializable and applies standard Java object serialization.
The desired serialization format can be specified when setting a variable using the Typed Value API:
CustomerData customerData = new CustomerData();

ObjectValue customerDataValue = Variables.objectValue(customerData)
  .serializationDataFormat(Variables.SerializationDataFormats.JAVA)
  .create();

execution.setVariable("someVariable", customerDataValue);
On top of that, the process engine configuration has an option defaultSerializationFormat that is used when no specific format is requested. This option defaults to application/x-java-serialized-object.
Using Custom Objects in Task Forms:
Note that the built-in serializer converts objects to byte streams that can only be interpreted with the Java class at hand. When implementing task forms that are based on complex objects, a text-based serialization format should be used since the tasklist cannot interpret these byte streams. See the box Serializing Objects to XML and JSON for details on how to integrate serialization formats like XML and JSON.
Serializing Objects to XML and JSON:
The camunda Spin plugin provides serializers that are capable of serializing object values to XML and JSON. They can be used when it is desired that the serialized objects values can be interpreted by humans or when the serialized value should be meaningful without having the corresponding Java class.
When using a pre-built camunda distribution, camunda Spin is already preconfigured and you can try these formats without further configuration.
Java Object API
The most convenient way of working with process variables from Java is to use their Java object representation. Wherever the process engine offers variable access, process variables can be accessed in this representation given that for custom objects the engine is aware of the involved classes. For example, the following code sets and retrieves a variable for a given process instance:
com.example.Order order = new com.example.Order();
runtimeService.setVariable(execution.getId(), "order", order);

com.example.Order retrievedOrder = (com.example.Order) runtimeService.getVariable(execution.getId(), "order");
Note that this code sets a variable at the highest possible point in the hierarchy of variable scopes. This means, if the variable is already present (whether in this execution or any of its parent scopes), it is updated. If the variable is not yet present, it is created in the highest scope, i.e. the process instance. If a variable is supposed to be set exactly on the provided execution, the local methods can be used. For example:
com.example.Order order = new com.example.Order();
runtimeService.setVariableLocal(execution.getId(), "order", order);

com.example.Order retrievedOrder = (com.example.Order) runtimeService.getVariable(execution.getId(), "order");
com.example.Order retrievedOrder = (com.example.Order) runtimeService.getVariableLocal(execution.getId(), "order");
// both methods return the variable
Whenever a variable is set in its Java representation, the process engine automatically determines a suitable value serializer or raises an exception if the provided value cannot be serialized.
Typed Value API
In cases in which it is important to access a variable's serialized representation or in which the engine has to be hinted to serialize a value in a certain format, the typed-value-based API can be used. In comparison to the Java-Object-based API, it wraps a variable value in a so-called Typed Value. Such a typed value allows richer representation of variable values.
In order to easily construct typed values, Camunda BPM offers the class org.camunda.bpm.engine.variable.Variables. This class contains static methods that allow creation of single typed values as well as creation of a map of typed values in a fluent way.
Primitive Values
The following code sets a single String variable by specifying it as a typed value:
StringValue typedStringValue = Variables.stringValue("a string value");
runtimeService.setVariable(execution.getId(), "stringVariable", typedStringValue);

StringValue retrievedTypedStringValue = runtimeService.getVariableTyped(execution.getId(), "order");
String stringValue = retrievedTypedStringValue.getValue(); // equals "a string value"
Note that with this API, there is one more level of abstraction around the variable value. Thus, in order to access the true value, it is necessary to unwrap the actual value.
Object Values
Of course, for plain String values, the Java-Object-based API is more concise. Let us therefore consider an example with a custom object value:
com.example.Order order = new com.example.Order();
ObjectValue typedObjectValue = Variables.objectValue(order).create();
runtimeService.setVariableLocal(execution.getId(), "order", typedObjectValue);

ObjectValue retrievedTypedObjectValue = runtimeService.getVariableTyped(execution.getId(), "order");
com.example.Order retrievedOrder = (com.example.Order) retrievedTypedObjectValue.getValue();
This again is equivalent to the Java-Object-based API. However, it is now possible to tell the engine which serialization format to use when persisting the value. For example, ObjectValue typedObjectValue = Variables.objectValue(order).serializationDataFormat(Variables.SerializationDataFormats.JAVA).create(); creates a value that gets serialized by the engine's built-in Java object serializer. Also, a retrieved ObjectValue instance provides additional variable details:
// returns true
boolean isDeserialized = retrievedTypedObjectValue.isDeserialized();

// returns the format used by the engine to serialize the value into the database
String serializationDataFormat = retrievedTypedObjectValue.getSerializationDateFormat();

// returns the serialized representation of the variable; the actual value depends on the serialization format used
String serializedValue = retrievedTypedObjectValue.getValueSerialized();

// returns the class com.example.Order
Class<com.example.Order> valueClass = retrievedTypedObjectValue.getObjectType();

// returns the String "com.example.Order"
String valueClassName = retrievedTypedObjectValue.getObjectTypeName();
The serialization details are useful when the calling application does not possess the classes of the actual variable value (i.e. com.example.Order is not known). In these cases, runtimeService.getVariableTyped(execution.getId(), "order") will raise an exception since it immediately tries to deserialize the variable value. In such a case, the invocation runtimeService.getVariableTyped(execution.getId(), "order", false) can be used. The additional boolean parameter tells the process engine to not attempt deserialization. In this case, the invocation isDeserialized() will return false and invocations like getValue() and getObjectType() will raise exceptions. Calling getValueSerialized() and getObjectTypeName() is a way to access the variable nonetheless.
Similarly, it is possible to set a variable from its serialized representation:
String serializedOrder = "...";
ObjectValue serializedValue =
  Variables
    .serializedObjectValue(serializedOrder)
    .serializationDataFormat(Variables.SerializationDataFormats.JAVA)
    .objectTypeName("com.example.Order")
    .create();

runtimeService.setVariableLocal(execution.getId(), "order", serializedValue);

ObjectValue retrievedTypedObjectValue = runtimeService.getVariableTyped(execution.getId(), "order");
com.example.Order retrievedOrder = (com.example.Order) retrievedTypedObjectValue.getValue();
Be Aware of Inconsistent Variable State:
When setting a serialized variable value, no checking is done whether the structure of the serialized value is compatible with the class the variable value is supposed to be an instance of. When setting the variable from the above example, the supplied serialized value is not validated against the structure of com.example.Order. Thus, an invalid variable value will only be detected when runtimeService#getVariableTyped is called.
Setting Multiple Typed Values
Similar to the Java-Object-based API, it is also possible to set multiple typed values in one API call. The Variables class offers a fluent API to construct a map of typed values:
com.example.Order order = new com.example.Order();

VariableMap variables =
  Variables.create()
    .putValueTyped("order", Variables.objectValue(order))
    .putValueTyped("string", Variables.stringValue("a string value"));
runtimeService.setVariablesLocal(execution.getId(), "order", variables);
Interchangeability of APIs
Both APIs offer different views on the same entities and can therefore be combined as is desired. For example, a variable that is set using the Java-Object-based API can be retrieved as a typed value and vice versa. As the class VariableMap implements the Map interface, it is also possible to put plain Java objects as well as typed values into this map.
Which API should you use? The one that fits your purpose best. When you are certain that you always have access to the involved value classes, such as when implementing code in a process application like a JavaDelegate, then the Java-Object-based API is easier to use. When you need to access value-specific meta data such as serialization formats, then the Typed-Value-based API is the way to go.
Input/Output Variable Mapping
To improve the reusability of source code and business logic, camunda BPM offers input/output mapping of process variables. This can be used for tasks, events and subprocesses.
In order to use the variable mapping, the camunda extension element inputOutput has to be added
to the element. It can contain multiple inputParameter and outputParameter elements that
specify which variables should be mapped. The name attribute of an inputParameter denotes
the variable name inside the activity (a local variable to be created), whereas the name attribute of an outputParameter
denotes the variable name outside of the activity.
The content of an input/outputParameter specifies the value that is mapped to the corresponding
variable. It can be a simple constant string or an expression. An empty body sets the variable
to the value null.
<camunda:inputOutput>
  <camunda:inputParameter name="x">foo</camunda:inputParameter>
  <camunda:inputParameter name="willBeNull"/>
  <camunda:outputParameter name="y">${x}</camunda:outputParameter>
  <camunda:outputParameter name="z">${willBeNull == null}</camunda:outputParameter>
</camunda:inputOutput>
Even complex structures like lists and maps can be used. Both can also be nested.
<camunda:inputOutput>
  <camunda:inputParameter name="x">
    <camunda:list>
      <camunda:value>a</camunda:value>
      <camunda:value>${1 + 1}</camunda:value>
      <camunda:list>
        <camunda:value>1</camunda:value>
        <camunda:value>2</camunda:value>
        <camunda:value>3</camunda:value>
      </camunda:list>
    </camunda:list>
  </camunda:inputParameter>
  <camunda:outputParameter name="y">
    <camunda:map>
      <camunda:entry key="foo">bar</camunda:entry>
      <camunda:entry key="map">
        <camunda:map>
          <camunda:entry key="hello">world</camunda:entry>
          <camunda:entry key="camunda">bpm</camunda:entry>
        </camunda:map>
      </camunda:entry>
    </camunda:map>
  </camunda:outputParameter>
</camunda:inputOutput>
A script can also be used to provide the variable value. Please see the corresponding section in the scripting chapter for how to specify a script.
A simple example of the benefit of input/output mapping is a complex calculation which should be part of multiple processes definitions. This calculation can be developed as isolated delegation code or a script and be reused in every process, even though the processes use a different variable set. An input mapping is used to map the different process variables to the required input parameters of the complex calculation activity. Accordingly, an output mapping allows to utilize the calculation result in the further process execution.
In more detail, let us assume such a calculation is implemented by a Java Delegate class org.camunda.bpm.example.ComplexCalculation.
This delegate requires a userId and a costSum variable as input
parameters. It then calculates three values, pessimisticForecast, realisticForecast and optimisticForecast,
which are different forecasts of the future costs a customer faces. In a first process, both input variables are available as process variables but with different names (id, sum). From the three results, the process only uses realisticForecast which it depends on by the name forecast in follow-up activities. A corresponding input/output mapping looks as follows:
<serviceTask camunda:class="org.camunda.bpm.example.ComplexCalculation">
  <extensionElements>
    <camunda:inputOutput>
      <camunda:inputParameter name="userId">${id}</camunda:inputParameter>
      <camunda:inputParameter name="costSum">${sum}</camunda:inputParameter>
      <camunda:outputParameter name="forecast">${realisticForecast}</camunda:outputParameter>
    </camunda:inputOutput>
  </extensionElements>
</serviceTask>
In a second process, let us assume the costSum variable has to be calculated from properties of three different maps. Also, the process
depends on a variable avgForecast as the average value of the three forecasts. In this case, the mapping looks as follows:
<serviceTask camunda:class="org.camunda.bpm.example.ComplexCalculation">
  <extensionElements>
    <camunda:inputOutput>
      <camunda:inputParameter name="userId">${id}</camunda:inputParameter>
      <camunda:inputParameter name="costSum">
        ${mapA[costs] + mapB[costs] + mapC[costs]}
      </camunda:inputParameter>
      <camunda:outputParameter name="avgForecast">
        ${(pessimisticForecast + realisticForecast + optimisticForecast) / 3}
      </camunda:outputParameter>
    </camunda:inputOutput>
  </extensionElements>
</serviceTask>
Multi-instance IO Mapping
Input mappings can also be used with multi-instance constructs, in which the mapping is applied for every instance that is created. For example, for a multi-instance subprocess with five instances, the mapping is executed five times and the involved variables are created in each of the five subprocess scopes such that they can be accessed independently.
No output mapping for multi-instance constructs:
The engine does not support output mappings for multi-instance constructs. Every instance of the output mapping would overwrite the variables set by the previous instances and the final variable state would become hard to predict.
Process Instance Modification
While the process model contains sequence flows that define in which order activities must be executed, sometimes it is desired to flexibly start an activity again or cancel a running activity. For example, this can be useful when the process model contains an error, such as a wrong sequence flow condition, and running process instances need to be corrected. Use cases for this API may be
- Repairing process instances in which some steps have to be repeated or skipped
- Migrating process instances from one version of a process definition to another
- Testing: Activities can be skipped or repeated for isolated testing of individual process segments
To perform such an operation, the process engine offers the process instance modification API that is entered via RuntimeService.createProcessInstanceModification(...). This API allows to specify multiple modification instructions in one call by using a fluent builder. In particular, it is possible to:
- start execution before an activity
- start execution on a sequence flow leaving an activity
- cancel a running activity instance
- cancel all running instances of a given activity
- set variables with each of the instructions
Process instance modification within the same instance is not recommended! An activity which tries to modify its own process instance can cause undefined behavior, which should be avoided.
The Camunda enterprise edition provides a user interface to compose process instance modifications visually on the BPMN diagram in Camunda Cockpit.
Process Instance Modification by Example
As an example, consider the following process model:
The model shows a simple process for processing a loan application. Let us assume that a loan application has arrived, the loan application has been evaluated, and it was determined to decline the application. That means, the process instance has the following activity instance state:
ProcessInstance
  Decline Loan Application
Now the worker performing the task Decline Loan Application recognizes an error in the evaluation result and comes to the conclusion that the application should be accepted nevertheless. While such flexibility is not modelled as part of the process, process instance modification allows to correct the running process instance. The following API call does the trick:
ProcessInstance processInstance = runtimeService.createProcessInstanceQuery().singleResult();
runtimeService.createProcessInstanceModification(processInstance.getId())
  .startBeforeActivity("acceptLoanApplication")
  .cancelAllForActivity("declineLoanApplication")
  .execute();
This command first starts execution before the activity Accept Loan Application until a wait state - the creation of the user task in this case - is reached. After that, it cancels the running instance of the activity Decline Loan Application. In the worker's task list, the Decline task has been removed and an Accept task has appeared. The resulting activity instance state is:
ProcessInstance
  Accept Loan Application
Let's assume that a variable called approver must exist when approving the application. This can be accomplished by extending the modification request as follows:
ProcessInstance processInstance = runtimeService.createProcessInstanceQuery().singleResult();
runtimeService.createProcessInstanceModification(processInstance.getId())
  .startBeforeActivity("acceptLoanApplication")
  .setVariable("approver", "joe")
  .cancelAllForActivity("declineLoanApplication")
  .execute();
The added setVariable call ensures that before starting the activity, the specified variable is submitted.
Now to some more complex cases. Say that the application was again not ok and the activity Decline Loan Application is active. Now, the worker recognizes that the evaluation process was erroneous and wants to restart it entirely. The following modification instructions represent the modification request to perform this task:
It is possible to start the subprocess activities:
ProcessInstance processInstance = runtimeService.createProcessInstanceQuery().singleResult();
runtimeService.createProcessInstanceModification(processInstance.getId())
  .cancelAllForActivity("declineLoanApplication")
  .startBeforeActivity("assessCreditWorthiness")
  .startBeforeActivity("registerApplication")
  .execute();
to start at the start event of the subprocess:
ProcessInstance processInstance = runtimeService.createProcessInstanceQuery().singleResult();
runtimeService.createProcessInstanceModification(processInstance.getId())
  .cancelAllForActivity("declineLoanApplication")
  .startBeforeActivity("subProcessStartEvent")
  .execute();
to start the subprocess itself:
ProcessInstance processInstance = runtimeService.createProcessInstanceQuery().singleResult();
runtimeService.createProcessInstanceModification(processInstance.getId())
  .cancelAllForActivity("declineLoanApplication")
  .startBeforeActivity("evaluateLoanApplication")
  .execute();
to start the process' start event:
ProcessInstance processInstance = runtimeService.createProcessInstanceQuery().singleResult();
runtimeService.createProcessInstanceModification(processInstance.getId())
  .cancelAllForActivity("declineLoanApplication")
  .startBeforeActivity("processStartEvent")
  .execute();
Operational Semantics
The following sections specify the exact semantics of process instance modification and should be read in order to understand the modification effects in varying circumstances. If not otherwise noted, the following examples refer to the following process model for illustration:
Modification Instruction Types
The fluent process instance modification builder offers the following instructions to be submitted:
startBeforeActivity(String activityId)startBeforeActivity(String activityId, String ancestorActivityInstanceId)startAfterActivity(String activityId)startAfterActivity(String activityId, String ancestorActivityInstanceId)startTransition(String transitionId)startTransition(String transition, String ancestorActivityInstanceId)cancelActivityInstance(String activityInstanceId)cancelTransitionInstance(String transitionInstanceId)cancelAllForActivity(String activityId)
Start Before an Activity
ProcessInstanceModificationBuilder#startBeforeActivity(String activityId)
ProcessInstanceModificationBuilder#startBeforeActivity(String activityId, String ancestorActivityInstanceId)
Starting before an activity via startBeforeActivity means that execution is started before entering the activity. The instruction respects an asyncBefore flag, meaning that a job will be created if the activity is asyncBefore. In general, this instruction executes the process model beginning with the specified activity until a wait state is reached. See the documentation on Transactions in Processes for details on wait states.
Start After an Activity
ProcessInstanceModificationBuilder#startAfterActivity(String activityId)
ProcessInstanceModificationBuilder#startAfterActivity(String activityId, String ancestorActivityInstanceId)
Starting after an activity via startAfterActivity means that execution is started on the single outgoing sequence flow of the activity. The instruction does not consider the asyncAfter flag of the given activity. If there is more than one outgoing sequence flow or none at all, the instruction fails. If successful, this instruction executes the process model beginning with the sequence flow until a wait state is reached.
Start a Transition
ProcessInstanceModificationBuilder#startTransition(String transitionId)
ProcessInstanceModificationBuilder#startTransition(String transition, String ancestorActivityInstanceId)
Starting a transition via startTransition translates to starting execution on a given sequence flow. This can be used in addition to startAfterActivity, when there is more than one outgoing sequence flow. If successful, this instruction executes the process model beginning with the sequence flow until a wait state is reached.
Cancel an Activity Instance
ProcessInstanceModificationBuilder#cancelActivityInstance(String activityInstanceId)A specific activity instance can be canceled by cancelActivityInstance. This can either be a leaf activity instance, such as an instance of a user task, as well as an instance of a scope higher in the hierarchy, such as an instance of a sub process. See the details on activity instances how to retrieve the activity instances of a process instance.
Cancel a Transition Instance
ProcessInstanceModificationBuilder#cancelTransitionInstance(String activityInstanceId)Transition instances represent execution flows that are about to enter/leave an activity in the form of an asynchronous continuation. An asynchronous continuation job that has already been created but not yet executed is represented as a transition instance. These instances can be canceled by cancelTransitionInstance. See the details on activity and transition instances how to retrieve the transition instances of a process instance.
Cancel All Activity Instances for an Activity
ProcessInstanceModificationBuilder#cancelAllForActivity(String activityId)For convenience, it is also possible to cancel all activity and transition instances of a given activity by the instruction cancelAllForActivity.
Providing Variables
With every instantiating instruction (i.e., startBeforeActivity, startAfterActivity, or startTransition), it is possible to submit process variables.
The API offers the methods
setVariable(String name, Object value)setVariables(Map<String, Object> variables)setVariableLocal(String name, Object value)setVariablesLocal(Map<String, Object> variables)
Variables are set after the necessary scopes for instantiation are created and before the actual execution of the specified element begins. That means, in the process engine history these variables do not appear as if they were set during execution of the specified activity for startBefore and startAfter instructions. Local variables are set on the execution that is about to perform the instruction, i.e., that enters the activity etc.
See the variables section of this guide for details on variables and scopes in general.
Activity-Instance-based API
The process instance modification API is based on activity instances. The activity instance tree of a process instance can be retrieved with the following method:
ProcessInstance processInstance = ...;
ActivityInstance activityInstance = runtimeService.getActivityInstance(processInstance.getId());
ActivityInstance is a recursive data structure where the activity instance returned by the above method call represents the process instance. The IDs of ActivityInstance objects can be used for cancelation of specific instances or for ancestor selection during instantiation.
The interface ActivityInstance has methods getChildActivityInstances and getChildTransitionInstances to drill down in the activity instance tree. For example, assume that the activities Assess Credit Worthiness and Register Application are active. Then the activity instance tree looks as follows:
ProcessInstance
  Evaluate Loan Application
    Assess Credit Worthiness
    Register Application Request
In code, the Assess and Register activity instances can be retrieved as follows:
ProcessInstance processInstance = ...;
ActivityInstance activityInstance = runtimeService.getActivityInstance(processInstance.getId());
ActivityInstance subProcessInstance = activityInstance.getChildActivityInstances()[0];
ActivityInstance[] leafActivityInstances = subProcessInstance.getChildActivityInstances();
// leafActivityInstances has two elements; one for each activity
It is also possible to directly retrieve all activity instances for a given activity:
ProcessInstance processInstance = ...;
ActivityInstance activityInstance = runtimeService.getActivityInstance(processInstance.getId());
ActivityInstance assessCreditWorthinessInstances = activityInstance.getActivityInstances("assessCreditWorthiness")[0];
Compared to activity instances, transition instances do not represent active activities but activities that are about to be entered or about to be left. This is the case when jobs for asynchronous continuations exist but have not been executed yet. For an activity instance, child transition instances can be retrieved with the method getChildTransitionInstances and the API for transition instances is similar to that for activity instances.
Nested Instantiation
Assume a process instance of the above example process where the activity Decline Loan Application is active. Now we submit the instruction to start before the activity Assess Credit Worthiness. When applying this instruction, the process engine makes sure to instantiate all parent scopes that are not active yet. In this case, before starting the activity, the process engine instantiates the Evaluate Loan Application sub process. Where before the activity instance tree was
ProcessInstance
  Decline Loan Application
it now is
ProcessInstance
  Decline Loan Application
  Evaluate Loan Application
    Assess Credit Worthiness
Apart from instantiating these parent scopes, the engine also ensures to register the event subscriptions and jobs in these scopes. For example, consider the following process:
Starting the activity Assess Credit Worthiness also registers an event subscription for the message boundary event Cancelation Notice Received such that it is possible to cancel the sub process this way.
Ancestor Selection for Instantiation
By default, starting an activity instantiates all parent scopes that are not instantiated yet. When the activity instance tree is the following:
ProcessInstance
  Decline Loan Application
Then starting Assess Credit Worthiness results in this updated tree:
ProcessInstance
  Decline Loan Application
  Evaluate Loan Application
    Assess Credit Worthiness
The sub process scope has been instantiated as well. Now assume that the sub process is already instantiated, such as in the following tree:
ProcessInstance
  Evaluate Loan Application
    Assess Credit Worthiness
Starting Assess Credit Worthiness again will start it in the context of the existing sub process instance, such that the resulting tree is:
ProcessInstance
  Evaluate Loan Application
    Assess Credit Worthiness
    Assess Credit Worthiness
If you want to avoid this behavior and instead want to instantiate the sub process a second time, an id of an ancestor activity instance can be supplied by using the method startBeforeActivity(String activityId, String ancestorActivityInstanceId) - similar methods exist for starting after an activity and starting a transition. The parameter ancestorActivityInstanceId takes the id of an activity instance that is currently active and that belongs to an ancestor activity of the activity to be started. An activity is a valid ancestor, if it contains the activity to be started (either directly, or indirectly with other activities in between).
With a given ancestor activity instance id, all scopes in between the ancestor activity and the activity to be started will be instantiated, regardless of whether they are already instantiated. In the example, the following code starts the activity Assess Credit Worthiness with the process instance (being the root activity instance) as the ancestor:
ProcessInstance processInstance = ...;
ActivityInstance activityInstanceTree = runtimeService.getActivityInstance(processInstance.getId());
runtimeService.createProcessInstanceModification(activityInstanceTree.getId())
  .startBeforeActivity("assessCreditWorthiness", processInstance.getId())
  .execute();
Then, the resulting activity instance tree is the following:
ProcessInstance
  Evaluate Loan Application
    Assess Credit Worthiness
  Evaluate Loan Application
    Assess Credit Worthiness
The sub process was started a second time.
Cancelation Propagation
Canceling an activity instance propagates to parent activity instances that do not contain other activity instances. This behavior ensures that the process instance is not left in an execution state that makes no sense. This means, when a single activity is active in a sub process and that activity instance is canceled, the sub process is canceled as well. Consider the following activity instance tree:
ProcessInstance
  Decline Loan Application
  Evaluate Loan Application
    Assess Credit Worthiness
After canceling the activity instance for Assess Credit Worthiness, the tree is:
ProcessInstance
  Decline Loan Application
If all instructions have been executed and there is no active activity instance left, the entire process instance is canceled. This would be the case in the example above if both activity instances were canceled, the one for Assess Credit Worthiness and the one for Decline Loan Application.
However, the process instance is only canceled after all instructions have been executed. That means, if the process instance has no active activity instances between two instructions the process instance is not immediately canceled. As an example, assume that the activity Decline Loan Application is active. The activity instance tree is:
ProcessInstance
  Decline Loan Application
The following modification operation succeeds although the process instance has no active activity instance directly after the cancelation instruction has been executed:
ProcessInstance processInstance = ...;
runtimeService.createProcessInstanceModification(processInstance.getId())
  .cancelAllForActivity("declineLoanApplication")
  .startBeforeActivity("acceptLoanApplication")
  .execute();
Instruction Execution Order
Modification instructions are always executed in the order they are submitted. Thus, performing the same instructions in a different order can make a difference. Consider the following activity instance tree:
ProcessInstance
  Evaluate Loan Application
    Assess Credit Worthiness
Assume you have the task of canceling the instance of Assess Credit Worthiness and starting the activity Register Application. There are two orderings for these two instructions: Either the cancelation is performed first, or the instantiation is performed first. In the former case, the code looks as follows:
ProcessInstance processInstance = ...;
runtimeService.createProcessInstanceModification(processInstance.getId())
  .cancelAllForActivity("assesCreditWorthiness")
  .startBeforeActivity("registerApplication")
  .execute();
Due to cancelation propagation, the sub process instance is canceled when the cancelation instruction is executed only to be re-instantiated when the instantiation instruction is executed. This means, after the modification has been executed, there is a different instance of the Evaluate Loan Application sub process. Any entities associated with the previous instance have been removed, such as variables or event subscriptions.
In contrast, consider the case where the instantiation is performed first:
ProcessInstance processInstance = ...;
runtimeService.createProcessInstanceModification(processInstance.getId())
  .startBeforeActivity("registerApplication")
  .cancelAllForActivity("assesCreditWorthiness")
  .execute();
Due to the default ancestor selection during instantiation and the fact that cancelation does not propagate to the sub process instance in this case, the sub process instance is the same after modification as it was before. Related entities like variables and event subscriptions are preserved.
Starting Activities with Interrupting/Canceling Semantics
Process instance modification respects any interrupting or canceling semantics of the activities to be started. In particular, starting an interrupting boundary event or an interrupting event sub process will cancel/interrupt the activity it is defined on/in. Consider the following process:
Assume that the activity Assess Credit Worthiness is currently active. The event sub process can be started with the following code:
ProcessInstance processInstance = ...;
runtimeService.createProcessInstanceModification(processInstance.getId())
  .startBeforeActivity("cancelEvaluation")
  .execute();
Since the start event of the Cancel Evaluation sub process is interrupting, it will cancel the running instance of Assess Credit Worthiness. The same happens when the start event of the event subprocess is started via:
ProcessInstance processInstance = ...;
runtimeService.createProcessInstanceModification(processInstance.getId())
  .startBeforeActivity("eventSubProcessStartEvent")
  .execute();
However, when an activity located in the event sub process is directly started, the interruption is not executed. Consider the following code:
ProcessInstance processInstance = ...;
runtimeService.createProcessInstanceModification(processInstance.getId())
  .startBeforeActivity("notifyAccountant")
  .execute();
The resulting activity instance tree would be:
ProcessInstance
  Evaluate Loan Application
    Assess Credit Worthiness
    Cancel Evaluation
      Notify Accountant
Modifying Multi-Instance Activity Instances
Modification also works for multi-instance activities. We distinguish in the following between the multi-instance body and the inner activity. The inner activity is the actual activity and has the ID as declared in the process model. The multi-instance body is a scope around this activity that is not represented in the process model as a distinct element. For an activity with id anActivityId, the multi-instance body has by convention the id anActivityId#multiInstanceBody.
With this distinction, it is possible to start the entire multi-instance body, as well as start a single inner activity instance for a running parallel multi-instance activity. Consider the following process model:
Let's assume the multi-instance activity is active and has three instances:
ProcessInstance
  Contact Customer - Multi-Instance Body
    Contact Customer
    Contact Customer
    Contact Customer
The following modification starts a fourth instance of the Contact Customer activity in the same multi-instance body activity:
ProcessInstance processInstance = ...;
runtimeService.createProcessInstanceModification(processInstance.getId())
  .startBeforeActivity("contactCustomer")
  .execute();
The resulting activity instance tree is:
ProcessInstance
  Contact Customer - Multi-Instance Body
    Contact Customer
    Contact Customer
    Contact Customer
    Contact Customer
The process engine makes sure to update the multi-instance-related variables nrOfInstances, nrOfActiveInstances, and loopCounter correctly. If the multi-instance activity is configured based on a collection, the collection is not considered when the instruction is executed and the collection element variable will not be populated for the additional instance. Such behavior can be achieved by providing the collection element variable with the instantiation instruction by using the method #setVariableLocal.
Now consider the following request:
ProcessInstance processInstance = ...;
runtimeService.createProcessInstanceModification(processInstance.getId())
  .startBeforeActivity("contactCustomer#multiInstanceBody")
  .execute();
This starts the entire multi-instance body a second time, leading to the following activity instance tree:
ProcessInstance
  Contact Customer - Multi-Instance Body
    Contact Customer
    Contact Customer
    Contact Customer
    Contact Customer
  Contact Customer - Multi-Instance Body
    Contact Customer
    Contact Customer
    Contact Customer
Skip Listener and Input/Output Invocation
It is possible to skip invocations of execution and task listeners as well as input/output mappings for the transaction that performs the modification. This can be useful when the modification is executed on a system that has no access to the involved process application deployments and their contained classes. Listener and ioMapping invocations can be skipped by using the modification builder's method execute(boolean skipCustomListeners, boolean skipIoMappings).
Soundness Checks
Process instance modification is a very powerful tool and allows to start and cancel activities at will. Thus, it is easy to create situations that are unreachable by normal process execution. Assume the following process model:
Assume that activity Decline Loan Approval is active. With modification, the activity Assess Credit Worthiness can be started. After that activity is completed, execution gets stuck at the joining parallel gateway because there will never arrive a token at the other incoming sequence flow such that the parallel gateway is activated. This is one of the most obvious situations where the process instance cannot continue execution and there are certainly many others, depending on the concrete process model.
The process engine is not able to detect modifications that create such situations. It is up to the user of this API to make modifications that do not leave the process instance in an undesired state. However, process instance modification is also the tool to repair these situations :-)
Delegation Code
Delegation Code allows you to execute external Java code, evaluate expressions or scripts when certain events occur during process execution.
There are different types of Delegation Code:
- Java Delegates can be attached to a BPMN ServiceTask.
- Execution Listeners can be attached to any event within the normal token flow, e.g. starting a process instance or entering an activity.
- Task Listeners can be attached to events within the user task lifecycle, e.g. creation or completion of a user task.
You can create generic delegation code and configure this via the BPMN 2.0 XML using so called Field Injection.
Java Delegate
To implement a class that can be called during process execution, this class needs to implement the org.camunda.bpm.engine.delegate.JavaDelegate
interface and provide the required logic in the execute
method. When process execution arrives at this particular step, it
will execute this logic defined in that method and leave the activity
in the default BPMN 2.0 way.
As an example let's create a Java class that can be used to change a
process variable String to uppercase. This class needs to implement
the org.camunda.bpm.engine.delegate.JavaDelegate
interface, which requires us to implement the execute(DelegateExecution)
method. It's this operation that will be called by the engine and
which needs to contain the business logic. Process instance
information such as process variables and other information can be accessed and
manipulated through the DelegateExecution interface (click on the link for
a detailed Javadoc of its operations).
public class ToUppercase implements JavaDelegate {

  public void execute(DelegateExecution execution) throws Exception {
    String var = (String) execution.getVariable("input");
    var = var.toUpperCase();
    execution.setVariable("input", var);
  }

}
Each time a delegation class referencing activity is executed, a separate instance of this class will be created. This means that each time an activity is executed there will be used another instance of the class to call `execute(DelegateExecution)`.
The classes that are referenced in the process definition (i.e. by using
camunda:class ) are NOT instantiated
during deployment. Only when a process execution arrives at the point in the process where the class is used for the
first time, an instance of that class will be created. If the class cannot be found,
a ProcessEngineException will be thrown. The reason for this is that the environment (and
more specifically the classpath) when you are deploying is often different than the actual runtime
environment.
Activity Behavior
Instead of writing a Java Delegate is also possible to provide a class that implements the org.camunda.bpm.engine.impl.pvm.delegate.ActivityBehavior
interface. Implementations then have access to the more powerful ActivityExecution that for example also allows to influence the control flow of the process. However, note that this is not a very good practice and should be avoided as much as possible. So, it is advised to use the ActivityBehavior interface only for advanced use cases and if you know exactly what you're doing.
Field Injection
It's possible to inject values into the fields of the delegated classes. The following types of injection are supported:
- Fixed string values
- Expressions
If available, the value is injected through a public setter method on
your delegated class, following the Java Bean naming conventions (e.g.
field firstName has setter setFirstName(...)).
If no setter is available for that field, the value of private
member will be set on the delegate (but using private fields is not recommended - see warning below).
Regardless of the type of value declared in the process-definition, the type of the
setter/private field on the injection target should always be org.camunda.bpm.engine.delegate.Expression.
Private fields cannot always be modified! It does not work with e.g. CDI beans (because you have proxies instead of real objects) or with some SecurityManager configurations. Please always use a public setter-method for the fields you want to have injected!
The following code snippet shows how to inject a constant value into a field.
Field Injection is supported when using the extensionElements XML element before the actual field injection
declarations, which is a requirement of the BPMN 2.0 XML Schema.
<serviceTask id="javaService"
             name="Java service invocation"
             camunda:class="org.camunda.bpm.examples.bpmn.servicetask.ToUpperCaseFieldInjected">
  <extensionElements>
      <camunda:field name="text" stringValue="Hello World" />
  </extensionElements>
</serviceTask>
The class ToUpperCaseFieldInjected has a field
text which is of type org.camunda.bpm.engine.delegate.Expression.
When calling text.getValue(execution), the configured string value
Hello World will be returned.
Alternatively, for longs texts (e.g. an inline e-mail) the camunda:string sub element can be
used:
<serviceTask id="javaService"
             name="Java service invocation"
             camunda:class="org.camunda.bpm.examples.bpmn.servicetask.ToUpperCaseFieldInjected">
  <extensionElements>
    <camunda:field name="text">
        <camunda:string>
          Hello World
      </camunda:string>
    </camunda:field>
  </extensionElements>
</serviceTask>
To inject values that are dynamically resolved at runtime, expressions
can be used. Those expressions can use process variables, CDI or Spring
beans. As already noted, a separate instance of the Java class will be created
each time the service task is executed. To have dynamic injection of
values in fields, you can inject value and method expressions in an
org.camunda.bpm.engine.delegate.Expression
which can be evaluated/invoked using the DelegateExecution
passed in the execute method.
<serviceTask id="javaService" name="Java service invocation"
             camunda:class="org.camunda.bpm.examples.bpmn.servicetask.ReverseStringsFieldInjected">

  <extensionElements>
    <camunda:field name="text1">
      <camunda:expression>${genderBean.getGenderString(gender)}</camunda:expression>
    </camunda:field>
    <camunda:field name="text2">
       <camunda:expression>Hello ${gender == 'male' ? 'Mr.' : 'Mrs.'} ${name}</camunda:expression>
    </camunda:field>
  </extensionElements>
</serviceTask>
The example class below uses the injected expressions and resolves
them using the current DelegateExecution.
public class ReverseStringsFieldInjected implements JavaDelegate {

  private Expression text1;
  private Expression text2;

  public void execute(DelegateExecution execution) {
    String value1 = (String) text1.getValue(execution);
    execution.setVariable("var1", new StringBuffer(value1).reverse().toString());

    String value2 = (String) text2.getValue(execution);
    execution.setVariable("var2", new StringBuffer(value2).reverse().toString());
  }
}
Alternatively, you can also set the expressions as an attribute instead of a child-element, to make the XML less verbose.
<camunda:field name="text1" expression="${genderBean.getGenderString(gender)}" />
<camunda:field name="text2" expression="Hello ${gender == 'male' ? 'Mr.' : 'Mrs.'} ${name}" />
The injection happens each time the service task is called since a separate instance of the class will be created. When the fields are altered by your code, the values will be re-injected when the activity is executed next time.
Execution Listener
Execution listeners allow you to execute external Java code or evaluate an expression when certain events occur during process execution. The events that can be captured are:
- Start and end of a process instance.
- Taking a transition.
- Start and end of an activity.
- Start and end of a gateway.
- Start and end of intermediate events.
- Ending a start event or starting an end event.
The following process definition contains 3 execution listeners:
<process id="executionListenersProcess">
  <extensionElements>
    <camunda:executionListener
        event="start"
        class="org.camunda.bpm.examples.bpmn.executionlistener.ExampleExecutionListenerOne" />
  </extensionElements>

  <startEvent id="theStart" />

  <sequenceFlow sourceRef="theStart" targetRef="firstTask" />

  <userTask id="firstTask" />

  <sequenceFlow sourceRef="firstTask" targetRef="secondTask">
    <extensionElements>
      <camunda:executionListener>
        <camunda:script scriptFormat="groovy">
          println execution.eventName
        </camunda:script>
      </camunda:executionListener>
    </extensionElements>
  </sequenceFlow>

  <userTask id="secondTask">
    <extensionElements>
      <camunda:executionListener expression="${myPojo.myMethod(execution.eventName)}" event="end" />
    </extensionElements>
  </userTask>

  <sequenceFlow sourceRef="secondTask" targetRef="thirdTask" />

  <userTask id="thirdTask" />

  <sequenceFlow sourceRef="thirdTask" targetRef="theEnd" />

  <endEvent id="theEnd" />
</process>
The first execution listener is notified when the process starts. The listener is an external Java-class (like ExampleExecutionListenerOne) and should implement the org.camunda.bpm.engine.delegate.ExecutionListener interface. When the event occurs (in this case end event) the method notify(DelegateExecution execution) is called.
public class ExampleExecutionListenerOne implements ExecutionListener {

  public void notify(DelegateExecution execution) throws Exception {
    execution.setVariable("variableSetInExecutionListener", "firstValue");
    execution.setVariable("eventReceived", execution.getEventName());
  }
}
It is also possible to use a delegation class that implements the org.camunda.bpm.engine.delegate.JavaDelegate interface. These delegation classes can then be reused in other constructs, such as a delegation for a serviceTask.
The second execution listener is called when the transition is taken. Note that the listener element doesn't define an event, since only take events are fired on transitions. Values in the event attribute are ignored when a listener is defined on a transition. Also it contains a camunda:script child element which defines a script which will be executed as execution listener. Alternatively it is possible to specify the script source code as external resources (see the documenation about script sources of script tasks).
The last execution listener is called when activity secondTask ends. Instead of using the class on the listener declaration, a expression is defined instead which is evaluated/invoked when the event is fired.
<camunda:executionListener expression="${myPojo.myMethod(execution.eventName)}" event="end" />As with other expressions, execution variables are resolved and can be used. Because the execution implementation object has a property that exposes the event name, it's possible to pass the event-name to your methods using execution.eventName.
Execution listeners also support using a delegateExpression, similar to a service task.
<camunda:executionListener event="start" delegateExpression="${myExecutionListenerBean}" />Task Listener
A task listener is used to execute custom Java logic or an expression upon the occurrence of a certain task-related event.
A task listener can only be added in the process definition as a child element of a user task. Note that this also must happen as a child of the BPMN 2.0 extensionElements and in the camunda namespace, since a task listener is a construct specifically for the camunda engine.
<userTask id="myTask" name="My Task" >
  <extensionElements>
    <camunda:taskListener event="create" class="org.camunda.bpm.MyTaskCreateListener" />
  </extensionElements>
</userTask>
A task listener supports following attributes:
- event (required): the type of task event on which the task listener will be invoked. Possible events are:
- create: occurs when the task has been created and all task properties are set.
- assignment: occurs when the task is assigned to somebody. Note: when process execution arrives in a userTask, first an assignment event will be fired, before the create event is fired. This might seem like an unnatural order but the reason is pragmatic: when receiving the create event, we usually want to inspect all properties of the task including the assignee.
- complete: occurs when the task is completed and just before the task is deleted from the runtime data.
- delete: occurs just before the task is deleted from the runtime data.
class: the delegation class that must be called. This class must implement the
org.camunda.bpm.engine.impl.pvm.delegate.TaskListenerinterface.public class MyTaskCreateListener implements TaskListener { public void notify(DelegateTask delegateTask) { // Custom logic goes here } }It is also possible to use Field Injection to pass process variables or the execution to the delegation class. Note that each time a delegation class referencing activity is executed, a separate instance of this class will be created.
expression: (cannot be used together with the class attribute): specifies an expression that will be executed when the event happens. It is possible to pass the DelegateTask object and the name of the event (using task.eventName) as parameter to the called object.
<camunda:taskListener event="create" expression="${myObject.callMethod(task, task.eventName)}" />delegateExpression: allows to specify an expression that resolves to an object implementing the TaskListener interface, similar to a service task.
<camunda:taskListener event="create" delegateExpression="${myTaskListenerBean}" />
Besides the class, expression and delegateExpression attribute a
camunda:script child element can be used to specify a script as task listener.
Also an external script resource can be declared with the resource attribute of the
camunda:script element (see the documenation about script sources of script
tasks).
<userTask id="task">
  <extensionElements>
    <camunda:taskListener event="create">
      <camunda:script scriptFormat="groovy">
        println task.eventName
      </camunda:script>
    </camunda:taskListener>
  </extensionElements>
</userTask>
Field Injection on Listener
When using listeners configured with the class attribute, Field Injection can be applied. This is exactly the same mechanism as described for Java Delegates, which contains an overview of the possibilities provided by field injection.
The fragment below shows a simple example process with an execution listener with fields injected:
<process id="executionListenersProcess">
  <extensionElements>
    <camunda:executionListener class="org.camunda.bpm.examples.bpmn.executionListener.ExampleFieldInjectedExecutionListener" event="start">
      <camunda:field name="fixedValue" stringValue="Yes, I am " />
      <camunda:field name="dynamicValue" expression="${myVar}" />
    </camunda:executionListener>
  </extensionElements>

  <startEvent id="theStart" />
  <sequenceFlow sourceRef="theStart" targetRef="firstTask" />

  <userTask id="firstTask" />
  <sequenceFlow sourceRef="firstTask" targetRef="theEnd" />

  <endEvent id="theEnd" />
</process>
The actual listener implementation may look as follows:
public class ExampleFieldInjectedExecutionListener implements ExecutionListener {

  private Expression fixedValue;

  private Expression dynamicValue;

  public void notify(DelegateExecution execution) throws Exception {
    String value =
      fixedValue.getValue(execution).toString() +
      dynamicValue.getValue(execution).toString();

    execution.setVariable("var", value);
  }
}
The class ExampleFieldInjectedExecutionListener concatenates the 2 injected fields (one fixed and the other dynamic) and stores this in the process variable var.
@Deployment(resources = {
  "org/camunda/bpm/examples/bpmn/executionListener/ExecutionListenersFieldInjectionProcess.bpmn20.xml"
})
public void testExecutionListenerFieldInjection() {
  Map<String, Object> variables = new HashMap<String, Object>();
  variables.put("myVar", "listening!");

  ProcessInstance processInstance = runtimeService.startProcessInstanceByKey("executionListenersProcess", variables);

  Object varSetByListener = runtimeService.getVariable(processInstance.getId(), "var");
  assertNotNull(varSetByListener);
  assertTrue(varSetByListener instanceof String);

  // Result is a concatenation of fixed injected field and injected expression
  assertEquals("Yes, I am listening!", varSetByListener);
}
Accessing process engine services
It is possible to access the public API services (RuntimeService, TaskService, RepositoryService ...) from the delegation code. The following is an example showing
how to access the TaskService from a JavaDelegate implementation.
public class DelegateExample implements JavaDelegate {

  public void execute(DelegateExecution execution) throws Exception {
    TaskService taskService = execution.getProcessEngineServices().taskService();
    taskService.createTaskQuery()...;
  }

}
Throwing BPMN Errors from Delegation Code
In the above example the error event is attached to a Service Task. In order to get this to work the Service Task has to throw the corresponding error. This is done by using a provided Java exception class from within your Java code (e.g. in the JavaDelegate):
public class BookOutGoodsDelegate implements JavaDelegate {

  public void execute(DelegateExecution execution) throws Exception {
    try {
        ...
    } catch (NotOnStockException ex) {
        throw new BpmnError(NOT_ON_STOCK_ERROR);
    }
  }

}
Expression Language
camunda BPM supports Unified Expression Language (EL), specified as part of the JSP 2.1 standard (JSR-245). It therefore uses the open source JUEL implementation. To get more general information about the usage of Expression Language please read the official documentation. Especially the provided examples give a good overview of the syntax of expressions.
Within Camunda BPM, EL can be used in many circumstances to evaluate small script-like expressions. The following table provides an overview of the BPMN elements which support usage of EL.
| BPMN element | EL support |
|---|---|
| Service Task, Business Rule Task, Send Task, Message Intermediate Throwing Event, Message End Event, Execution Listener and Task Listener | Expression language as delegation code |
| Sequence Flows | Expression language as condition expression of a sequence flow |
| All Tasks, All Events, Transaction, Subprocess and Connector | Expression language inside an inputOutput parameter mapping |
| Different Elements | Expression language as the value of an attribute or element |
Use Expression Language as Delegation Code
Besides Java code, Camunda BPM also supports the evaluation of expressions as delegation code. For general information about delegation code, see the corresponding section.
Two types of expressions are currently supported: camunda:expression and
camunda:delegateExpression.
With camunda:expression it is possible to evaluate a value expression or to invoke
a method expression. You can use special variables which are available inside an expression or
Spring and CDI beans. For more information about variables and Spring, respectively CDI beans,
please see the corresponding sections.
<process id="process">
  <extensionElements>
    <!-- execution listener which uses an expression to set a process variable -->
    <camunda:executionListener event="start" expression="${execution.setVariable('test', 'foo')}" />
  </extensionElements>

  <!-- ... -->

  <userTask id="userTask">
    <extensionElements>
      <!-- task listener which calls a method of a bean with current task as parameter -->
      <camunda:taskListener event="complete" expression="${myBean.taskDone(task)}" />
    </extensionElements>
  </userTask>

  <!-- ... -->

  <!-- service task which evaluates an expression and saves it in a result variable -->
  <serviceTask id="serviceTask"
      camunda:expression="${myBean.ready}" camunda:resultVariable="myVar" />

  <!-- ... -->

</process>
The attribute camunda:delegateExpression is used for expressions which evaluate to a delegate
object. This delegate object must implement either the JavaDelegate or ActivityBehavior
interface.
<!-- service task which calles a bean implementing the JavaDelegate interface -->
<serviceTask id="task1" camunda:delegateExpression="${myBean}" />

<!-- service task which calles a method which returns delegate object -->
<serviceTask id="task2" camunda:delegateExpression="${myBean.createDelegate()}" />
Use Expression Language as Conditions
To use conditional sequence flows, expression language is usually used. Therefore, a
conditionExpression element of a sequence flow of the type tFormalExpression has to be used.
The text content of the element is the expression to be evaluated.
Inside the expression some special variables are available which enable the access of the current context. To find more information about the available variables please see the corresponding section.
The following example shows the usage of expression language as condition of a sequence flow:
<sequenceFlow>
  <conditionExpression xsi:type="tFormalExpression">
    ${test == 'foo'}
  </conditionExpression>
</sequenceFlow>
Use Expression Language as inputOutput Parameters
With the camunda inputOutput extension element you can map an inputParameter or outputParameter
with expression language.
Inside the expression some special variables are available which enable the access of the current context. To find more information about the available variables please see the corresponding section.
The following example shows an inputParameter which uses expression language to call a method of
a bean.
<serviceTask id="task" camunda:class="org.camunda.bpm.example.SumDelegate">
  <extensionElements>
    <camunda:inputOutput>
      <camunda:inputParameter name="x">
        ${myBean.calculateX()}
      </camunda:inputParameter>
    </camunda:inputOutput>
  </extensionElements>
</serviceTask>
Use Expression Language as Value
Different BPMN and CMMN elements allow to specify their content or an attribute value by an expression. Please see the corresponding sections for BPMN and CMMN in the references for more detailed examples.
Variables and functions available inside expression language
Process variables
All process variables of the current scope are directly available inside an expression. So a conditional sequence flow can directly check a variable value:
<sequenceFlow>
  <conditionExpression xsi:type="tFormalExpression">
    ${test == 'start'}
  </conditionExpression>
</sequenceFlow>
Internal context variables
Depending on the current execution context, special built-in context variables are available while evaluating expressions:
| Variable | Java Type | Context |
|---|---|---|
execution |
DelegateExecution |
Available in a BPMN execution context like a service task, execution listener or sequence flow. |
task |
DelegateTask |
Available in a task context like a task listener. |
caseExecution |
DelegateCaseExecution |
Available in a CMMN execution context. |
authenticatedUserId |
String |
The id of the currently authenticated user. Only returns a value if the id of the currently
authenticated user has been set through the corresponding methods of the
IdentityService. Otherwise it returns null.
|
The following example shows an expression which sets the variable test to the current
event name of an execution listener.
<camunda:executionListener event="start"
  expression="${execution.setVariable('test', execution.eventName)}" />
External context variables with Spring and CDI
If the process engine is integrated with Spring or CDI, it is possible to access Spring and CDI
beans inside of expressions. Please see the corresponding sections for Spring and CDI
for more information. The following example shows the usage of a bean which implements the
JavaDelegate interface as delegateExecution.
<serviceTask id="task1" camunda:delegateExpression="${myBean}" />With the expression attribute any method of a bean can be called.
<serviceTask id="task2" camunda:expression="${myBean.myMethod(execution)}" />Internal context functions
Special built-in context functions are available while evaluating expressions:
| Function | Return Type | Description |
|---|---|---|
currentUser() |
String |
Returns the user id of the currently authenticated user or null no user is authenticated at the moment.
|
currentUserGroups() |
List of Strings |
Returns a list of the group ids of the currently authenticated user or null if no user is authorized at the moment.
|
now() |
Date |
Returns the current date as a Java Date object. |
dateTime() |
DateTime |
Returns a Joda-Time DateTime object of the current date. Please see the Joda-Time documentation for all available functions. |
The following example sets the due date of a user task to the date 3 days after the creation of the task.
<userTask id="theTask" name="Important task" camunda:dueDate="${dateTime().plusDays(3).toDate()}"/>Built-in Camunda Spin functions
If the Camunda Spin process engine plugin is activated, the Spin functions S,
XML and JSON are also available inside of an expression. See the Data Formats section for a detailed explanation.
<serviceTask id="task" camunda:expression="${XML(xml).attr('test').value()}" resultVariable="test" />Scripting
camunda BPM supports scripting with JSR-223 compatible script engine implementations. Currently we test the integration for Groovy, Javascript, JRuby and Jython. To use a scripting engine it is necessary to add the corresponding jar to the classpath.
Javascript is part of the Java Runtime (JRE) and thus available out ot the box. We include Groovy in the pre-packaged camunda distributions.
The following table provides an overview of the BPMN elements which support the execution of scripts.
| BPMN element | Script support |
|---|---|
| Script Task | Script inside a script task |
| Process, Activities, Sequence Flows, Gateways and Events | Script as an execution listener |
| User Tasks | Script as a task listener |
| Sequence Flows | Script as condition expression of a sequence flow |
| All Tasks, All Events, Transaction, Subprocess and Connector | Script inside an inputOutput parameter mapping |
Use Script Tasks
With a BPMN 2.0 script task you can add a script to your BPM process (see for more information the BPMN 2.0 reference).
The following process is a simple example with a Groovy script task that sums up the elements of an array.
<?xml version="1.0" encoding="UTF-8"?>
<definitions xmlns="http://www.omg.org/spec/BPMN/20100524/MODEL"
                   targetNamespace="http://camunda.org/example">
  <process id="process" isExecutable="true">
    <startEvent id="start"/>
    <sequenceFlow id="sequenceFlow1" sourceRef="start" targetRef="task"/>
    <scriptTask id="task" name="Groovy Script" scriptFormat="groovy">
      <script>
        <![CDATA[
        sum = 0

        for ( i in inputArray ) {
          sum += i
        }

        println "Sum: " + sum
        ]]>
      </script>
    </scriptTask>
    <sequenceFlow id="sequenceFlow2" sourceRef="task" targetRef="end"/>
    <endEvent id="end"/>
  </process>
</definitions>
To start the process a variable inputArray is necessary.
Map<String, Object> variables = new HashMap<String, Object>();
variables.put("inputArray", new Integer[]{5, 23, 42});
runtimeService.startProcessInstanceByKey("process", variables);
Use Scripts as Execution Listeners
Besides Java code and expression language, camunda BPM also supports the execution of a script as an execution listener. For general information about execution listeners see the corresponding section.
To use a script as an execution listener, a camunda:script element has to be added as a child
element of the camunda:executionListener element. During script evaluation, the variable execution is
available, which corresponds to the DelegateExecution interface.
The following example shows usage of scripts as execution listeners.
<process id="process" isExecutable="true">
  <extensionElements>
    <camunda:executionListener event="start">
      <camunda:script scriptFormat="groovy">
        println "Process " + execution.eventName + "ed"
      </camunda:script>
    </camunda:executionListener>
  </extensionElements>

  <startEvent id="start">
    <extensionElements>
      <camunda:executionListener event="end">
        <camunda:script scriptFormat="groovy">
          println execution.activityId + " " + execution.eventName + "ed"
        </camunda:script>
      </camunda:executionListener>
    </extensionElements>
  </startEvent>
  <sequenceFlow id="flow1" startRef="start" targetRef="task">
    <extensionElements>
      <camunda:executionListener>
        <camunda:script scriptFormat="groovy" resource="org/camunda/bpm/transition.groovy" />
      </camunda:executionListener>
    </extensionElements>
  </sequenceFlow>

  <!--
    ... remaining process omitted
  -->
</process>
Use Scripts as Task Listeners
Similar to execution listeners, task listeners can also be implemented as scripts. For general information about execution listeners see the corresponding section.
To use a script as a task listener, a camunda:script element has to be added as a child element of
the camunda:taskListener. Inside the script, the variable task is available, which corresponds to
the DelegateTask interface.
The following example shows usage of scripts as task listeners.
<userTask id="userTask">
  <extensionElements>
    <camunda:taskListener event="create">
      <camunda:script scriptFormat="groovy">println task.eventName</camunda:script>
    </camunda:taskListener>
    <camunda:taskListener event="assignment">
      <camunda:script scriptFormat="groovy" resource="org/camunda/bpm/assignemnt.groovy" />
    </camunda:taskListener>
  </extensionElements>
</userTask>
Use Scripts as Conditions
As an alternative to expression language, camunda BPM allows you to use scripts as
conditionExpression of conditional sequence flows. To do that, the language attribute of the
conditionExpression element has to be set to the desired scripting language. The script source code
is the text content of the element, as with expression language. Another way to specify the script
source code is to define an external source as described in the script source section.
The following example shows usage of scripts as conditions. The Groovy variable status is a
process variable which is available inside the script.
<sequenceFlow>
  <conditionExpression xsi:type="tFormalExpression" language="groovy">
    status == 'closed'
  </conditionExpression>
</sequenceFlow>

<sequenceFlow>
  <conditionExpression xsi:type="tFormalExpression" language="groovy"
      camunda:resource="org/camunda/bpm/condition.groovy" />
</sequenceFlow>
Use Scripts as inputOutput Parameters
With the Camunda inputOutput extension element you can map an inputParameter or outputParameter
with a script. The following example process uses the Groovy script from the previous example to assign
the Groovy variable sum to the process variable x for a Java delegate.
Please note that the last statement of the script is returned. This applies to Groovy,
Javascript and JRuby but not to Jython. If you want to use Jython, your script has to be a
single expression like a + b or a > b where a and
b are already process variables. Otherwise, the Jython scripting engine will
not return a value.
<?xml version="1.0" encoding="UTF-8"?>
<definitions xmlns="http://www.omg.org/spec/BPMN/20100524/MODEL"
                   xmlns:camunda="http://activiti.org/bpmn"
                   targetNamespace="http://camunda.org/example">
  <process id="process" isExecutable="true">
    <startEvent id="start"/>
    <sequenceFlow id="sequenceFlow1" sourceRef="start" targetRef="task"/>
    <serviceTask id="task" camunda:class="org.camunda.bpm.example.SumDelegate">
      <extensionElements>
        <camunda:inputOutput>
          <camunda:inputParameter name="x">
             <camunda:script scriptFormat="groovy">
              <![CDATA[

              sum = 0

              for ( i in inputArray ) {
                sum += i
              }

              sum
              ]]>
            </camunda:script>
          </camunda:inputParameter>
        </camunda:inputOutput>
      </extensionElements>
    </serviceTask>
    <sequenceFlow id="sequenceFlow2" sourceRef="task" targetRef="end"/>
    <endEvent id="end"/>
  </process>
</definitions>
After the script has assigned a value to the sum variable, x can be used inside the Java delegate
code.
public class SumDelegate implements JavaDelegate {

  public void execute(DelegateExecution execution) throws Exception {
    Integer x = (Integer) execution.getVariable("x");

    // do something
  }

}
The script source code can also be loaded from an external resource in the same way as described for script tasks.
<camunda:inputOutput>
  <camunda:inputParameter name="x">
     <camunda:script scriptFormat="groovy" resource="org/camunda/bpm/example/sum.groovy"/>
  </camunda:inputParameter>
</camunda:inputOutput>
Script Engine Caching
Whenever the process engine reaches a point where a script has to be executed, the process engine looks up for a Script Engine by a language name. The default behavior is that when it is the first request a new Script Engine is created. If the Script Engine declares to be thread safe it is also cached. The caching prevents the process engine from creating a new Script Engine for each request for the same script language.
By default the caching of Script Engines happens at Process Application level. So that each Process Application holds an own instance of a Script Engine for a given language. This behavior can be disabled by setting the process engine configuration flag named enableFetchScriptEngineFromProcessApplication to false. In consequence, the Script Engines are cached globally at process engine level and they are shared between each Process Application. For further details about the process engine configuration flag enableFetchScriptEngineFromProcessApplication please read the section about referencing process application classes.
If it is not desired to cache Script Engines in general, it can be disabled by setting the process engine configuration flag name enableScriptEngineCaching to false.
Script Compilation
Most script engines compile script source code either to a Java class or to a different
intermediary format prior to executing the script. Script engines implementing the Java Compilable
interface allow programs to retrieve and cache the script compilation. The default setting of the
process engine is to check if a Script Engine supports the compile feature. If true and the caching of Script Engines is enabled, the script engine compiles the script and then cache the compilation result. This prevents the process engine from compiling a script source each time the same script task is executed.
By default, compilation of scripts is enabled. If you need to disable script compilation, you can set the process engine configuration flag named enableScriptCompilation to false.
Load Script Engine
If the process engine configuration flag named enableFetchScriptEngineFromProcessApplication is set to true, it is also possible to load Script Engines from the classpath of the process application. Therefore the Script Engine can be packaged as a library within the process application. It is also possible to install the Script Engine globally as well.
In case the Script Engine module should be installed globally and a Jboss is used, it is necessary to add a module dependency to the Script Engine. This can be done by adding a jboss-deployment-structure.xml to the process application for example:
<?xml version="1.0" encoding="UTF-8"?>
<jboss-deployment-structure>
  <deployment>
    <dependencies>
      <module name="org.codehaus.groovy.groovy-all"
              services="import" />
    </dependencies>
  </deployment>
</jboss-deployment-structure>
Reference Process Application Provided Classes
The script can reference to process application provided classes by importing them like in the following groovy script example.
import my.process.application.CustomClass

sum = new CustomClass().calculate()
execution.setVariable('sum', sum)
In order to avoid possible class loading problems during the script execution it is recommended to set the process engine configuration flag name enableFetchScriptEngineFromProcessApplication to true.
Be aware that the process engine flag enableFetchScriptEngineFromProcessApplication is only relevant in a shared engine scenario.
Variables available during Script Execution
During the execution of scripts, all process variables visible in the current scope are available.
They can be accessed directly by the name of the variable (i.e. sum). This does not apply for
JRuby where you have to access the variable as a ruby global variable (prepend with a dollar sign,
i.e. $sum)
There are also special variables like execution which is always available if the script is
executed in an execution scope (e.g. in a script task), task which is available if the script is
executed in a task scope (e.g. a task listener) and connector which is available if the script is
executed in a connector variable scope (e.g. outputParameter of a camunda:connector). These
variables correspond to the DelegateExecution, DelegateTask or resp. ConnectorVariableScope
interface which means that it can be used to get and set variables or access process engine services.
// get process variable
sum = execution.getVariable('x')

// set process variable
execution.setVariable('y', x + 15)

// get task service and query for task
task = execution.getProcessEngineServices().getTaskService()
  .createTaskQuery()
  .taskDefinitionKey("task")
  .singleResult()
Script Source
The standard way to specify the script source code in the BPMN XML model is to add it directly to the XML file. Nonetheless, camunda BPM provides additional ways to specify the script source.
If you use another scripting language than Expression Language, you can also specify the script source as an expression which returns the source code to be executed. This way, the source code can, for example, be contained in a process variable.
In the following example snippet the process engine will evaluate the expression ${sourceCode} in
the current context every time the element is executed.
<!-- inside a script task -->
<scriptTask scriptFormat="groovy">
  <script>${sourceCode}</script>
</scriptTask>

<!-- as an execution listener -->
<camunda:executionListener>
  <camunda:script scriptFormat="groovy">${sourceCode}</camunda:script>
</camunda:executionListener>

<!-- as a condition expression -->
<sequenceFlow id="flow" sourceRef="theStart" targetRef="theTask">
  <conditionExpression xsi:type="tFormalExpression" language="groovy">
    ${sourceCode}
  </conditionExpression>
</sequenceFlow>

<!-- as an inputOutput mapping -->
<camunda:inputOutput>
  <camunda:inputParameter name="x">
    <camunda:script scriptFormat="groovy">${sourceCode}</camunda:script>
  </camunda:inputParameter>
</camunda:inputOutput>
You can also specify the attribute camunda:resource on the scriptTask and conditionExpression
element, respectively the resource attribute on the camunda:script element. This extension
attribute specifies the location of an external resource which should be used as script source code.
Optionally, the resource path can be prefixed with an URL-like scheme to specify if the resource is
contained in the deployment or classpath. The default behaviour is that the resource is part of the
classpath. This means that the first two script task elements in the following examples are equal.
<!-- on a script task -->
<scriptTask scriptFormat="groovy" camunda:resource="org/camunda/bpm/task.groovy"/>
<scriptTask scriptFormat="groovy" camunda:resource="classpath://org/camunda/bpm/task.groovy"/>
<scriptTask scriptFormat="groovy" camunda:resource="deployment://org/camunda/bpm/task.groovy"/>

<!-- in an execution listener -->
<camunda:executionListener>
  <camunda:script scriptFormat="groovy" resource="deployment://org/camunda/bpm/listener.groovy"/>
</camunda:executionListener>

<!-- on a conditionExpression -->
<conditionExpression xsi:type="tFormalExpression" language="groovy"
    camunda:resource="org/camunda/bpm/condition.groovy" />

<!-- in an inputParameter -->
<camunda:inputParameter name="x">
  <camunda:script scriptFormat="groovy" resource="org/camunda/bpm/mapX.groovy" />
</camunda:inputParameter>
The resource path can also be specified as an expression which is evaluated on the invocation of the script task.
<scriptTask scriptFormat="groovy" camunda:resource="${scriptPath}"/>For more information, see the camunda:resource section of the Custom Extensions chapter.
Templating
camunda BPM supports template engines which are implemented as script engines compatible with JSR-223. As a result, templates can be used everywhere where scripts can be used.
In community distributions of camunda BPM, the following template engines are provided out of the box:
The following template engines are provided as optional add-ons:
The script engine wrapper implementations can be found in the camunda-template-engines repository.
Additionally, the following template engines are supported as enterprise extension:
- XSLT
Installing a Template Engine
Installing a Template Engine for an Embedded Process Engine
A template engine must be installed in the same way as a script engine. This means that the template engine must be added to the process engine classpath.
When using an embedded process engine, the template engine libraries must be added to the
application deployment. When using the process engine in a maven war project, the template engine
dependencies must be added as dependencies to the maven pom.xml file:
<dependencies>

  <!-- freemarker -->
  <dependency>
    <groupId>org.camunda.template-engines</groupId>
    <artifactId>camunda-template-engines-freemarker</artifactId>
  </dependency>

  <!-- apache velocity -->
  <dependency>
    <groupId>org.camunda.template-engines</groupId>
    <artifactId>camunda-template-engines-velocity</artifactId>
  </dependency>

</dependencies>
Installing a Template Engine for a Shared Process Engine
When using a shared process engine, the template engine must be added to the shared process engine
classpath. The procedure for achieving this depends on the application server. In Apache Tomcat, the
libraries have to be added to the shared lib/ folder.
Note: FreeMarker is pre-installed in the camunda pre-packaged distribution.
Using a Template Engine
If the template engine library is in the classpath, you can use templates everywhere in the BPMN process where you can use scripts, for example as a script task or inputOutput mapping. The FreeMarker template engine is part of the camunda BPM distribution.
Inside the template, all process variables of the BPMN element scope are available. The template can also be loaded from an external resource as described in the script source section.
The following example shows a FreeMarker template, of which the result is saved in the process variable
text.
<scriptTask id="templateScript" scriptFormat="freemarker" camunda:resultVariable="text">
  <script>
    Dear ${customer},

    thank you for working with camunda BPM ${version}.

    Greetings,
    camunda Developers
  </script>
</scriptTask>
In an inputOutput mapping it can be very useful to use an external template to generate the
payload of a camunda:connector.
<bpmn2:serviceTask id="soapTask" name="Send SOAP request">
  <bpmn2:extensionElements>
    <camunda:connector>
      <camunda:connectorId>soap-http-connector</camunda:connectorId>
      <camunda:inputOutput>

        <camunda:inputParameter name="soapEnvelope">
          <camunda:script scriptFormat="freemarker" resource="soapEnvelope.ftl" />
        </camunda:inputParameter>

        <!-- ... remaining connector config omitted -->

      </camunda:inputOutput>
    </camunda:connector>
  </bpmn2:extensionElements>
</bpmn2:serviceTask>
Using XSLT as Template Engine
Enterprise Feature
Please note that this feature is only included in the enterprise edition of the camunda BPM platform, it is not available in the community edition.Check the camunda enterprise homepage for more information or get your free trial version.
Installing the XSLT Template Engine
The XSLT Template Engine can be downloaded from the Enterprise Edition Download page.
Instructions on how to install the template engine can be found inside the downloaded distribution.
Using XSLT Template Engine with an embedded process engine
When using an embedded process engine, the XSLT template engine library must be added to the
application deployment. When using the process engine in a maven war project, the template engine
dependency must be added as dependencies to the maven pom.xml file:
<dependencies>

  <!-- XSLT -->
  <dependency>
    <groupId>org.camunda.bpm.extension.xslt</groupId>
    <artifactId>camunda-bpm-xslt</artifactId>
  </dependency>

</dependencies>
Using XSLT Templates
The following is an example of a BPMN ScriptTask used to execute a XSLT Template:
<bpmn2:scriptTask id="ScriptTask_1" name="convert input"
                  scriptFormat="xslt"
                  camunda:resource="org/camunda/bpm/example/xsltexample/example.xsl"
                  camunda:resultVariable="xmlOutput">

  <bpmn2:extensionElements>
    <camunda:inputOutput>
      <camunda:inputParameter name="camunda_source">${customers}</camunda:inputParameter>
    </camunda:inputOutput>
  </bpmn2:extensionElements>

</bpmn2:scriptTask>
As shown in the example above, the XSL source file can be referenced using the camunda:resource
attribute. It may be loaded from the classpath or the deployment (database) in the same way as
described for script tasks.
The result of the transformation can be mapped to a variable using the camunda:resultVariable
attribute.
Finally, the input of the transformation must be mapped using the special variable camunda_source
using a <camunda:inputParameter ... /> mapping.
A full example of the XSLT Template Engine in camunda BPM can be found in the examples repository..
Custom Code and Security
The process engine offers numerous extension points for customization of process behavior by using Java Code, Expression Language, Scripts, and Templates. While these extension points allow for great flexibility in process implementation, they open up the possibility to perform malicious actions when in the wrong hands. It is therefore advisable to restrict access to API that allows custom code submission to trusted parties only. The following concepts exist that allow submitting custom code (via Java or REST API):
- Deployment: Most of the custom logic is submitted with the deployment of a process, case, or decision model. For example, an execution listener invocation is defined in the BPMN 2.0 XML.
- Queries: Queries offer the ability to include expressions for certain parameters (currently task queries only). This enables users to define reusable queries that can be repeatedly executed and dynamically adapted to changing circumstances. For example, a task query
taskService.createTaskQuery().dueBeforeExpression(${now()}).list();uses an expression to always return the tasks currently due. Camunda Tasklist makes use of this feature in the form of task filters.
Only trusted users should be authorized to interact with these endpoints. How access can be restricted is outlined in the next sections.
Camunda BPM in a Trusted Environment
When Camunda BPM is deployed in an environment where only trusted parties can access the system (for example due to firewall policies), no untrusted party can access the APIs for submitting custom code and the following suggestions need not be adhered to.
Deployments
Access to performing deployments can be restricted by using the authorization infrastructure and activating authentication checks for any endpoint a potentially untrusted party may access. The crucial permission for making deployments is Deployment/Create. Untrusted users should not be granted this permission.
Queries
Query access cannot be generally restricted with authorizations. Instead, a query's result is reduced to entities a user is authorized to access. Thus, authorization permissions cannot be used to guard expression evaluation in queries.
The process engine configuration offers two flags to toggle expression evaluation in adhoc and stored queries. Adhoc queries are directly submitted queries. For example, taskService.createTaskQuery().list(); creates and executes an adhoc query. In contrast, a stored query is persisted along with a filter and executed when the filter is executed. Expressions in adhoc queries can be disabled by setting the configuration property enableExpressionsInAdhocQueries to false. Accordingly, the property enableExpressionsInStoredQueries disables expressions in stored queries. If an expression is used although expression evaluation is disabled, the process engine raises an exception before evaluating any expression, thereby preventing malicious code from being executed.
The following configuration combinations exist:
enableExpressionsInAdhocQueries=true,enableExpressionsInStoredQueries=true: Expression evaluation is enabled for any query. Use this setting if all users are trusted.enableExpressionsInAdhocQueries=false,enableExpressionsInStoredQueries=true: Default Setting. Adhoc queries may not use expressions, however filters with expressions can be defined and executed. Access to filter creation can be restricted by the granting the authorization permissionFilter/Create. Use this setting if all users authorized to create filters are trusted.enableExpressionsInAdhocQueries=false,enableExpressionsInStoredQueries=false: Expressions are disabled for all queries. Use this setting if none of the above settings can be applied.
Connectors
With the optional dependency camunda-connect, the process engine supports simple connectors. Currently the following connector implementations exist:
| Connector | ID |
|---|---|
| REST HTTP | http-connector |
| SOAP HTTP | soap-http-connector |
Configuring Camunda Connect
As Camunda Connect is an optional dependency, it is not immediately available when using the process engine. With a pre-built distribution, Camunda Connect is already preconfigured.
There are two types of connect artifacts:
camunda-connect-core: a jar that contains only the core Connect classes. In addition tocamunda-connect-core, single connector implementations likecamunda-connect-http-clientandcamunda-connect-soap-http-clientexist. These dependencies should be used when the default connectors have to be reconfigured or when custom connector implementations are used.camunda-connect-connectors-all: a single jar without dependencies that contains the HTTP and SOAP connectors.camunda-engine-plugin-connect: a process engine plugin to add Connect to the Camunda BPM platform.
Maven Coordinates
camunda-connect-core
camunda-connect-core contains the core classes of Connect. Additionally, the HTTP and SOAP connectors can be added with the dependencies camunda-connect-http-client and camunda-connect-soap-http-client. These artifacts will transitively pull in their dependencies, like Apache HTTP client. For integration with the engine, the artifact camunda-engine-plugin-connect is needed. Given that the BOM is imported, the Maven coordinates are as follows:
<dependency>
  <groupId>org.camunda.connect</groupId>
  <artifactId>camunda-connect-core</artifactId>
</dependency><dependency>
<groupId>org.camunda.connect</groupId>
<artifactId>camunda-connect-http-client</artifactId>
</dependency><dependency>
<groupId>org.camunda.connect</groupId>
<artifactId>camunda-connect-soap-http-client</artifactId>
</dependency><dependency>
<groupId>org.camunda.bpm</groupId>
<artifactId>camunda-engine-plugin-connect</artifactId>
</dependency>camunda-connect-connectors-all
This artifact contains the HTTP and SOAP connectors as well as their dependencies. To avoid conflicts with other versions of these dependencies, the dependencies are relocated to different packages. camunda-connect-connectors-all has the following Maven coordinates:
<dependency>
  <groupId>org.camunda.connect</groupId>
  <artifactId>camunda-connect-connectors-all</artifactId>
</dependency>
Configuring the Process Engine Plugin
camunda-engine-plugin-connect contains a class called org.camunda.connect.plugin.impl.ConnectProcessEnginePlugin that can be registered with a process engine using the plugin mechanism. For example, a bpm-platform.xml file with the plugin enabled would look as follows:
<?xml version="1.0" encoding="UTF-8"?>
<bpm-platform xmlns="http://www.camunda.org/schema/1.0/BpmPlatform"
  xmlns:xsi="http://www.w3.org/2001/XMLSchema-instance"
  xsi:schemaLocation="http://www.camunda.org/schema/1.0/BpmPlatform http://www.camunda.org/schema/1.0/BpmPlatform ">

  ...

  <process-engine name="default">
    ...

    <plugins>
      <plugin>
        <class>org.camunda.connect.plugin.impl.ConnectProcessEnginePlugin</class>
      </plugin>
    </plugins>

    ...
  </process-engine>

</bpm-platform>When using a pre-built distribution of Camunda BPM, the plugin is already pre-configured.
Using connectors
To use a connector, you have to add the Camunda extension element connector. The connector is configured by a unique connectorId, which specifies the used connector implementation. The ids of the currently supported connectors can be found at the beginning of this section. Additionally, an input/output mapping is used to configure the connector. The required input parameters and the available output parameters depend on the connector implementation. Additional input parameters can also be provided to be used within the connector.
As an example, a shortened configuration of the camunda SOAP connector implementation is shown. A complete example can be found in the camunda examples repository on GitHub.
<serviceTask id="soapRequest" name="Simple SOAP Request">
  <extensionElements>
    <camunda:connector>
      <camunda:connectorId>soap-http-connector</camunda:connectorId>
      <camunda:inputOutput>
        <camunda:inputParameter name="url">
          http://example.com/webservice
        </camunda:inputParameter>
        <camunda:inputParameter name="payload">
          <![CDATA[
            <soap:Envelope ...>
              ... // the request envelope
            </soap:Envelope>
          ]]>
        </camunda:inputParameter>
        <camunda:outputParameter name="result">
          <![CDATA[
            ... // process response body
          ]]>
        </camunda:outputParameter>
      </camunda:inputOutput>
    </camunda:connector>
  </extensionElements>
</serviceTask>
A full example of the REST connector can also be found in the camunda examples repository on GitHub.
Process Versioning
Versioning of process definitions
Business Processes are by nature long running. The process instances will maybe last for weeks, or months. In the meantime the state of the process instance is stored to the database. But sooner or later you might want to change the process definition even if there are still running instances.
This is supported by the process engine:
- If you redeploy a changed process definition you get a new version in the database.
- Running process instances will continue to run in the version they were started in.
- New process instances will run in the new version - unless specified explicitly.
- Support for migrating process instances to new a version is supported within certain limits.
So you can see different versions in the process definition table and the process instances are linked to this:
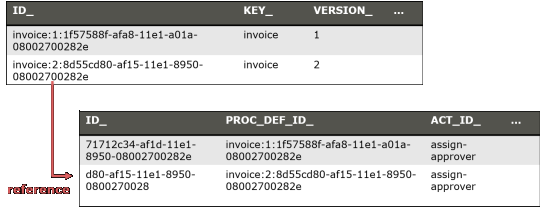
Which version will be used
When you start a process instance
- by key: It starts an instance of the latest deployed version of the process definition with the key.
- by id: It starts an instance of the deployed process definition with the database id. By using this you can start a specific version.
The default and recommended usage is to just use startProcessInstanceByKey and always use the latest version:
processEngine.getRuntimeService().startProcessInstanceByKey("invoice");
// will use the latest version (2 in our example)
If you want to specifically start an instance of an old process definition, use a Process Definition Query to find the correct ProcessDefinition id and use startProcessInstanceById:
ProcessDefinition pd = processEngine.getRepositoryService().createProcessDefinitionQuery()
    .processDefinitionKey("invoice")
    .processDefinitionVersion(1).singleResult();
processEngine.getRuntimeService().startProcessInstanceById(pd.getId());
When you use BPMN CallActivities you can configure which version is used:
<callActivity id="callSubProcess" calledElement="checkCreditProcess"
  camunda:calledElementBinding="latest|deployment|version"
  camunda:calledElementVersion="17">
</callActivity>
The options are
- latest: use the latest version of the process definition (as with
startProcessInstanceByKey). - deployment: use the process definition in the version matching the version of the calling process. This works if they are deployed within one deployment - as then they are always versioned together (see Process Application Deployment for more details).
- version: specify the version hard coded in the XML.
Key vs. ID of a process definition
You might have spotted that two different columns exist in the process definition table with different meanings:
Key: The key is the unique identifier of the process definition in the XML, so its value is read from the id attribute in the XML:
<bpmn2:process id="invoice" ...Id: The id is the database primary key and an artificial key normally combined out of the key, the version and a generated id (note that the ID may be shortened to fit into the database column, so there is no guarantee that the id is built this way).
Version Migration
Sometimes it is necessary to migrate (upgrade) running process instances to a new version, maybe when you have added an important new task or even fixed a bug. In this case we can migrate the running process instances to the new version.
Please note that migration can only be applied if a process instance is currently in a persistent wait state, see Transactions in Processes.
public void migrateVersion() {
   String processInstanceId = "71712c34-af1d-11e1-8950-08002700282e";
   int newVersion = 2;
   SetProcessDefinitionVersionCmd command =
      new SetProcessDefinitionVersionCmd(processInstanceId, newVersion);
   ((ProcessEngineImpl) ProcessEngines.getDefaultProcessEngine())
        .getProcessEngineConfiguration()
        .getCommandExecutorTxRequired().execute(command);
}
Risks and limitations of Version Migration
Process Version Migration is not an easy topic. Migrating process instances to a new version only works if:
- for all currently existing executions and running tokens the "current activity" with the same id still exists in the new process definition
- the scopes, sub executions, jobs and so on are still valid.
Hence the cases in which this simple instance migration works are limited. The following examples will cause problems:
- If the new version introduces a new (message / signal / timer) boundary event attached to an activity, process instances which are waiting at this activity cannot be migrated (since the activity is a scope in the new version and not a scope in the old version).
- If the new version introduces a new (message / signal / timer) boundary event attached to a subprocess, process instances which are waiting in an activity contained by the subprocess can be migrated, but the event will never trigger (event subscription / timer not created when entering the scope).
- If the new version removes a (message / signal / timer) boundary event attached to an activity, process instances which are waiting at this activity cannot be migrated.
- If the new version removes a timer boundary event attached to a subprocess, process instances which are waiting at an activity contained by the subprocess can be migrated. If the timer job is triggered (executed by the job executor) it will fail. The timer job is removed with the scope execution.
- If the new version removes a signal or message boundary event attached to a subprocess, process instances which are waiting at an activity contained by the subprocess can be migrated. The signal/message subscription already exists but cannot be triggered anymore. The subscription is removed with the scope execution.
- If a new version changes field injection on Java classes, you might want to set attributes on a Java class which doesn't exist any more or the other way round: you are missing attributes.
Other important aspects to think of when doing version migration are:
- Execution: Migration can lead to situations where some activities from the old or new process definition might have never been executed for some process instances. Keep this in mind, you might have to deal with this in some of your own migration scripts.
- Traceability and Audit Trail: Is the produced audit trail still valid if some entries point to version 1 and some to version 2? Do all activities still exist in the new process definition?
- Reporting: Your reports may be broken or show strange figures if they get confused by version mishmash.
- KPI Monitoring: Let's assume you introduced new KPI's, for migrated process instances you might get only parts of the figures. Does this do any harm to your monitoring?
If you cannot migrate your process instance you have a couple of alternatives, for example:
- Continue running the old version (as described at the beginning).
- Cancel the old process instance and start a new one. The challenge might be to skip activities already executed and "jump" to the right wait state. This is currently a difficult task, you could maybe leverage Message Start Events here. We are currently discussing the option of providing more support on this in Migration Points. Sometimes you can skip this by adding some magic to your code or deploying some mocks during a migration phase or by another creative solution.
- Cancel the old process instances and start a new one in a completely customized migration process definition.
So there is actually no "standard" way. If in doubt, discuss the right solution for your environment with us.
Database Schema
The database schema of the process engine consists of multiple tables. The table names all start with ACT. The second part is a two-character identification of the use case of the table. This use case will also roughly match the service API.
ACT_RE_*:REstands for repository. Tables with this prefix contain 'static' information such as process definitions and process resources (images, rules, etc.).ACT_RU_*:RUstands for runtime. These are the runtime tables, that contain the runtime data of process instances, user tasks, variables, jobs, etc. The engine only stores the runtime data during process instance execution, and removes the records when a process instance ends. This keeps the runtime tables small and fast.ACT_ID_*:IDstands for identity. These tables contain identity information, such as users, groups, etc.ACT_HI_*:HIstands for history. These are the tables that contain historical data, such as past process instances, variables, tasks, etc.ACT_GE_*: general data, which is used in various use cases.
The main tables of the process engines are the entities of process definitions, executions, tasks, variables and event subscriptions. Their relationship is show in the following UML model.
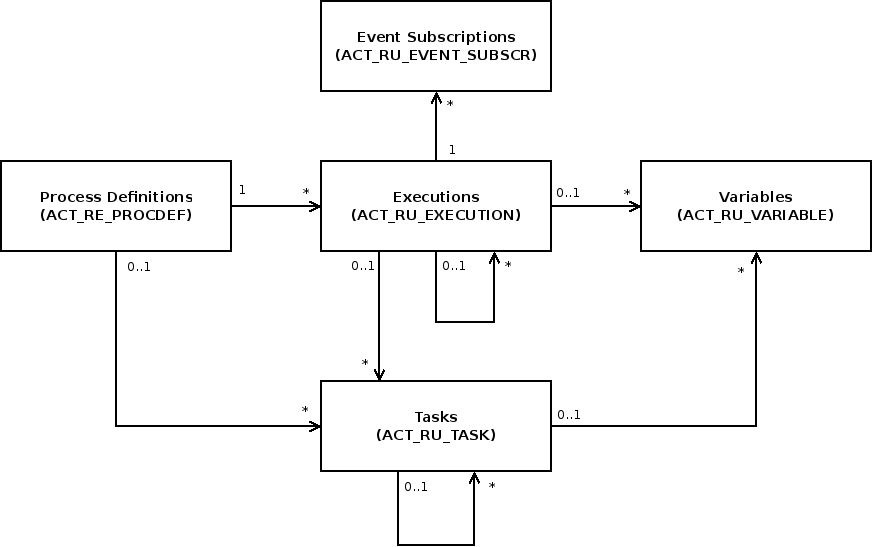
Process Definitions (ACT_RE_PROCDEF)
The ACT_RE_PROCDEF table contains all deployed process definitions. It
includes information like the version details, the resource name or the
suspension state.
Executions (ACT_RU_EXECUTION)
The ACT_RU_EXECUTION table contains all current executions. It includes
informations like the process definition, parent execution, business key, the
current activity and different metadata about the state of the execution.
Tasks (ACT_RU_TASK)
The ACT_RU_TASK table contains all open tasks of all running process
instances. It includes information like the corresponding process instance and
execution and also metadata as creation time, assignee or due date.
Variables (ACT_RU_VARIABLE)
The ACT_RU_VARIABLE table contains all currently set process or task
variables. It includes the names, types and values of the variables and
information about the corresponding process instance or task.
Event Subscriptions (ACT_RU_EVENT_SUBSCR)
The ACT_RU_EVENT_SUBSCR table contains all currently existing event
subscriptions. It includes the type, name and configuration of the expected
event along with information about the corresponding process instance and
execution.
Entity Relationship Diagrams
Please note: The following diagrams are based on the oracle database schema. For other databases the diagram may be slightly different.
The following Entity Relationship Diagrams visualize the database tables and their explicit foreign key constraints grouped by Engine with focus on BPMN, Engine with focus on CMMN, the Engine History and the Identity. Please note that the diagrams do not visualize implicit connections between the tables.
Example
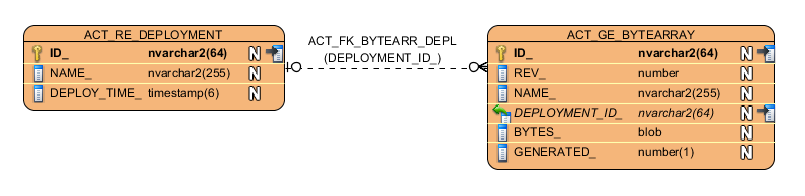
- foreign keys are displayed as arrow from one entity to the other
- the arrow label describes the name of the foreign key and the database filed name in brackets
- the database filed name is marked with a green arrow in the table box
Engine BPMN

Engine CMMN

History
To allow different configurations and to keep the tables more flexible, the history tables contain no foreign key constraints.

Identity

Database Configuration
There are two ways to configure the database that the camunda engine will use. The first option is to define the JDBC properties of the database:
jdbcUrl: JDBC URL of the database.jdbcDriver: implementation of the driver for the specific database type.jdbcUsername: username to connect to the database.jdbcPassword: password to connect to the database.
Note that internally the engine uses Apache MyBatis for persistence.
The data source that is constructed based on the provided JDBC properties will have the default MyBatis connection pool settings. The following attributes can optionally be set to tweak that connection pool (taken from the MyBatis documentation):
jdbcMaxActiveConnections: The maximum number of active connections that the connection pool can contain at any given time. Default is 10.jdbcMaxIdleConnections: The maximum number of idle connections that the connection pool can contain at any given time.jdbcMaxCheckoutTime: The amount of time in milliseconds that a connection can be 'checked out' for from the connection pool before it is forcefully returned. Default is 20000 (20 seconds).jdbcMaxWaitTime: This is a low level setting that gives the pool a chance to print a log status and re-attempt the acquisition of a connection in the case that it takes unusually long (to avoid failing silently forever if the pool is mis-configured) Default is 20000 (20 seconds).jdbcStatementTimeout: The amount of time in seconds the jdbc driver will wait for a response from the database. Default is null that means there is no timeout.
Example database configuration:
<property name="jdbcUrl" value="jdbc:h2:mem:camunda;DB_CLOSE_DELAY=1000" />
<property name="jdbcDriver" value="org.h2.Driver" />
<property name="jdbcUsername" value="sa" />
<property name="jdbcPassword" value="" />
Alternatively, a javax.sql.DataSource implementation can be used (e.g. DBCP from Apache Commons):
<bean id="dataSource" class="org.apache.commons.dbcp.BasicDataSource" >
  <property name="driverClassName" value="com.mysql.jdbc.Driver" />
  <property name="url" value="jdbc:mysql://localhost:3306/camunda" />
  <property name="username" value="camunda" />
  <property name="password" value="camunda" />
  <property name="defaultAutoCommit" value="false" />
</bean>

<bean id="processEngineConfiguration" class="org.camunda.bpm.engine.impl.cfg.StandaloneProcessEngineConfiguration">

    <property name="dataSource" ref="dataSource" />
    ...
Note that camunda does not ship with a library that allows to define such a data source. So you have to make sure that the libraries (e.g. from DBCP) are on your classpath.
The following properties can be set, regardless of whether you are using the JDBC or data source approach:
databaseType: it's normally not necessary to specify this property as it is automatically analyzed from the database connection meta data. Should only be specified in case automatic detection fails. Possible values: {h2, mysql, oracle, postgres, mssql, db2}. This property is required when not using the default H2 database. This setting will determine which create/drop scripts and queries will be used. See the 'supported databases' section for an overview of which types are supported.databaseSchemaUpdate: allows to set the strategy to handle the database schema on process engine boot and shutdown.false(default): Checks the version of the DB schema against the library when the process engine is being created and throws an exception if the versions don't match.true: Upon building the process engine, a check is performed and an update of the schema is performed if necessary. If the schema doesn't exist, it is created.create-drop: Creates the schema when the process engine is being created and drops the schema when the process engine is being closed.
For information on supported databases please refer to Supported Environments.
Here are some sample JDBC urls:
- h2: jdbc:h2:tcp://localhost/camunda
- mysql: jdbc:mysql://localhost:3306/camunda?autoReconnect=true
- oracle: jdbc:oracle:thin:@localhost:1521:xe
- postgres: jdbc:postgresql://localhost:5432/camunda
- db2: jdbc:db2://localhost:50000/camunda
- mssql: jdbc:sqlserver://localhost:1433/camunda
Additional database schema configuration
Business Key
Since the release of camunda-bpm 7.0.0-alpha9, the unique constraint for the business key is removed in the runtime and history tables and the database schema create and drop scripts. If you rely on the constraint, you can add it manually to your schema by issuing following sql statements:
db2
Runtime:
alter table ACT_RU_EXECUTION add UNI_BUSINESS_KEY varchar (255) not null generated always as (case when "BUSINESS_KEY_" is null then "ID_" else "BUSINESS_KEY_" end);
alter table ACT_RU_EXECUTION add UNI_PROC_DEF_ID varchar (64) not null generated always as (case when "PROC_DEF_ID_" is null then "ID_" else "PROC_DEF_ID_" end);
create unique index ACT_UNIQ_RU_BUS_KEY on ACT_RU_EXECUTION(UNI_PROC_DEF_ID, UNI_BUSINESS_KEY);

History:
alter table ACT_HI_PROCINST add UNI_BUSINESS_KEY varchar (255) not null generated always as (case when "BUSINESS_KEY_" is null then "ID_" else "BUSINESS_KEY_" end);
alter table ACT_HI_PROCINST add UNI_PROC_DEF_ID varchar (64) not null generated always as (case when "PROC_DEF_ID_" is null then "ID_" else "PROC_DEF_ID_" end);
create unique index ACT_UNIQ_HI_BUS_KEY on ACT_HI_PROCINST(UNI_PROC_DEF_ID, UNI_BUSINESS_KEY);
h2
Runtime:
alter table ACT_RU_EXECUTION add constraint ACT_UNIQ_RU_BUS_KEY unique(PROC_DEF_ID_, BUSINESS_KEY_);

History:
alter table ACT_HI_PROCINST add constraint ACT_UNIQ_HI_BUS_KEY unique(PROC_DEF_ID_, BUSINESS_KEY_);
mssql
Runtime:
create unique index ACT_UNIQ_RU_BUS_KEY on ACT_RU_EXECUTION (PROC_DEF_ID_, BUSINESS_KEY_) where BUSINESS_KEY_ is not null;

History:
create unique index ACT_UNIQ_HI_BUS_KEY on ACT_HI_PROCINST (PROC_DEF_ID_, BUSINESS_KEY_) where BUSINESS_KEY_ is not null;
mysql
Runtime:
alter table ACT_RU_EXECUTION add constraint ACT_UNIQ_RU_BUS_KEY UNIQUE (PROC_DEF_ID_, BUSINESS_KEY_);

History:
alter table ACT_HI_PROCINST add constraint ACT_UNIQ_HI_BUS_KEY UNIQUE (PROC_DEF_ID_, BUSINESS_KEY_);
oracle
Runtime:
create unique index ACT_UNIQ_RU_BUS_KEY on ACT_RU_EXECUTION
         (case when BUSINESS_KEY_ is null then null else PROC_DEF_ID_ end,
         case when BUSINESS_KEY_ is null then null else BUSINESS_KEY_ end);

History:
create unique index ACT_UNIQ_HI_BUS_KEY on ACT_HI_PROCINST
         (case when BUSINESS_KEY_ is null then null else PROC_DEF_ID_ end,
         case when BUSINESS_KEY_ is null then null else BUSINESS_KEY_ end);
postgres
Runtime:
alter table ACT_RU_EXECUTION add constraint ACT_UNIQ_RU_BUS_KEY UNIQUE (PROC_DEF_ID_, BUSINESS_KEY_);

History:
alter table ACT_HI_PROCINST add constraint ACT_UNIQ_HI_BUS_KEY UNIQUE (PROC_DEF_ID_, BUSINESS_KEY_);
Custom Configuration for Microsoft SQL Server
Microsoft SQL Server implements the isolation level READ_COMMITTED different
than most databases and does not play together well with the process engine's
optimistic locking scheme. As a result you may suffer deadlocks when
putting the process engine under high load.
If you experience deadlocks in your MSSQL installation, you must execute the following statements in order to enable SNAPSHOT isolation:
ALTER DATABASE [process-engine]
SET ALLOW_SNAPSHOT_ISOLATION ON

ALTER DATABASE [process-engine]
SET READ_COMMITTED_SNAPSHOT ON
where [process-engine] contains the name of your database.
History and Audit Event Log
The History Event Stream provides audit information about executed process instances.

The process engine maintains the state of running process instances inside the database. This includes writing (1.) the state of a process instance to the database as it reaches a wait state and reading (2.) the state as process execution continues. We call this database the runtime database. In addition to maintaining the runtime state, the process engine creates an audit log providing audit information about executed process instances. We call this event stream the history event stream (3.). The individual events which make up this event stream are called History Events and contain data about executed process instances, activity instances, changed process variables and so forth. In the default configuration, the process engine will simply write (4.) this event stream to the history database. The HistoryService API allows querying this database (5.). The history database and the history service are optional components; if the history event stream is not logged to the history database or if the user chooses to log events to a different database, the process engine is still able to work and it is still able to populate the history event stream. This is possible because the BPMN 2.0 Core Engine component does not read state from the history database. It is also possible to configure the amount of data logged, using the historyLevel setting in the process engine configuration.
Since the process engine does not rely on the presence of the history database for generating the history event stream, it is possible to provide different backends for storing the history event stream. The default backend is the DbHistoryEventHandler which logs the event stream to the history database. It is possible to exchange the backend and provide a custom storage mechanism for the history event log.
Choosing a History Level
The history level controls the amount of data the process engine provides via the history event stream. The following settings are available out of the box:
NONE: no history events are fired.ACTIVITY: the following events are fired:- Process Instance START, UPDATE, END: fired as process instances are being started, updated and ended
- Case Instance CREATE, UPDATE, CLOSE: fired as case instances are being created, updated and closed
- Activity Instance START, UPDATE, END: fired as activity instances are being started, updated and ended
- Case Activity Instance CREATE, UPDATE, END: fired as case activity instances are being created, updated and ended
- Task Instance CREATE, UPDATE, COMPLETE, DELETE: fired as task instances are being created, updated (i.e., re-assigned, delegated etc.), completed and deleted.
AUDIT: in addition to the events provided by history levelACTIVITY, the following events are fired:- Variable Instance CREATE, UPDATE, DELETE, as process variables are created, updated and deleted. The default history backend (DbHistoryEventHandler) writes variable instance events to the historic variable instance database table. Rows in this table are updated as variable instances are updated, meaning that only the last value of a process variable will be available.
FULL: in addition to the events provided by history levelAUDIT, the following additional events are fired:- Form property UPDATE: fired as form properties are being created and/or updated.
- The default history backend (DbHistoryEventHandler) writes historic variable updates to the database. This makes it possible to inspect the intermediate values of a process variable using the history service.
- User Operation Log UPDATE: fired when a user performs an operation like claiming a user task, delegating a user task etc.
- Incidents CREATE, DELETE, RESOLVE: fired as incidents are being created, deleted or resolved
- Historic Job Log CREATE, FAILED, SUCCESSFUL, DELETED: fired as a job is being created, a job execution failed or was successful or a job was deleted
If you need to customize the amount of history events logged, you can provide a custom implementation HistoryEventProducer and wire it in the process engine configuration.
Setting the History Level
The history level can be provided as a property in the process engine configuration. Depending on how the process engine is configured, the property can be set using Java Code
ProcessEngine processEngine = ProcessEngineConfiguration
  .createProcessEngineConfigurationFromResourceDefault()
  .setHistory(ProcessEngineConfiguration.HISTORY_FULL)
  .buildProcessEngine();
Or it can be set using Spring Xml or a deployment descriptor (bpm-platform.xml, processes.xml). When using the Camunda jBoss Subsystem, the property can be set through jBoss configuration (standalone.xml, domain.xml).
<property name="history">audit</property>Note that when using the default history backend, the history level is stored in the database and cannot be changed later.
The default History Implementation
The default history database writes History Events to the appropriate database tables. The database tables can then be queried using the History Service or using the REST API.
History Entities
There are nine History entities, which - in contrast to the runtime data - will also remain present in the DB after process and case instances have been completed:
HistoricProcessInstancescontaining information about current and past process instances.HistoricProcessVariablescontaining information about the latest state a variable held in a process instance.HistoricCaseInstancescontaining information about current and past case instances.HistoricActivityInstancescontaining information about a single execution of an activity.HistoriCasecActivityInstancescontaining information about a single execution of a case activity.HistoricTaskInstancescontaining information about current and past (completed and deleted) task instances.HistoricDetailscontaining various kinds of information related to either a historic process instances, an activity instance or a task instance.HistoricIncidentscontaining information about current and past (i.e., deleted or resolved) incidents.UserOperationLogEntrylog entry containing information about an operation performed by a user. This is used for logging actions such as creating a new task, completing a task, etc.HistoricJobLogcontaining information about the job execution. The log provides details about the lifecycle of a job.
Querying History
The HistoryService exposes the methods createHistoricProcessInstanceQuery(),
createHistoricProcessVariableQuery(), createHistoricCaseInstanceQuery(),
createHistoricActivityInstanceQuery(), createHistoricCaseActivityInstanceQuery(),
createHistoricDetailQuery(), createHistoricTaskInstanceQuery(), createHistoricIncidentQuery(),
createUserOperationLogQuery() and createHistoricJobLogQuery() which can be used for querying history.
Below are a few examples which show some of the possibilities of the query API for history. Full description of the possibilities can be found in the javadocs, in the org.camunda.bpm.engine.history package.
HistoricProcessInstanceQuery
Get the ten HistoricProcessInstances that are finished and which took the most time to complete (the longest duration) of all finished processes with definition 'XXX'.
historyService.createHistoricProcessInstanceQuery()
  .finished()
  .processDefinitionId("XXX")
  .orderByProcessInstanceDuration().desc()
  .listPage(0, 10);
HistoricCaseInstanceQuery
Get the ten HistoricCaseInstances that are closed and which took the most time to be closed (the longest duration) of all closed cases with definition 'XXX'.
historyService.createHistoricCaseInstanceQuery()
  .closed()
  .caseDefinitionId("XXX")
  .orderByCaseInstanceDuration().desc()
  .listPage(0, 10);
HistoricActivityInstanceQuery
Get the last HistoricActivityInstance of type 'serviceTask' that has been finished in any process that uses the processDefinition with id XXX.
historyService.createHistoricActivityInstanceQuery()
  .activityType("serviceTask")
  .processDefinitionId("XXX")
  .finished()
  .orderByHistoricActivityInstanceEndTime().desc()
  .listPage(0, 1);
HistoricCaseActivityInstanceQuery
Get the last HistoricCaseActivityInstance that has been finished in any case that uses the caseDefinition with id XXX.
historyService.createHistoricCaseActivityInstanceQuery()
  .caseDefinitionId("XXX")
  .finished()
  .orderByHistoricCaseActivityInstanceEndTime().desc()
  .listPage(0, 1);
HistoricProcessVariableQuery
Get all HistoricProcessVariables from a finished process instance with id 'xxx' ordered by variable name.
historyService.createHistoricProcessVariableQuery()
  .processInstanceId("XXX")
  .orderByVariableName.desc()
  .list();
HistoricDetailQuery
The next example gets all variable-updates that have been done in process with id 123. Only HistoricVariableUpdates will be returned by this query. Note that it's possible for a certain variable name to have multiple HistoricVariableUpdate entries, one for each time the variable was updated in the process. You can use orderByTime (the time the variable update was done) or orderByVariableRevision (revision of runtime variable at the time of updating) to find out in what order they occurred.
historyService.createHistoricDetailQuery()
  .variableUpdates()
  .processInstanceId("123")
  .orderByVariableName().asc()
  .list()
The last example gets all variable updates that were performed on the task with id "123". This returns all HistoricVariableUpdates for variables that were set on the task (task local variables), and NOT on the process instance.
historyService.createHistoricDetailQuery()
  .variableUpdates()
  .taskId("123")
  .orderByVariableName().asc()
  .list()
HistoricTaskInstanceQuery
Get the ten HistoricTaskInstances that are finished and which took the most time to complete (the longest duration) of all tasks.
historyService.createHistoricTaskInstanceQuery()
  .finished()
  .orderByHistoricTaskInstanceDuration().desc()
  .listPage(0, 10);
Get HistoricTaskInstances that are deleted with a delete reason that contains "invalid", which were last assigned to user 'jonny'.
historyService.createHistoricTaskInstanceQuery()
  .finished()
  .taskDeleteReasonLike("%invalid%")
  .taskAssignee("jonny")
  .listPage(0, 10);
HistoricIncidentQuery
Query for all resolved incidents:
historyService.createHistoricIncidentQuery()
  .resolved()
  .list();
UserOperationLogQuery
Query for all operations performed by user "jonny":
historyService.createUserOperationLogQuery()
  .userId("jonny")
  .listPage(0, 10);
HistoricJobLogQuery
Query for successful historic job logs:
historyService.createUserOperationLogQuery()
  .successLog()
  .list();
Partially Sorting History Events by their Occurrence
Sometimes you are interested in sorting history events according to the order in which they occurred. Please note that timestamps cannot be used for that.
Most history events contain a timestamp which marks the point in time at which the action signified by the event occurred. However, this timestamp can, in general, not be used for sorting the history events. The reason is that the process engine can be run on multiple cluster nodes:
- on a single machine, the clock may change due to network synch at runtime,
- in a cluster, events happening in a single process instance may be generated on different nodes among which the clock may not be synced accurately down to nanoseconds.
To work around this, the Camunda engine generates sequence numbers which can be used to partially sort history events by their occurrence.
At a BPMN level this means that instances of concurrent activities (example: activities on different parallel branches after a parallel gateway) cannot be compared to each other. Instances of activities which are part of happens-before relation at the BPMN level will be ordered in respect to that relation.
Example:
List<HistoricActivityInstance> result = historyService
  .createHistoricActivityInstanceQuery()
  .processInstanceId("someProcessInstanceId")
  .orderPartiallyByOccurrence()
  .asc()
  .list();
Please note the returned list of historic activity instances in the example is only partial sorted as explained above. It guarantees that related activity instances are sorted by their occurrence. The ordering of unrelated activity instances is arbitrary and is not guaranteed.
User Operation Log
The user operation log contains entries for many API operations and can be used for auditing purposes. It provides data on what kind of operations are performed as well as details on the changes involved in the operation. Operations are logged regardless whether the operation is performed in the context of a logged in user or not (e.g., during job execution). To use the operation log, the process engine history level must be set to FULL.
Accessing the User Operation Log
The user operation log can be accessed via the Java API. The runtime service can be used to execute a UserOperationLogQuery by calling runtimeService.createUserOperationLogQuery().execute(). The query can be restricted with various filtering options. The query is also exposed in the REST API.
User Operation Log Entries
The log consists of operations and entries. An operation corresponds to one performed action and consists of many entries, one at least. Entries contain the detailed changes being part of the operation. When making a user operation log query the returned entities are of type UserOperationLogEntry, corresponding to entries. Multiple entries of one operation are linked by an operation id.
A user operation log entry has the following properties:
- Operation Type: An identifier of the operation performed. Available operation types are listed in the interface org.camunda.bpm.engine.history.UserOperationLogEntry.
- Operation ID: A generated id that uniquely identifies a performed operation. Multiple log entries that are part of one operation reference the same operation ID.
- Entity Type: An identifier of the type of the entity that was addressed by the operation. Available entity types are listed in the class org.camunda.bpm.engine.EntityTypes.
- Entity IDs: A job log entry contains the entity IDs that serve to identify the entities addressed by the operation. For example, an operation log entry on a task contains the id of the task as well as the id of the process instance the task belongs to. As a second example, a log entry for suspending all process instances of a process definition does not contain individual process instance IDs but only the process definition ID.
- User ID: The ID of the user who performed the operation.
- Timestamp: The time at which the operation was performed.
- Changed Property: A user operation may change multiple properties. For example, suspension of a process instance changes the suspension state property. A log entry is created for each property changed involved in an operation.
- Old Property Value: The previous value of the changed property. A
nullvalue either indicates that the property was previouslynullor is not known. - New Property Value: The new value of the changed property.
Glossary of Operations Logged in the User Operation Log
The following describes the operations logged in the user operation log and the entries that are created as part of it:
| Entity Type | Operation Type | Properties |
|---|---|---|
| Task | Assign |
|
| Claim |
|
|
| Complete |
|
|
| Create | No additional property is logged | |
| Delegate |
When delegating a task three log entries are created, containing one of the following properties:
|
|
| Delete | delete: The new delete state, true |
|
| Resolve |
|
|
| SetOwner |
|
|
| SetPriority |
|
|
| Update |
The manually changed property of a task, where manually means that a property got directly changed. Claiming a task via the TaskService wouldn't be logged with an update entry, but setting the assignee directly would be. One of the following is possible:
|
|
| ProcessInstance | Activate |
|
| Delete | No additional property is logged | |
| ModifyProcessInstance | No additional property is logged | |
| Suspend |
|
|
| IdentityLink | AddUserLink |
|
| DeleteUserLink |
|
|
| AddGroupLink |
|
|
| DeleteGroupLink |
|
|
| Attachment | AddAttachment |
|
| DeleteAttachment |
|
|
| JobDefinition | ActivateJobDefinition |
|
| SuspendJobDefinition |
|
|
| ProcessDefinition | ActivateProcessDefinition |
|
| SuspendProcessDefinition |
|
|
| Job | ActivateJob |
|
| SetJobRetries |
|
|
| SuspendJob |
|
|
| Variable | ModifyVariable | No additional property is logged |
| RemoveVariable | No additional property is logged | |
| SetVariable | No additional property is logged |
Providing a custom History Backend
In order to understand how to provide a custom history backend, it is useful to first look at a more detailed view of the history architecture:

Whenever the state of a runtime entity is changed, the core execution component of the process engine fires History Events. In order to make this flexible, the actual creation of the History Events as well as populating the history events with data from the runtime structures is delegated to the History Event Producer. The producer is handed in the runtime data structures (such as an ExecutionEntity or a TaskEntity), creates a new History Event and populates it with data extracted from the runtime structures.
The event is next delivered to the History Event Handler which constitutes the History Backend. The drawing above contains a logical component named event transport. This is supposed to represent the channel between the process engine core component producing the events and the History Event Handler. In the default implementation, events are delivered to the History Event Handler synchronously and inside the same JVM. It is however conceptually possible to send the event stream to a different JVM (maybe running on a different machine) and making delivery asynchronous. A good fit might be a transactional message Queue (JMS).
Once the event has reached the History Event Handler, it can be processed and stored in some kind of datastore. The default implementation writes events to the History Database so that they can be queried using the History Service.
Exchanging the History Event Handler with a custom implementation allows users to plug in a custom History Backend. In order to do so, two main steps are required:
- Provide a custom implementation of the HistoryEventHandler interface.
- Wire the custom implementation in the process engine configuration.
Note that if you provide a custom implementation of the HistoryEventHandler and wire it with the process engine, you override the default DbHistoryEventHandler. The consequence is that the process engine will stop writing to the history database and you will not be able to use the history service for querying the audit log. If you do not want to replace the default behavior but only provide an additional event handler, you need to write a composite History Event Handler which dispatches events a collection of handlers.
Implementing a custom History Level
To provide a custom history level the interface org.camunda.bpm.engine.impl.history.HistoryLevel has to be implemented. The custom history level implementation
then has to be added to the process engine configuration, either by configuration or a process engine plugin.
<?xml version="1.0" encoding="UTF-8"?>
<beans xmlns="http://www.springframework.org/schema/beans"
       xmlns:xsi="http://www.w3.org/2001/XMLSchema-instance"
       xsi:schemaLocation="http://www.springframework.org/schema/beans http://www.springframework.org/schema/beans/spring-beans.xsd">

  <bean id="processEngineConfiguration" class="org.camunda.bpm.engine.impl.cfg.StandaloneInMemProcessEngineConfiguration" >

    <property name="customHistoryLevels">
      <list>
        <bean class="org.camunda.bpm.example.CustomHistoryLevel" />
      </list>
    </property>

  </bean>

</beans>
The custom history level has to provide an unique id and name for the new history level.
public int getId() {
  return 42;
}

public String getName() {
  return "custom-history";
}
If the history level is enabled, the method
boolean isHistoryEventProduced(HistoryEventType eventType, Object entity)is called for every history event to determine if the event should be saved to the history. The event types used in the
engine can be found in org.camunda.bpm.engine.impl.history.event.HistoryEventTypes (see java docs).
The second argument is the entity for which the event is triggered, e.g., a process instance, activity
instance or variable instance. If the entity is null the engine tests if the history level in general
handles such history events. If the method returns false in this case, the engine will not generate
any history events of this type again. This means that if your history level only wants to generate the history
event for some instances of an event it must still return true if entity is null.
Please have a look at this complete example to get a better overview.
Process Definition Cache
All process definitions are cached (after they're parsed) to avoid hitting the database every time a process definition is needed and because process definition data doesn't change.
Transactions in Processes
The process engine is a piece of passive Java Code which works in the Thread of the client. For instance, if you have a web application allowing users to start a new process instance and a user clicks on the corresponding button, some thread from the application server's http-thread-pool will invoke the API method runtimeService.startProcessInstanceByKey(...), thus entering the process engine and starting a new process instance. We call this "borrowing the client thread".
On any such external trigger (i.e. start a process, complete a task, signal an execution), the engine runtime will advance in the process until it reaches wait states on each active path of execution. A wait state is a task which is performed later, which means that the engine persists the current execution to the database and waits to be triggered again. For example in case of a user task, the external trigger on task completion causes the runtime to execute the next bit of the process until wait states are reached again (or the instance ends). In contrast to user tasks, a timer event is not triggered externally. Instead it is continued by an internal trigger. That is why the engine also needs an active component, the job executor, which is able to fetch registered jobs and process them asynchronously.
Wait States
We talked about wait states as transaction boundaries where the process state is stored to the database, the Thread returns to the client and the transaction is committed. The following BPMN elements are always wait states:
Message Event
Timer Event
Signal Event
The Event Based Gateway:
Keep in mind that Asynchronous Continuations can add transaction boundaries to other tasks as well.
Transaction Boundaries
The transition from one such stable state to another stable state is always part of one transaction, meaning that it succeeds as a whole or is rolled back on any kind of exception occuring during its execution. This is illustrated in the following example:
We see a segment of a BPMN process with a user task, a service task and a timer event. The timer event marks the next wait state. Completing the user task and validating the address is therefore part of the same unit of work, so it should succeed or fail atomically. That means that if the service task throws an exception we want to roll back the current transaction, so that the execution tracks back to the user task and the user task is still present in the database. This is also the default behavior of the process engine.
In 1, an application or client thread completes the task. In that same thread the engine runtime is now executing the service task and advances until it reaches the wait state at the timer event (2). Then it returns the control to the caller (3) potentially committing the transaction (if it was started by the engine).
Asynchronous Continuations
Why Asynchronous Continuations?
In some cases the synchronous behavior is not desired. Sometimes it is useful to have custom control over transaction boundaries in a process. The most common motivation is the requirement to scope logical units of work. Consider the following process fragment:
We are completing the user task, generating an invoice and then sending that invoice to the customer. It can be argued that the generation of the invoice is not part of the same unit of work: we do not want to roll back the completion of the usertask if generating an invoice fails. Ideally, the process engine would complete the user task (1), commit the transaction and return control to the calling application (2). In a background thread (3), it would generate the invoice. This is the exact behavior offered by asynchronous continuations: they allow us to scope transaction boundaries in the process.
Configuring Asynchronous Continuations
Asynchronous Continuations can be configured before and after an activity. Additionally, a process instance itself may be configured to be started asynchronously.
An asynchronous continuation before an activity is enabled using the camunda:asyncBefore extension
attribute:
<serviceTask id="service1" name="Generate Invoice" camunda:asyncBefore="true" camunda:class="my.custom.Delegate" />An asynchronous continuation after an activity is enabled using the camunda:asyncAfter extension
attribute:
<serviceTask id="service1" name="Generate Invoice" camunda:asyncAfter="true" camunda:class="my.custom.Delegate" />Asynchronous instantiation of a process instance is enabled using the camunda:asyncBefore
extension attribute on a process-level start event.
On instantiation, the process instance will be created and persisted in the database, but execution
will be deferred. Also, execution listeners will not be invoked synchronously. This can be helpful
in various situations such as heterogeneous clusters,
when the execution listener class is not available on the node that instantiates the process.
<startEvent id="theStart" name="Invoice Received" camunda:asyncBefore="true" />Understanding Asynchronous Continuations
In order to understand how asynchronous continuations work, we first need to understand how an activity is executed:
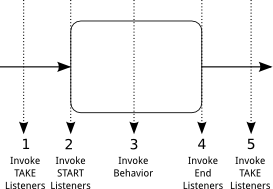
The above illustration shows how a regular activity which is entered and left by a sequence flow is executed:
- the "TAKE" listeners are invoked on the sequence flow entering the activity.
- the "START" listeners are invoked on the activity itself.
- the behavior of the activity is executed: the actual behavior depends on the type of the
activity: in case of a
Service Taskthe behavior consists in invoking Delegation Code, in case of aUser Task, the behavior consists in creating aTaskinstance in the task list etc... - the "END" listeners are invoked on the activity.
- The "TAKE" listeners of the outgoing sequence flow are invoked.
Asynchronous Continuations allow putting break points between the execution of the sequence flows and the execution of the activity:
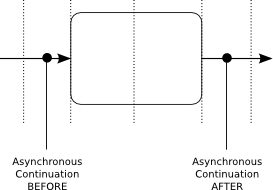
The above illustration shows where the different types of asynchronous continuations break the execution flow:
- an asynchronous continuation BEFORE an activity breaks the execution flow between the invocation of the incoming sequence flow's TAKE listeners and the execution of the activity's START listeners.
- an asynchronous continuation AFTER an activity breaks the execution flow after the invocation of the activity's END listeners and the outgoing sequence flow's TAKE listeners.
Asynchronous continuations directly relate to transaction boundaries: putting an asynchronous continuation before or after an activity creates a transaction boundary before or after an activity:
What's more, asynchronous continuations are always executed by the Job Executor.
Rollback on Exception
We want to emphasize that in case of a non handled exception the current transaction gets rolled back and the process instance is in the last wait state (safe point). The following image visualizes that.
If an exception occurs when calling startProcessInstanceByKey the process instance will not be saved to the database at all.
Reasoning for this design
The above sketched solution normally leads to discussion as people expect the process engine to stop in case the task caused an exception. Also, other BPM suites often implement every task as a wait state. But this approach has a couple of advantages:
- In Testcases you know the exact state of the engine after the method call, which makes assertions on process state or service call results easy.
- In production code the same is true; allowing you to use synchronous logic if required, for example because you want to present a synchronous user experience in the front-end as shown in the tutorial "UI Mediator".
- The execution is plain Java computing which is very efficient in terms of performance.
- You can always switch to 'asyncBefore/asyncAfter=true' if you need different behavior.
But there are consequences which you should keep in mind:
- In case of Exceptions the state is rolled back to the last persistent wait state of the process instance. It might even mean that the process instance will never be created! You cannot easily trace the exception back to the node in the process causing the exception. You have to handle the exception in the client.
- Parallel process paths are not executed in parallel in terms of Java Threads, the different paths are executed sequentially, since we only have and use one Thread.
- Timers cannot fire before the transaction is committed to the database. Timers are explained in more detail later, but they are triggered by the only active part of the Process Engine where we use own Threads: The Job Executor. Hence they run in an own thread which receives the due timers from the database. But in the database the timers are not visible before the current transaction is visible. So the following timer will never fire:
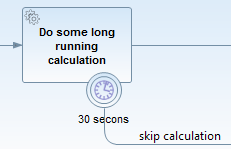
Transaction Integration
The process engine can either manage transactions on its own ("Standalone" transaction management) or integrate with a platform transaction manager.
Standalone Transaction Management
If the process engine is configured to perform standalone transaction management, it always opens a
new transaction for each command which is executed. To configure the process engine to use
standalone transaction management, use the
org.camunda.bpm.engine.impl.cfg.StandaloneProcessEngineConfiguration:
ProcessEngineConfiguration.createStandaloneProcessEngineConfiguration()
  ...
  .buildProcessEngine();
The usecases for standalone transaction management are situations where the process engine does not have to integrate with other transactional resources such as secondary datasources or messaging systems.
Note: in the tomcat distribution the process engine is configured using standalone transaction management.
Transaction Manager Integration
The process engine can be configured to integrate with a transaction manager (or transaction management systems). Out of the box, the process engine supports integration with Spring and JTA transaction management. More information can be found in the following chapters:
The usecase for transaction manager integration are situations where the process engine needs to integrate with
- transaction focused programming models such as Java EE or Spring (think about transaction scoped JPA entity managers in Java EE),
- other transactional resources such as secondary datasources, messaging systems or other transactional middleware like the web services stack.
The Job Executor
A job is an explicit representation of a task to trigger process execution. A job is created whenever a wait state is reached during process execution that has to be triggered internally. This is the case when a timer event or a task marked for asynchronous execution (see transaction boundaries) is approached. The job executor has two responsibilities: job acquisition and job execution. The following diagram illustrates this:
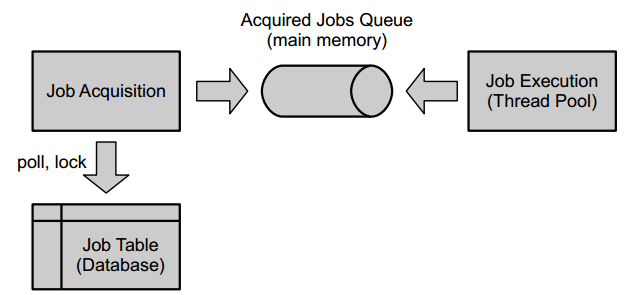
Job Executor Activation
By default, the JobExecutor is activated when the process engine boots. For unit testing scenarios it is cumbersome to work with this background component. Therefore the Java API offers to query for (ManagementService.createJobQuery) and execute jobs (ManagementService.executeJob) by hand, which allows to control job execution from within a unit test. To avoid interference with the job executor, it can be switched off.
Specify
<property name="jobExecutorActivate" value="false" />in the process engine configuration when you don't want the JobExecutor to be activated upon booting the process engine.
Job Acquisition
Job acquisition is the process of retrieving jobs from the database that are to be executed next. Therefore jobs must be persisted to the database together with properties determining whether a job can be executed. For example, a job created for a timer event may not be executed before the defined time span has passed.
Persistence
Jobs are persisted to the database, in the ACT_RU_JOB table. This database table has the following columns (among others):
ID_ | REV_ | LOCK_EXP_TIME_ | LOCK_OWNER_ | RETRIES_ | DUEDATE_Job acquisition is concerned with polling this database table and locking jobs.
Acquirable Jobs
A job is acquirable, i.e. a candidate for execution, if it fulfills all following conditions:
- it is due, meaning that the value in the
DUEDATE_column is in the past - it is not locked, meaning that the value in the
LOCK_EXP_TIME_column is in the past - its retries have not elapsed, meaning that the value in the
RETRIES_column is greater than zero.
In addition, the process engine has a concept of suspending a process definition and a process instance. A job is only acquirable if neither the corresponding process instance nor the corresponding process definition are suspended.
The two Phases of Job Acquisition
Job acquisition has two phases. In the first phase the job executor queries for a configurable amount of acquirable jobs. If at least one job can be found, it enters the second phase, locking the jobs. Locking is necessary in order to ensure that jobs are executed exactly once. In a clustered scenario, it is accustom to operate multiple job executor instances (one for each node) that all poll the same ACT_RU_JOB table. Locking a job ensures that it is only acquired by a single job executor instance. Locking a job means updating its values in the LOCK_EXP_TIME_ and LOCK_OWNER_ columns. The LOCK_EXP_TIME_ column is updated with a timestamp signifying a date that lies in the future. The intuition behind this is that we want to lock the job until that date is reached. The LOCK_OWNER_ column is updated with a value uniquely identifying the current job executor instance. In a clustered scenario this could be a node name uniquely identifying the current cluster node.
The situation where multiple job executor instances attempt to lock the same job concurrently is accounted for by using optimistic locking (see REV_ column).
After having locked a job, the job executor instance has effectively reserved a time slot for executing the job: once the date written to the LOCK_EXP_TIME_ column is reached it will be visible to job acquisition again. In order to execute the acquired jobs, they are passed to the acquired jobs queue.
The Job Order of Job Acquisition
By default the job executor does not impose an order in which acquirable jobs are acquired. This means that the job acquisition order depends on the database and its configuration. That's why the job acquisition is assumed to be nondeterministic. The intention for this is to keep the job acquisition query simple and fast.
But this simple job acquisition query can lead to disadvantages in some situations. In theory job starvation is possible if there are always too many jobs to acquire and the database returns the acquirable jobs in a manner that some jobs are never returned. Another observation could be that timer execution is delayed in a high load scenario, meaning that the execution date of a timer job can be significantly later than its actual due date. This is not unexpected behavior since the due date only specifies the earliest date a job can be executed and not the date of the actual execution. However, in some scenarios it may be preferable to acquire timer jobs as soon as they become available to execute.
To address the previously described issues, the job acquisition query can be controlled by the process engine configuration. Currently, two options are supported:
jobExecutorPreferTimerJobs. If set totrue, the job executor will acquire all acquirable timer jobs before other job types. This doesn't specify a order within types of jobs which are acquired.jobExecutorAcquireByDueDate. If set totrue, the job executor will acquire jobs by ascending due date. Where an asynchronous continuation has its creation date set as due date, it is immediately executable.
If both options (jobExecutorPreferTimerJobs and jobExecutorAcquireByDueDate)
are set to true the job executor will first acquire timer jobs and after that
asynchronous continuation jobs. And also sort these jobs within the type ascending
by due date.
false by default and should only be
activated if required by the use case. The options alter the used job
acquisition query and may affect its performance. That's why we also advise to
add an index on the corresponding column(s) of the ACT_RU_JOB table.
| jobExecutorPreferTimerJobs | jobExecutorAcquireByDueDate | Recommend Index |
|---|---|---|
true |
false |
ACT_RU_JOB(TYPE_ DESC) |
false |
true |
ACT_RU_JOB(DUEDATE_ ASC) |
true |
true |
ACT_RU_JOB(TYPE_ DESC, DUEDATE_ ASC) |
Job Execution
Thread Pool
Acquired jobs are executed by a thread pool. The thread pool consumes jobs from the acquired jobs queue. The acquired jobs queue is an in-memory queue with a fixed capacity. When an executor starts executing a job, it is first removed from the queue.
In the scenario of an embedded process engine, the default implementation for this thread pool is a java.util.concurrent.ThreadPoolExecutor. However, this is not allowed in Java EE environments. There we hook into the application server capabilities of thread management. See the platform-specific information in the Runtime Container Integration section on how this achieved.
Failed Jobs
Upon failure of job execution, e.g., if a service task invocation throws an exception, a job will be retried a number of times (by default 3). It is not immediately retried and added back to the acquisition queue, but the value of the RETRIES_ column is decreased. The process engine thus performs bookkeeping for failed jobs. After updating the RETRIES_ column, the executor unlocks the job. The unlocking also includes erasing the time LOCK_EXP_TIME_ and the owner of the lock LOCK_OWNER_ by setting both entries to null. Subsequently, the failed job will automatically be retried once the job is acquired for execution.
By default, a failed job will be retried three times and the retries are performed immediately after the failure. In daily business it might be useful to configure a retry strategy, i.e., by setting how often a job is retried and how long the engine should wait until it tries to execute a job again. In the Camunda engine, this can be configured as an extension element of a task in the BPMN 2.0 XML:
<definitions ... xmlns:camunda="http://activiti.org/bpmn">
  ...
  <serviceTask id="failingServiceTask" camunda:asyncBefore="true" camunda:class="org.camunda.engine.test.cmd.FailingDelegate">
    <extensionElements>
      <camunda:failedJobRetryTimeCycle>R5/PT5M</camunda:failedJobRetryTimeCycle>
    </extensionElements>
  </serviceTask>
  ...
</definitions>
The configuration follows the ISO_8601 standard for repeating time intervals. In the example, R5/PT5M means that the maximum number of retries is 5 (R5) and the delay of retry is 5 minutes (PT5M).
Similarly, the following example defines three retries after 5 seconds each for a boundary timer event:
<definitions ... xmlns:camunda="http://activiti.org/bpmn">
  ...
  <boundaryEvent id="BoundaryEvent_1" name="Boundary event" attachedToRef="Freigebenden_zuordnen_143">
    <extensionElements>
      <camunda:failedJobRetryTimeCycle>R3/PT5S</camunda:failedJobRetryTimeCycle>
    </extensionElements>
    <outgoing>SequenceFlow_3</outgoing>
    <timerEventDefinition id="sid-ac5dcb4b-58e5-4c0c-b30a-a7009623769d">
      <timeDuration xsi:type="tFormalExpression" id="sid-772d5012-17c2-4ae4-a044-252006933a1a">PT10S</timeDuration>
    </timerEventDefinition>
  </boundaryEvent>
  ...
</definitions>
Recap: a retry may be required if there are any failures during the transaction which follows the timer.
You can now enable this feature by adding the FoxFailedJobParseListener and the customized foxFailedJobCommandFactory to the process engine configuration:
<bean id="processEngineConfiguration" class="org.camunda.bpm.engine.impl.cfg.StandaloneInMemProcessEngineConfiguration">
    <!-- Your defined properties! -->

    <property name="customPostBPMNParseListeners">
      <list>
        <bean class="org.camunda.bpm.engine.impl.bpmn.parser.FoxFailedJobParseListener" />
      </list>
    </property>

    <property name="failedJobCommandFactory" ref="foxFailedJobCommandFactory" />
</bean>

<bean id="foxFailedJobCommandFactory" class="org.camunda.bpm.engine.impl.jobexecutor.FoxFailedJobCommandFactory" />
The listener enables the BPMN parser to recognize the extension element failedJobRetryTimeCycle and the factory augments the retry configuration applied in case of a failed job. Hereby, the LOCK_EXP_TIME_ is used to define when the job can be executed again, meaning the failed job will automatically be retried once the LOCK_EXP_TIME_ date is expired.
Concurrent Job Execution
The Job Executor makes sure that jobs from a single process instance are never executed concurrently. Why is this? Consider the following process definition:
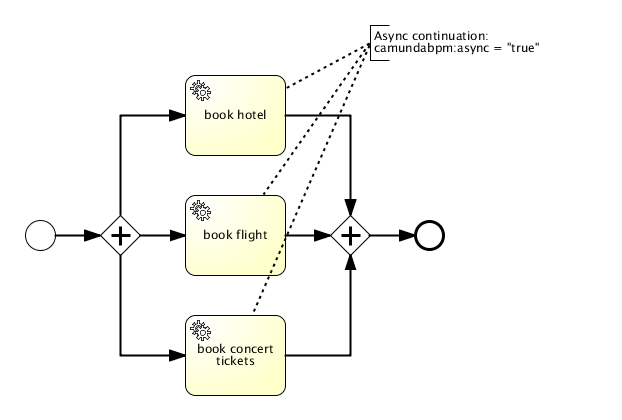
We have a parallel gateway followed by three service tasks which all perform an asynchronous continuation. As a result of this, three jobs are added to the database. Once such a job is present in the database it can be processed by the job executor. It acquires the jobs and delegates them to a thread pool of worker threads which actually process the jobs. This means that using an asynchronous continuation, you can distribute the work to this thread pool (and in a clustered scenario even across multiple thread pools in the cluster).
This is usually a good thing. However it also bears an inherent problem: consistency. Consider the parallel join after the service tasks. When the execution of a service task is completed, we arrive at the parallel join and need to decide whether to wait for the other executions or whether we can move forward. That means, for each branch arriving at the parallel join, we need to take a decision whether we can continue or whether we need to wait for one or more other executions from the other branches.
This requires synchronization between the branches of execution. The engine addresses this problem with optimistic locking. Whenever we take a decision based on data that might not be current (because another transaction might modify it before we commit), we make sure to increment the revision of the same database row in both transactions. This way, whichever transaction commits first wins and the other ones fail with an optimistic locking exception. This solves the problem in the case of the process discussed above: if multiple executions arrive at the parallel join concurrently, they all assume that they have to wait, increment the revision of their parent execution (the process instance) and then try to commit. Whichever execution is first will be able to commit and the other ones will fail with an optimistic locking exception. Since the executions are triggered by a job, the job executor will retry to perform the same job after waiting for a certain amount of time and hopefully this time pass the synchronizing gateway.
However, while this is a perfectly fine solution from the point of view of persistence and consistency, this might not always be desirable behavior at a higher level, especially if the execution has non-transactional side effects, which will not be rolled back by the failing transaction. For instance, if the book concert tickets service does not share the same transaction as the process engine, we might book multiple tickets if we retry the job. That is why jobs of the same process instance are processed exclusively by default.
Exclusive Jobs
An exclusive job cannot be performed at the same time as another exclusive job from the same process instance. Consider the process shown in the section above: if the jobs corresponding to the service tasks are treated as exclusive, the job executor will try to avoid that they are not executed in parallel. Instead, it will ensure that whenever it acquires an exclusive job from a certain process instance, it also acquires all other exclusive jobs from the same process instance and delegates them to the same worker thread. This enforces sequential execution of these jobs and in most cases avoids optimistic locking exceptions. However, this behavior is a heuristic, meaning that the job executor can only enforce sequential execution of the jobs that are available during lookup time. If a potentially conflicting job is created after that, it may be processed by another job execution thread in parallel.
Exclusive Jobs are the default configuration. All asynchronous continuations and timer events are thus exclusive by default. In addition, if you want a job to be non-exclusive, you can configure it as such using camunda:exclusive="false". For example, the following service task would be asynchronous but non-exclusive.
<serviceTask id="service" camunda:expression="${myService.performBooking(hotel, dates)}" camunda:asyncBefore="true" camunda:exclusive="false" />Is this a good solution? We had some people asking whether it was. Their concern was that it would prevent you from doing things in parallel and would thus be a performance problem. Again, two things have to be taken into consideration:
- It can be turned off if you are an expert and know what you are doing (and have understood this section). Other than that, it is more intuitive for most users if things like asynchronous continuations and timers just work. Note: one strategy to deal with OptimisticLockingExceptions at a parallel gateway is to configure the gateway to use asynchronous continuations. This way the job executor can be used to retry the gateway until the exception resolves.
- It is actually not a performance issue. Performance is an issue under heavy load. Heavy load means that all worker threads of the job executor are busy all the time. With exclusive jobs the engine will simply distribute the load differently. Exclusive jobs means that jobs from a single process instance are performed by the same thread sequentially. But consider: you have more than one single process instance. Jobs from other process instances are delegated to other threads and executed concurrently. This means that with exclusive jobs the engine will not execute jobs from the same process instance concurrently but it will still execute multiple instances concurrently. From an overall throughput perspective this is desirable in most scenarios as it usually leads to individual instances being done more quickly.
The Job Executor and Multiple Process Engines
In the case of a single, application-embedded process engine, the job executor setup is the following:

There is a single job table that the engine adds jobs to and the acquisition consumes from. Creating a second embedded engine would therefore create another acquisition thread and execution thread-pool.
In larger deployments however, this quickly leads to a poorly manageable situation. When running camunda BPM on Tomcat or an application server, the platform allows to declare multiple process engines shared by multiple process applications. With respect to job execution, one job acquisition may serve multiple job tables (and thus process engines) and a single thread-pool for execution may be used.
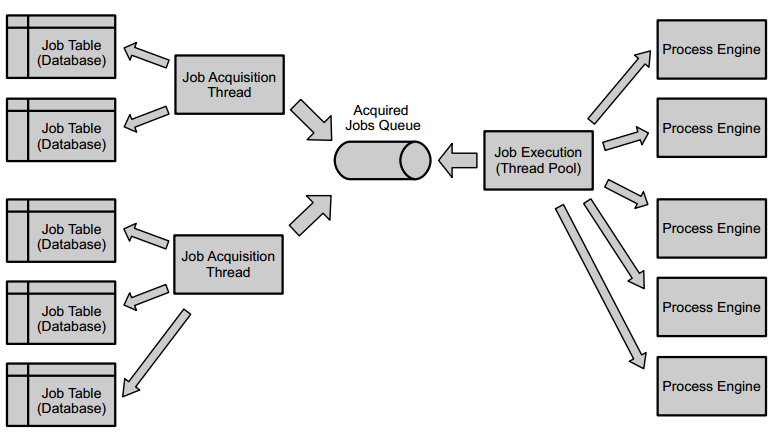
This setup enables centralized monitoring of job acquisition and execution. See the platform-specific information in the Runtime Container Integration section on how the thread pooling is implemented on the different platforms.
Different job acquisitions can also be configured differently, e.g. to meet business requirements like SLAs. For example, the acquisition's timeout when no more executable jobs are present can be configured differently per acquisition.
To which job acquisition a process engine is assigned can be specified in the declaration of the engine, so either in the processes.xml deployment descriptor of a process application or in the camunda BPM platform descriptor. The following is an example configuration that declares a new engine and assigns it to the job acquisition named default, which is created when the platform is bootstrapped.
<process-engine name="newEngine">
  <job-acquisition>default</job-acquisition>
  ...
</process-engine>
Job acquisitions have to be declared in the BPM platform's deployment descriptor, see the container-specific configuration options.
Cluster Setups
When running the camunda platform in a cluster, there is a distinction between homogeneous and heterogeneous setups. We define a cluster as a set of network nodes that all run the camunda BPM platform against the same database (at least for one engine on each node). In the homogeneous case, the same process applications (and thus custom classes like JavaDelegates) are deployed to all of the nodes, as depicted below.
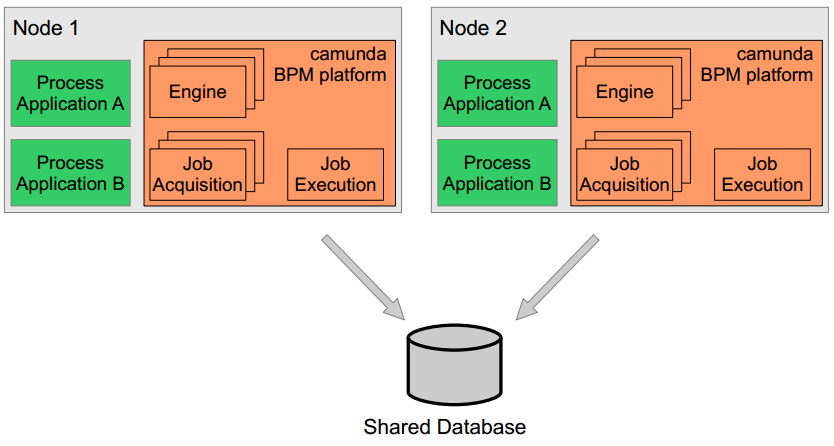
In the heterogeneous case, this is not given, meaning that some process applications areonly deployed to a part of the nodes.

Job Execution in Heterogeneous Clusters
A heterogeneous cluster setup as described above poses additional challenges to the job executor. Both platforms declare the same engine, i.e. they run against the same database. This means that jobs will be inserted into the same table. However, in the default configuration the job acquisition thread of node 1 will lock any executable jobs of that table and submit them to the local job execution pool. This means that jobs created in the context of process application B (so on node 2) may be executed on node 1 and vice versa. As the job execution may involve classes that are part of B's deployment, you are likely going to see a ClassNotFoundExeception or any of the likes.
To prevent the job acquisition on node 1 from picking jobs that belong to node 2, the process engine can be configured as deployment aware, by the setting following property in the process engine configuration:
<process-engine name="default">
  ...
  <properties>
    <property name="jobExecutorDeploymentAware">true</property>
    ...
  </properties>
</process-engine>
Now, the job acquisition thread on node 1 will only pick up jobs that belong to deployments made on that node, which solves the problem. Digging a little deeper, the acquisition will only pick up those jobs that belong to deployments that were registered with the engines it serves. Every deployment gets automatically registered. Additionally, one can explicitly register and unregister single deployments with an engine by using the ManagementService methods registerDeploymentForJobExecutor(deploymentId) and unregisterDeploymentForJobExecutor(deploymentId). It also offers a method getRegisteredDeployments() to inspect the currently registered deployments.
As this is configurable on engine level, you can also work in a mixed setup, when some deployments are shared between all nodes and some are not. You can assign the globally shared process applications to an engine that is not deployment aware and the others to a deployment aware engine, probably both running against the same database. This way, jobs created in the context of the shared process applications will get executed on any cluster node, while the others only get executed on their respective nodes.
Multi-Tenancy
Multi-tenancy regards the case in which a single Camunda installation should serve more than one tenant. For each tenant, certain guarantees of isolation should be made. For example, one tenant's process instances should not interfere with those of another tenant.
Multi-tenancy can be achieved on different levels of data isolation. On the one end of the spectrum, different tenants' data can be stored in different databases by configuring multiple process engines, while on the other end of the spectrum, runtime entities can be associated with tenant markers and are stored in the same tables. In between these two extremes, it is possible to separate tenant data into different schemas or tables.
Recommended Approach:
We recommend the approach of multiple process engines (i.e., isolation into different databases/schemas/tables) over the tenant marker approach as it is more robust and easier to use.
One Process Engine Per Tenant
Database-, schema-, and table-based multi-tenancy can be enabled by configuring one process engine per tenant. Each process engine can be configured to point to a different portion of the database. While they are isolated in that sense, they may all share computational resources such as a data source (when isolating via schemas or tables) or a thread pool for asynchronous job execution. Furthermore, the Camunda API offers convenient access to different process engines based on a tenant identifier.
Data isolation
Database, schema or table level
Advantages
- Strict data separation
- Hardly any performance overhead for application servers due to resource sharing
- In case one tenant's database state is inconsistent, no other tenant is affected
- Camunda Cockpit, Tasklist, and Admin offer tenant-specific views out of the box by switching between different process engines
Disadvantages
- Additional process engine configuration necessary
- No out-of-the-box support for tenant-independent queries
Implementation
Working with different process engines for multiple tenants comprises the following steps:
- Configuration of process engines
- Deployment of process definitions for different tenants to their respective engines
- Access to a process engine based on a tenant identifier via the Camunda API
Tutorial
You can find a tutorial here that shows how to implement multi-tenancy with data isolation by schemas.
Configuration
Multiple process engines can be configured in a configuration file or via Java API. Each engine should be given a name that is related to a tenant such that it can be identified based on the tenant. For example, each engine can be named after the tenant it serves. See the Process Engine Bootstrapping section for details.
The process engine configuration can be adapted to achieve either database-, schema- or table-based isolation of data. If different tenants should work on entirely different databases, they have to use different jdbc settings or different data sources. For schema- or table-based isolation, a single data source can be used which means that resources like a connection pool can be shared among multiple engines. The configuration option databaseTablePrefix can be used to configure database access in this case.
For background execution of processes and tasks, the process engine has a component called job executor. The job executor periodically acquires jobs from the database and submits them to a thread pool for execution. For all process applications on one server, one thread pool is used for job execution. Furthermore, it is possible to share the acquisition thread between multiple engines. This way, resources are still manageable even when a large number of process engines is used. See the section The Job Executor and Multiple Process Engines for details.
Multi-tenancy settings can be applied in the various ways of configuring a process engine. The following is an example of a bpm-platform.xml file that specifies engines for two tenants that share the same database but work on different schemas:
<?xml version="1.0" encoding="UTF-8"?>
<bpm-platform xmlns="http://www.camunda.org/schema/1.0/BpmPlatform"
              xmlns:xsi="http://www.w3.org/2001/XMLSchema-instance"
              xsi:schemaLocation="http://www.camunda.org/schema/1.0/BpmPlatform http://www.camunda.org/schema/1.0/BpmPlatform">

  <job-executor>
    <job-acquisition name="default" />
  </job-executor>

  <process-engine name="tenant1">
    <job-acquisition>default</job-acquisition>
    <configuration>org.camunda.bpm.engine.impl.cfg.StandaloneProcessEngineConfiguration</configuration>
    <datasource>java:jdbc/ProcessEngine</datasource>

    <properties>
      <property name="databaseTablePrefix">TENANT_1.</property>

      <property name="history">full</property>
      <property name="databaseSchemaUpdate">true</property>
      <property name="authorizationEnabled">true</property>
    </properties>
  </process-engine>

  <process-engine name="tenant2">
    <job-acquisition>default</job-acquisition>
    <configuration>org.camunda.bpm.engine.impl.cfg.StandaloneProcessEngineConfiguration</configuration>
    <datasource>java:jdbc/ProcessEngine</datasource>

    <properties>
      <property name="databaseTablePrefix">TENANT_2.</property>

      <property name="history">full</property>
      <property name="databaseSchemaUpdate">true</property>
      <property name="authorizationEnabled">true</property>
    </properties>
  </process-engine>
</bpm-platform>
Deployment
When developing process applications, i.e., process definitions and supplementary code, some processes may be deployed to every tenant's engine while others are tenant-specific. The processes.xml deployment descriptor that is part of every process application offers this kind of flexibility by the concept of process archives. One application can contain any number of process archive deployments, each of which can be deployed to a different process engine with different resources. See the section on the processes.xml deployment descriptor for details.
The following is an example that deploys different process definitions for two tenants. It uses the configuration property resourceRootPath that specifies a path in the deployment that contains process definitions to deploy. Accordingly, all the processes under processes/tenant1 on the application's classpath are deployed to engine tenant1, while all the processes under processes/tenant2 are deployed to engine tenant2.
<process-application
  xmlns="http://www.camunda.org/schema/1.0/ProcessApplication"
  xmlns:xsi="http://www.w3.org/2001/XMLSchema-instance">

  <process-archive name="tenant1-archive">
    <process-engine>tenant1</process-engine>
    <properties>
      <property name="resourceRootPath">classpath:processes/tenant1/</property>

      <property name="isDeleteUponUndeploy">false</property>
      <property name="isScanForProcessDefinitions">true</property>
    </properties>
  </process-archive>

  <process-archive name="tenant2-archive">
    <process-engine>tenant2</process-engine>
    <properties>
      <property name="resourceRootPath">classpath:processes/tenant2/</property>

      <property name="isDeleteUponUndeploy">false</property>
      <property name="isScanForProcessDefinitions">true</property>
    </properties>
  </process-archive>

</process-application>
Access
In order to access a specific tenant's process engine at runtime, it has to be identified by its name. The Camunda engine offers access to named engines in various programming models:
- Plain Java API: Via the ProcessEngineService any named engine can be accessed.
- CDI Integration: Named engine beans can be injected out of the box. The built-in CDI bean producer can be specialized to access the engine of the current tenant dynamically.
- Via JNDI on JBoss/Wildfly: On JBoss and Wildfly, every container-managed process engine can be looked up via JNDI.
A Tenant Marker Per Process Instance
The least isolated approach is to add tenant-specific markers in form of a process variable to running processes. This marker identifies the tenant in which context the process instance is running. In order to access only data for a specific tenant, many process engine queries allow to filter by process variables. A calling application must make sure to filter according to the correct tenant.
Data isolation
Row level with applications responsible for filtering
Advantages
- Straightforward querying for data across multiple tenants as the data for all tenants is organized in the same tables.
Disadvantages
- Requires tenant-aware queries
- Querying with process variables may reduce performance.
- Risk of disclosing data that belong to other tenants because of bugs or careless application programming.
Implementation
Working with tenant markers comprises the following aspects:
- Instantiating tenant markers
- Querying for process entities of different tenants
Instantiating
A tenant marker can be added to a process instance by passing it as a process variable on instantiation:
Map<String, Object> variables = new HashMap<String, Object>();
variables.put("TENANT_ID", "tenant1");

runtimeService.startProcessInstanceByKey("some process", variables);
For process definitions that are specific to a single tenant, it is also possible to use an execution listener on the start event that immediately sets the variable after instantiation.
Querying
Process applications that retrieve tenant-specific data must ensure that they filter by the tenant marker in order to isolate data between tenants. The following is a query that retrieves all process instances for tenant tenant1:
List<ProcessInstance> processInstances =
  runtimeService.createProcessInstanceQuery()
    .variableValueEquals("TENANT_ID", "tenant1")
    .list();
Other queries like task and execution queries offer the same filtering capabilities. For correlation via the RuntimeService#correlateMessage methods, tenant-specific correlation can be achieved by adding the tenant marker as a correlation key like:
runtimeService.createMessageCorrelation("someMessage")
  .processInstanceVariableEquals("TENANT_ID", "tenant1")
  .correlate();
Logging
We use Java Logging to avoid any third party logging requirements.
Metrics
The process engine reports runtime metrics to the database that can help with drawing conclusions about usage, load, and performance of the BPM platform. Metrics are reported in the database table ACT_RU_METER_LOG as natural numbers in the Java long range and count the occurrence of specific events. Single metric entries consist of a metric identifier, a value that the metric took in a certain timespan, and a name identifying the metric reporter. There is a set of built-in metrics that are reported by default.
Built-in Metrics
The following table describes the built-in metrics. The identifiers of all built-in metrics are available as constants of the class org.camunda.bpm.engine.management.Metrics.
| Category | Identifier | Description |
|---|---|---|
| BPMN Execution | activity-instance-start | The number of activity instances started. |
Querying
Metrics can be queried by making a MetricsQuery offered by the ManagementService. For example, the following query retrieves the number of all executed activity instances throughout the entire history of reporting:
long numCompletedActivityInstances = managementService
  .createMetricsQuery()
  .name(Metrics.ACTIVTY_INSTANCE_START)
  .sum();
The metrics query offers filters #startDate(Date date) and #endDate(Date date) to restrict the collected metrics to a certain timespan.
Configuration
Metrics Reporter
The process engine flushes the collected metrics to the runtime database tables in an interval of 15 minutes. The behavior of metrics reporting can be changed by replacing the dbMetricsReporter instance of the process engine configuration. For example, to change the reporting interval a process engine plugin replacing the reporter can be employed:
public class MetricsConfigurationPlugin implements ProcessEnginePlugin {

  public void preInit(ProcessEngineConfigurationImpl processEngineConfiguration) {
  }

  public void postInit(ProcessEngineConfigurationImpl processEngineConfiguration) {
    DbMetricsReporter metricsReporter = new DbMetricsReporter(processEngineConfiguration.getMetricsRegistry(),
        processEngineConfiguration.getCommandExecutorTxRequired());
    metricsReporter.setReportingIntervalInSeconds(5);

    processEngineConfiguration.setDbMetricsReporter(metricsReporter);
  }

  public void postProcessEngineBuild(ProcessEngine processEngine) {
  }

}
Disable Reporting
By default, all built-in metrics are reported. Using the engine configuration flag isMetricsEnabled metrics reporting can be disabled.
Incidents
Incidents are notable events that happen in the process engine. Such incidents usually indicate some kind of problem related to process execution. Examples of such incidents may be a failed job with elapsed retries (retries = 0), indicating that an execution is stuck and manual administrative action is necessary to repair the process instance. Or the fact that a process instance has entered an error state which could be modeled as a BPMN Error Boundary event or a User Task explicitly marked as "error state". If such incidents arise, the process engine fires an internal event which can be handled by a configurable incident handler.
In the default configuration, the process engine writes incidents to the process engine database. You may then query the database for different types and kinds of incidents using the IncidentQuery exposed by the RuntimeService:
runtimeService.createIncidentQuery()
  .processDefinitionId("someDefinition")
  .list();
Incidents are stored in the ACT_RU_INCIDENT database table.
If you want to customize the incident handling behavior, it is possible to replace the default incident handlers in the process engine configuration and provide custom implementations (see below).
Incident Types
There are different types of incidents. Currently the process engine supports the following incidents:
- Failed Job: this type of incident is raised when automatic retries for a Job (Timer or Asynchronous continuation) have elapsed. The incident indicates that the corresponding execution is stuck and will not continue automatically. Administrative action is necessary. The incident is resolved when the job is manually executed or when the retries for the corresponding job are reset to a value > 0.
(De-)Activating Incidents
The process engine allows you to configure whether certain incidents should be raised or not on an incident type base.
The following properties are available in the org.camunda.bpm.engine.ProcessEngineConfiguration class:
createIncidentOnFailedJobEnabled: indicates whether Failed Job incidents should be raised or not.
Implementing custom Incident Handlers
Incident Handlers are responsible for handling incidents of a certain type (see Incident Types).
An Incident Handler implements the following interface:
public interface IncidentHandler {

  public String getIncidentHandlerType();

  public void handleIncident(String processDefinitionId, String activityId, String executionId, String configuration);

  public void resolveIncident(String processDefinitionId, String activityId, String executionId, String configuration);

}
The handleIncident method is called when a new incident is created. The resolveIncident method is called when an incident is resolved. If you want to provide a custom incident handler implementation you can replace one or multiple incident handlers using the following method:
org.camunda.bpm.engine.impl.cfg.ProcessEngineConfigurationImpl.setCustomIncidentHandlers(List<IncidentHandler>)
An example of a custom incident handler could be a handler which, in addition to the default behavior, also sends an email to an administrator.
Process Engine Plugins
The process engine configuration can be extended through process engine plugins. A process engine plugin is an extension to the process engine configuration.
A plugin must provide an implementation of the ProcessEnginePlugin interface.
Configuring Process Engine Plugins
Process engine plugins can be configured
- in the BPM Platform Deployment Descriptors (bpm-platform.xml / processes.xml),
- in JBoss Application Server 7 / Wildfly 8 configuration file (standalone.xml / domain.xml)
- using Spring Beans XML,
- programatically.
The following is an example of how to configure a process engine plugin in a bpm-platform.xml file:
<?xml version="1.0" encoding="UTF-8"?>
<bpm-platform xmlns="http://www.camunda.org/schema/1.0/BpmPlatform"
  xmlns:xsi="http://www.w3.org/2001/XMLSchema-instance"
  xsi:schemaLocation="http://www.camunda.org/schema/1.0/BpmPlatform http://www.camunda.org/schema/1.0/BpmPlatform ">

  <job-executor>
    <job-acquisition name="default" />
  </job-executor>

  <process-engine name="default">
    <job-acquisition>default</job-acquisition>
    <configuration>org.camunda.bpm.engine.impl.cfg.JtaProcessEngineConfiguration</configuration>
    <datasource>jdbc/ProcessEngine</datasource>

    <plugins>
      <plugin>
        <class>org.camunda.bpm.engine.MyCustomProcessEnginePlugin</class>
        <properties>
          <property name="boost">10</property>
          <property name="maxPerformance">true</property>
          <property name="actors">akka</property>
        </properties>
      </plugin>
    </plugins>
  </process-engine>

</bpm-platform>
A process engine plugin class must be visible to the classloader which loads the process engine classes.
List of built-in Process Engine Plugins
The following is a list of built-in process engine plugins:
Identity Service
The identity service is an API abstraction over various User / Group repositories. The basic entities are
- User: a user identified by a unique Id
- Group: a group identified by a unique Id
- Membership: the relationship between users and groups
Example:
User demoUser = processEngine.getIdentityService()
  .createUserQuery()
  .userId("demo")
  .singleResult();
camunda BPM distinguishes between read-only and writable user repositories. A read-only user repository provides read-only access to the underlying user / group database. A writable user repository allows write access to the user database which includes creating, updating and deleting users and groups.
In order to provide a custom identity provider implementation, the following interfaces can be implemented:
- org.camunda.bpm.engine.impl.identity.ReadOnlyIdentityProvider
- org.camunda.bpm.engine.impl.identity.WritableIdentityProvider
The Database Identity Service
The database identity service uses the process engine database for managing users and groups. This is the default identity service implementation used if no alternative identity service implementation is provided.
The Database Identity Service implements both ReadOnlyIdentityProvider and WritableIdentityProvider providing full CRUD functionality in Users, Groups and Memberships.
The LDAP Identity Service
The LDAP identity service provides read-only access to an LDAP-based user / group repository. The identity service provider is implemented as a Process Engine Plugin and can be added to the process engine configuration. In that case it replaces the default Database Identity Service.
In order to use the LDAP identity service, the camunda-identity-ldap.jar library has to be added to the classloader of the process engine.
<dependency>
  <groupId>org.camunda.bpm.identity</groupId>
  <artifactId>camunda-identity-ldap</artifactId>
</dependency>
Activating the LDAP Plugin
The following is an example of how to configure the LDAP Identity Provider Plugin using Spring XML:
<beans xmlns="http://www.springframework.org/schema/beans"
       xmlns:xsi="http://www.w3.org/2001/XMLSchema-instance"
       xsi:schemaLocation="http://www.springframework.org/schema/beans   http://www.springframework.org/schema/beans/spring-beans.xsd">
  <bean id="processEngineConfiguration" class="org.camunda.bpm.engine.impl.cfg.StandaloneInMemProcessEngineConfiguration">
    ...
    <property name="processEnginePlugins">
      <list>
        <ref bean="ldapIdentityProviderPlugin" />
      </list>
    </property>
  </bean>
  <bean id="ldapIdentityProviderPlugin" class="org.camunda.bpm.identity.impl.ldap.plugin.LdapIdentityProviderPlugin">
    <property name="serverUrl" value="ldap://localhost:3433/" />
    <property name="managerDn" value="uid=daniel,ou=office-berlin,o=camunda,c=org" />
    <property name="managerPassword" value="daniel" />
    <property name="baseDn" value="o=camunda,c=org" />

    <property name="userSearchBase" value="" />
    <property name="userSearchFilter" value="(objectclass=person)" />
    <property name="userIdAttribute" value="uid" />
    <property name="userFirstnameAttribute" value="cn" />
    <property name="userLastnameAttribute" value="sn" />
    <property name="userEmailAttribute" value="mail" />
    <property name="userPasswordAttribute" value="userpassword" />

    <property name="groupSearchBase" value="" />
    <property name="groupSearchFilter" value="(objectclass=groupOfNames)" />
    <property name="groupIdAttribute" value="ou" />
    <property name="groupNameAttribute" value="cn" />
    <property name="groupMemberAttribute" value="member" />
  </bean>
</beans>
The following is an example of how to configure the LDAP Identity Provider Plugin in bpm-platform.xml / processes.xml:
<process-engine name="default">
  <job-acquisition>default</job-acquisition>
  <configuration>org.camunda.bpm.engine.impl.cfg.StandaloneProcessEngineConfiguration</configuration>
  <datasource>java:jdbc/ProcessEngine</datasource>

  <properties>...</properties>

  <plugins>
    <plugin>
      <class>org.camunda.bpm.identity.impl.ldap.plugin.LdapIdentityProviderPlugin</class>
      <properties>

        <property name="serverUrl">ldap://localhost:4334/</property>
        <property name="managerDn">uid=jonny,ou=office-berlin,o=camunda,c=org</property>
        <property name="managerPassword">s3cr3t</property>

        <property name="baseDn">o=camunda,c=org</property>

        <property name="userSearchBase"></property>
        <property name="userSearchFilter">(objectclass=person)</property>

        <property name="userIdAttribute">uid</property>
        <property name="userFirstnameAttribute">cn</property>
        <property name="userLastnameAttribute">sn</property>
        <property name="userEmailAttribute">mail</property>
        <property name="userPasswordAttribute">userpassword</property>

        <property name="groupSearchBase"></property>
        <property name="groupSearchFilter">(objectclass=groupOfNames)</property>
        <property name="groupIdAttribute">ou</property>
        <property name="groupNameAttribute">cn</property>

        <property name="groupMemberAttribute">member</property>

      </properties>
    </plugin>
  </plugins>

</process-engine>
Administrator Authorization Plugin The LDAP Identity Provider Plugin is usually used in combination with the Administrator Authorization Plugin which allows you to grant administrator authorizations for a particular LDAP User / Group.
Configuration Properties of the LDAP Plugin
The LDAP Identity Provider provides the following configuration properties:
| Property | Description |
|---|---|
serverUrl |
The url of the LDAP server to connect to. |
managerDn |
The absolute DN of the manager user of the LDAP directory. |
managerPassword |
The password of the manager user of the LDAP directory |
baseDn |
The base DN: identifies the root of the LDAP directory. Is appended to all DN names composed for searching for users or groups. Example: |
userSearchBase |
Identifies the node in the LDAP tree under which the plugin should search for users. Must be relative to Example: |
userSearchFilter |
LDAP query string used when searching for users. Example: |
userIdAttribute |
Name of the user Id property. Example: |
userFirstnameAttribute |
Name of the firstname property. Example: |
userLastnameAttribute |
Name of the lastname property. Example: |
userEmailAttribute |
Name of the email property. Example: |
userPasswordAttribute |
Name of the password property. Example: |
groupSearchBase |
Identifies the node in the LDAP tree under which the plugin should search for groups. Must be relative to Example: |
groupSearchFilter |
LDAP query string used when searching for groups. Example: |
groupIdAttribute |
Name of the group Id property. Example: |
groupNameAttribute |
Name of the group Name property. Example: |
groupTypeAttribute |
Name of the group Type property. Example: |
groupMemberAttribute |
Name of the member attribute. Example: |
acceptUntrustedCertificates |
Accept of untrusted certificates if LDAP server uses SSL. Warning: we strongly advise against using this property. Better install untrusted certificates to JDK key store. |
useSsl |
Set to true if LDAP connection uses SSL. Default: |
initialContextFactory |
Value for the |
securityAuthentication |
Value for the |
usePosixGroups |
Indicates whether posix groups are used. If true, the connector will use a simple
(unqualified) user id when querying for groups by group member instead of the full DN.
Default: |
allowAnonymousLogin |
Allows to login anonymously without a password. Default: Warning: we strongly advise against using this property. You should configure your LDAP to use simple authentication without anonymous login. |
sortControlSupported |
If this property is set to Note: the support of search result ordering is not be implemented by every LDAP server. Make sure that your currently used LDAP Server implements the RFC 2891. |
Authorization Service
Deployments
Before a process (or case) can be executed by the process engine, it has to be deployed. A deployment is a logical entity that groups multiple resources that are deployed together. Deployments can be made programmatically via Java API or REST API, or declaratively for resources of a process application. This section covers advanced deployment concepts.
Deployments in a Clustered Scenario
Before the process engine starts to perform a deployment it tries to acquire an exclusive lock on a row in the table ACT_RU_PROPERTY. When the process engine is able to acquire the lock successfully, it starts to deploy and holds the exclusive lock as long as the execution of the deployment take place.
If a deployment of the same resources is performed on multiple nodes in a clustered scenario simultaneously, the acquired exclusive lock ensures that duplicate filter works as expected. Otherwise, parallel deployments may result in multiple versions of the same process definition.
In consequence, the exclusive lock enforces a sequential order of deployments.
By default, the exclusive lock acquisition is enabled. If this is not desired, it is possible to disable it by setting the process engine configuration flag named deploymentLockUsed to false.
Process Diagram Visualization
A BPMN process diagram is a formidable place to visualize information around your process. We recommend using JavaScript libraries to display process diagrams and enrich them with additional information.
In our web applications Cockpit and Tasklist, we use bpmn.io, a toolkit for rendering BPMN 2.0 process models directly in the browser. It allows to add additional information to the diagram and includes ways for user interaction. Although bpmn.io is still under development, its API is rather stable.
The previous Javascript BPMN renderer can still be found at camunda-bpmn.js, but it is not actively developed anymore.
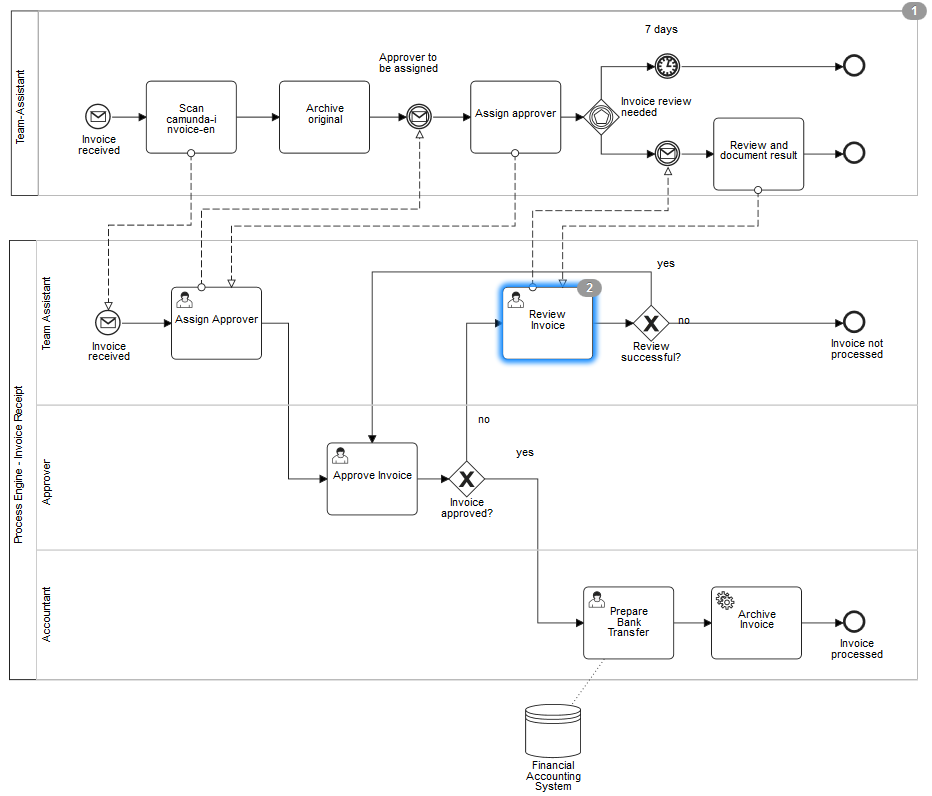
Using bpmn.io to render a diagram
In order to render a process diagram, you need to retrieve the diagram XML via the Java- or REST API. The following example shows how to render the process xml using bpmn.io. For more documentation regarding the annotation of the diagram and user interaction, please refer to the bpmn.io page.
var BpmnViewer = require('bpmn-js');

var xml = getBpmnXml(); // get the process xml via REST
var viewer = new BpmnViewer({ container: 'body' });

viewer.importXML(xml, function(err) {

  if (err) {
    console.log('error rendering', err);
  } else {
    console.log('rendered');
  }
});
Alternatively, you can use the bpmn-viewer widget from the Camunda commons UI.
Process Applications
Overview
A Process Application is an ordinary Java Application that uses the camunda process engine for BPM and Worklow functionality. Most such applications will start their own process engine (or use a process engine provided by the runtime container), deploy some BPMN 2.0 process definitions and interact with process instances derived from these process definitions. Since most process applications perform very similar bootstrapping, deployment and runtime tasks, we generalized this functionality into a Java Class which is named - Surprise! - ProcessApplication. The concept is similar to the javax.ws.rs.core.Application class in JAX-RS: adding the process application class allows you to bootstrap and configure the provided services.
Adding a ProcessApplication class to your Java Application provides your applications with the following services:
- Bootstrapping embedded process engine(s) or looking up container managed process engine(s). You can define multiple process engines in a file named
processes.xmlwhich is added to your application. The ProcessApplication class makes sure this file is picked up and the defined process engines are started and stopped as the application is deployed / undeployed. - Automatic deployment of classpath BPMN 2.0 resources. You can define multiple deployments (process archives) in the
processes.xmlfile. The process application class makes sure the deployments are performed upon deployment of your application. Scanning your application for process definition resource files (engine in .bpmn20.xml or .bpmn) is supported as well. - Resolution of application-local Java Delegate Implementations and Beans in case of a multi-application deployment. The process application class allows your java application to expose your local Java Delegate implementations or Spring / CDI beans to a shared, container managed process engine. This way you can start a single process engine that dispatches to multiple process applications that can be (re-)deployed independently.
Transforming an existing Java Application into a Process Application is easy and non-intrusive. You simply have to add:
- A Process Application class: The Process Application class constitutes the interface between your application and the process engine. There are different base classes you can extend to reflect different environments (e.g. Servlet vs. EJB Container).
- A processes.xml file to META-INF: The deployment descriptor file allows you to provide a declarative configuration of the deployment(s) that this process application makes to the process engine. It can be empty (see the empty processes.xml section) and serve as simple marker file. If it is not present then the engine will start up but auto-deployment will not be performed.
Heads-up! You might want to checkout the Getting Started Tutorial first as it explains the creation of a process application step by step or the Project Templates for Maven, which gives you a complete running process application out of the box.
The Process Application class
You can delegate the bootstrapping of the process engine and process deployment to a process application class. The basic ProcessApplication functionality is provided by the org.camunda.bpm.application.AbstractProcessApplication base class. Based on this class there is a set of environment-specific sub classes that realize integration within a specific environment:
- ServletProcessApplication: To be used for Process Applications in a Servlet Container like Apache Tomcat.
- EjbProcessApplication: To be used in a Java EE application server like JBoss, Glassfish or IBM WebSphere Application Server.
- EmbeddedProcessApplication: To be used when embedding the process engine in an ordinary Java SE application.
- SpringProcessApplication: To be used for bootstrapping the process application from a Spring Application Context.
In the following section, we walk through the different implementations and discuss where and how they can be used.
The ServletProcessApplication
All Servlet Containers
The Servlet Process Application is supported on all containers. Read the note about Servlet Process Application and EJB / Java EE containers.
Packaging: WAR (or embedded WAR inside EAR)
The ServletProcessApplication class is the base class for developing Process Applications based on the Servlet Specification (Java Web Applications). The servlet process application implements the javax.servlet.ServletContextListener interface which allows it to participate in the deployment lifecycle of your Web application
The following is an example of a Servlet Process Application:
package org.camunda.bpm.example.loanapproval;

import org.camunda.bpm.application.ProcessApplication;
import org.camunda.bpm.application.impl.ServletProcessApplication;

@ProcessApplication("Loan Approval App")
public class LoanApprovalApplication extends ServletProcessApplication {
  // empty implementation
}
Notice the @ProcessApplication annotation. This annotation fulfills two purposes:
- providing the name of the ProcessApplication: You can provide a custom name for your process application using the annotation:
@ProcessApplication("Loan Approval App"). If no name is provided, a name is automatically detected. In case of a ServletProcessApplication, the name of the ServletContext is used. - triggering auto-deployment. In a Servlet 3.0 container, the annotation is sufficient for making sure that the process application is automatically picked up by the servlet container and automatically added as a ServletContextListener to the Servlet Container deployment. This functionality is realized by a
javax.servlet.ServletContainerInitializerimplementation namedorg.camunda.bpm.application.impl.ServletProcessApplicationDeployerwhich is located in the camunda-engine module. The implementation works for both embedded deployment of the camunda-engine.jar as a web application library in theWEB-INF/libfolder of your WAR file or for the deployment of the camunda-engine.jar as a shared library in the shared library (e.g. Apache Tomcat globallib/folder) directory of your application server. The Servlet 3.0 Specification foresees both deployment scenarios. In case of embedded deployment, theServletProcessApplicationDeployeris notified once, when the webapplication is deployed. In case of deployment as a shared library, theServletProcessApplicationDeployeris notified for each WAR file containing a class annotated with@ProcessApplication(as required by the Servlet 3.0 Specification).
This means that in case you deploy to a Servlet 3.0 compliant container (such as Apache Tomcat 7) annotating your class with @ProcessApplication is sufficient.
There is a project template for Maven called camunda-archetype-servlet-war, which gives you a complete running project based on a ServletProcessApplication.
Deploying to Apache Tomcat 6 or other Pre-Servlet 3.0 Containers
In a Pre-Servlet 3.0 container such as Apache Tomcat 6 (or JBoss Application Server 5 for that matter), you need manually register your ProcessApplication class as Servlet Context Listener in the Servlet Container. This can be achieved by adding a listener element to your WEB-INF/web.xml file:
<?xml version="1.0" encoding="UTF-8"?>
<web-app version="2.5" xmlns="http://java.sun.com/xml/ns/javaee"
         xmlns:xsi="http://www.w3.org/2001/XMLSchema-instance"
         xsi:schemaLocation="http://java.sun.com/xml/ns/javaee http://java.sun.com/xml/ns/javaee/web-app_2_5.xsd">

  <listener>
    <listener-class>org.my.project.MyProcessApplication</listener-class>
  </listener>

</web-app>
Using the ServletProcessApplication inside an EJB / Java EE Container such as Glassfish or JBoss
You can use the ServletProcessApplication inside an EJB / Java EE Container such as Glassfish or JBoss. Process application bootstrapping and deployment will work in the same way. However, you will not be able to use all Java EE features at runtime. In contrast to the EjbProcessApplication (see next section), the ServletProcessApplication does not perform proper Java EE cross-application context switching. When the process engine invokes Java Delegates from your application, only the Context Class Loader of the current Thread is set to the classloader of your application. This does allow the process engine to resolve Java Delegate implementations from your application but the container will not perform an EE context switch to your application. As a consequence, if you use the ServletProcessApplciation inside a Java EE container, you will not be able to use features like:
- using CDI beans and EJBs as JavaDelegate Implementations in combination with the Job Executor,
- using @RequestScoped CDI Beans with the Job Executor,
- looking up JNDI resources from the application's naming scope
If your application does not use such features, it is perfectly fine to use the ServletProcessApplication inside an EE container. In that case you only get servlet specification guarantees.
The EjbProcessApplication
Java EE 6 Container only
The EjbProcessApplication is supported in Java EE 6 containers or higher. It is not supported on Servlet Containers like Apache Tomcat. It may be adapted to work inside Java EE 5 Containers.
Packaging: JAR, WAR, EAR
The EjbProcessApplication is the base class for developing Java EE based Process Applications. An Ejb Process Application class itself must be deployed as an EJB.
In order to add an Ejb Process Application to your Java Application, you have two options:
- Bundling the camunda-ejb-client: we provide a generic, reusable EjbProcessApplication implementation (named
org.camunda.bpm.application.impl.ejb.DefaultEjbProcessApplication) bundled as a maven artifact. The simplest possibility is to add this implementation as a maven dependency to your application. - Writing a custom EjbProcessApplication: if you want to customize the behavior of the EjbProcessApplication, you can write a custom subclass of the EjbProcessApplication class and add it to your application.
Both options are explained in greater detail below.
Bundling the camunda-ejb-client Jar
The most convenient option for deploying a process application to an Ejb Container is by adding the following maven dependency to you maven project:
<dependency>
  <groupId>org.camunda.bpm.javaee</groupId>
  <artifactId>camunda-ejb-client</artifactId>
</dependency>
The camunda-ejb-client contains a reusable default implementation of the EjbProcessApplication as a Singleton Session Bean with auto-activation.
This deployment option requires that your project is a composite deployment (such as a WAR or EAR) since you need to add a library JAR file. You could of course use something like the maven shade plugin for adding the class contained in the camunda-ejb-client artifact to a JAR-based deployment.
camunda-archetype-ejb-war, which gives you a complete running project based on the camunda-ejb-client.
Deploying a custom EjbProcessApplication class
If you want to customize the behavior of the the EjbProcessApplication class you have the option of writing a custom EjbProcessApplication class. The following is an example of such an implementation:
@Singleton
@Startup
@ConcurrencyManagement(ConcurrencyManagementType.BEAN)
@TransactionAttribute(TransactionAttributeType.REQUIRED)
@ProcessApplication
@Local(ProcessApplicationInterface.class)
public class MyEjbProcessApplication extends EjbProcessApplication {

  @PostConstruct
  public void start() {
    deploy();
  }

  @PreDestroy
  public void stop() {
    undeploy();
  }

}
Expose servlet context path using a custom EjbProcessApplication
If your application is a WAR (or a WAR inside an EAR) and you want to use embedded or external task forms inside the Tasklist application, then your custom EjbProcessApplication must expose the servlet context path of your application as a property. This enables the Tasklist to resolve the path to the embedded or external task forms.
Therefore your custom EjbProcessApplication must be extended by a Map and a getter-method for that Map as follows:
@Singleton
@Startup
@ConcurrencyManagement(ConcurrencyManagementType.BEAN)
@TransactionAttribute(TransactionAttributeType.REQUIRED)
@ProcessApplication
@Local(ProcessApplicationInterface.class)
public class MyEjbProcessApplication extends EjbProcessApplication {

  protected Map<String, String> properties = new HashMap<String, String>();

  @PostConstruct
  public void start() {
    deploy();
  }

  @PreDestroy
  public void stop() {
    undeploy();
  }

  public Map<String, String> getProperties() {
    return properties;
  }

}
Furthermore, to provide the servlet context path a custom javax.servlet.ServletContextListener must be added to your application. Inside your custom implementation of the ServletContextListener you have to
- inject your custom EjbProcessApplication using the
@EJBannotation, - resolve the servlet context path and
- expose the servlet context path through the
ProcessApplicationInfo#PROP_SERVLET_CONTEXT_PATHproperty inside your custom EjbProcessApplication.
This can be done as follows:
public class ProcessArchiveServletContextListener implements ServletContextListener {

  @EJB
  private ProcessApplicationInterface processApplication;

  public void contextInitialized(ServletContextEvent contextEvent) {

    String contextPath = contextEvent.getServletContext().getContextPath();

    Map<String, String> properties = processApplication.getProperties();
    properties.put(ProcessApplicationInfo.PROP_SERVLET_CONTEXT_PATH, contextPath);
  }

  public void contextDestroyed(ServletContextEvent arg0) {
  }

}
Finally the custom ProcessArchiveServletContextListener has to be added to your WEB-INF/web.xml file:
<?xml version="1.0" encoding="UTF-8"?>
<web-app version="2.5" xmlns="http://java.sun.com/xml/ns/javaee"
         xmlns:xsi="http://www.w3.org/2001/XMLSchema-instance"
         xsi:schemaLocation="http://java.sun.com/xml/ns/javaee http://java.sun.com/xml/ns/javaee/web-app_2_5.xsd">

  <listener>
    <listener-class>org.my.project.ProcessArchiveServletContextListener</listener-class>
  </listener>

  ...

</web-app>
Invocation Semantics of the EjbProcessApplication
The fact that the EjbProcessApplication exposes itself as a Session Bean Component inside the EJB container determines
- the invocation semantics when invoking code from the process application and
- the nature of the
ProcessApplicationReferenceheld by the process engine.
When the process engine invokes the Ejb Process Application, it gets EJB invocation semantics. For example, if your process application provides a JavaDelegate implementation, the process engine will call the EjbProcessApplication's execute(java.util.concurrent.Callable) method and from that method invoke JavaDelegate. This makes sure that
- the call is intercepted by the EJB container and "enters" the process application legally.
- the
JavaDelegatemay take advantage of the EjbProcessApplication's invocation context and resolve resources from the component's environment (such as ajava:comp/BeanManager).
                   Big pile of EJB interceptors
                                |
                                |  +--------------------+
                                |  |Process Application |
                  invoke        v  |                    |
 ProcessEngine ----------------OOOOO--> Java Delegate   |
                                   |                    |
                                   |                    |
                                   +--------------------+
When the EjbProcessApplication registers with a process engine (see ManagementService#registerProcessApplication(String, ProcessApplicationReference), the process application passes a reference to itself to the process engine. This reference allows the process engine to reference the process application. The EjbProcessApplication takes advantage of the Ejb Containers naming context and passes a reference containing the EJBProcessApplication's Component Name to the process engine. Whenever the process engine needs access to process application, the actual component instance is looked up and invoked.
The EmbeddedProcessApplication
All containers
The EmbeddedProcessApplication can only be used with an embedded process engine and does not provide auto-activation.
Packaging: JAR, WAR, EAR
The org.camunda.bpm.application.impl.EmbeddedProcessApplication can only be used in combination with an embedded process engine. Usage in combination with a Shared Process Engine is not supported as the class performs no process application context switching at runtime.
The Embedded Process Application also does not provide auto-startup. You need to manually call the deploy method of your process application:
// instantiate the process application
MyProcessApplication processApplication = new MyProcessApplication();

// deploy the process application
processApplication.deploy();

// interact with the process engine
ProcessEngine processEngine = BpmPlatform.getDefaultProcessEngine();
processEngine.getRuntimeService().startProcessInstanceByKey(...);

// undeploy the process application
processApplication.undeploy();
Where the class MyProcessApplication could look like this:
@ProcessApplication(
    name="my-app",
    deploymentDescriptors={"path/to/my/processes.xml"}
)
public class MyProcessApplication extends EmbeddedProcessApplication {

}
The SpringProcessApplication
Supported on
The spring process application is currently not supported on JBoss AS 7 / Wildfly 8.
Packaging: JAR, WAR, EAR
The org.camunda.bpm.engine.spring.application.SpringProcessApplication class allows bootstrapping a process application through a Spring Application Context. You can either reference the SpringProcessApplication class from an XML-based application context configuration file or use an annotation-based setup.
If your application is a WebApplication you should use org.camunda.bpm.engine.spring.application.SpringServletProcessApplication as it provides support for exposing the servlet context path through the ProcessApplicationInfo#PROP_SERVLET_CONTEXT_PATH property.
We recommend to always use SpringServletProcessApplication unless the deployment is not a web application. Using this class requires the
org.springframework:spring-web module to be on the classpath.
Configuring a Spring Process Application
The following shows an example of how to bootstrap a SpringProcessApplication inside a spring application context XML file:
<beans xmlns="http://www.springframework.org/schema/beans"
       xmlns:xsi="http://www.w3.org/2001/XMLSchema-instance"
       xsi:schemaLocation="http://www.springframework.org/schema/beans
                           http://www.springframework.org/schema/beans/spring-beans.xsd">

  <bean id="invoicePa" class="org.camunda.bpm.engine.spring.application.SpringServletProcessApplication" />

</beans>
(Remember that you additionally need a META-INF/processes.xml file.
Process Application Name
The SpringProcessApplication will use the bean name (id="invoicePa" in the example above) as auto-detected name for the process application. Make sure to provide a unique process application name here (unique across all process applications deployed on a single application server instance.) As an alternative, you can provide a custom subclass of SpringProcessApplication (or SpringServletProcessApplication) and override the getName() method.
Configuring a Managed Process Engine using Spring
If you use a Spring Process Application, you may want to configure your process engine inside the spring application context Xml file (as opposed to the processes.xml file). In this case, you must use the org.camunda.bpm.engine.spring.container.ManagedProcessEngineFactoryBean class for creating the process engine object instance. In addition to creating the process engine object, this implementation registers the process engine with the BPM Platform infrastructure so that the process engine is returned by the ProcessEngineService. The following is an example of how to configure a managed process engine using Spring.
<beans xmlns="http://www.springframework.org/schema/beans"
       xmlns:xsi="http://www.w3.org/2001/XMLSchema-instance"
       xsi:schemaLocation="http://www.springframework.org/schema/beans
                           http://www.springframework.org/schema/beans/spring-beans.xsd">

    <bean id="dataSource" class="org.springframework.jdbc.datasource.TransactionAwareDataSourceProxy">
        <property name="targetDataSource">
            <bean class="org.springframework.jdbc.datasource.SimpleDriverDataSource">
                <property name="driverClass" value="org.h2.Driver"/>
                <property name="url" value="jdbc:h2:mem:camunda;DB_CLOSE_DELAY=1000"/>
                <property name="username" value="sa"/>
                <property name="password" value=""/>
            </bean>
        </property>
    </bean>

    <bean id="transactionManager" class="org.springframework.jdbc.datasource.DataSourceTransactionManager">
        <property name="dataSource" ref="dataSource"/>
    </bean>

    <bean id="processEngineConfiguration" class="org.camunda.bpm.engine.spring.SpringProcessEngineConfiguration">
        <property name="processEngineName" value="default" />
        <property name="dataSource" ref="dataSource"/>
        <property name="transactionManager" ref="transactionManager"/>
        <property name="databaseSchemaUpdate" value="true"/>
        <property name="jobExecutorActivate" value="false"/>
    </bean>

    <!-- using ManagedProcessEngineFactoryBean allows registering the ProcessEngine with the BpmPlatform -->
    <bean id="processEngine" class="org.camunda.bpm.engine.spring.container.ManagedProcessEngineFactoryBean">
        <property name="processEngineConfiguration" ref="processEngineConfiguration"/>
    </bean>

    <bean id="repositoryService" factory-bean="processEngine" factory-method="getRepositoryService"/>
    <bean id="runtimeService" factory-bean="processEngine" factory-method="getRuntimeService"/>
    <bean id="taskService" factory-bean="processEngine" factory-method="getTaskService"/>
    <bean id="historyService" factory-bean="processEngine" factory-method="getHistoryService"/>
    <bean id="managementService" factory-bean="processEngine" factory-method="getManagementService"/>

</beans>
The processes.xml deployment descriptor
The processes.xml deployment descriptor contains the deployment metadata for a process application. The following example is a simple example of a processes.xml deployment descriptor:
<process-application
  xmlns="http://www.camunda.org/schema/1.0/ProcessApplication"
  xmlns:xsi="http://www.w3.org/2001/XMLSchema-instance">

  <process-archive name="loan-approval">
    <process-engine>default</process-engine>
    <properties>
      <property name="isDeleteUponUndeploy">false</property>
      <property name="isScanForProcessDefinitions">true</property>
    </properties>
  </process-archive>

</process-application>
A single deployment (process-archive) is declared. The process archive has the name loan-approval and is deployed to the process engine with the name default. Two additional properties are specified:
isDeleteUponUndeploy: this property controls whether the undeployment of the process application should entail that the process engine deployment is deleted from the database. The default setting is false. If this property is set to true, undeployment of the process application leads to the removal of the deplyoment (including process instances) from the database.isScanForProcessDefinitions: if this property is set to true, the classpath of the process application is automatically scanned for process definition resources. Process definition resources must end in.bpmn20.xmlor.bpmn.
See Deployment Descriptor Reference for complete documentation of the syntax of the processes.xml file.
Empty processes.xml
The processes.xml may optionally be empty (left blank). In this case default values are used. The empty processes.xml corresponds to the following configuration:
<process-application
  xmlns="http://www.camunda.org/schema/1.0/ProcessApplication"
  xmlns:xsi="http://www.w3.org/2001/XMLSchema-instance">

  <process-archive>
    <properties>
      <property name="isDeleteUponUndeploy">false</property>
      <property name="isScanForProcessDefinitions">true</property>
    </properties>
  </process-archive>

</process-application>
The empty processes.xml will scan for process definitions and perform a single deployment to the default process engine.
Location of the processes.xml file
The default location of the processes.xml file is META-INF/processes.xml. The camunda BPM platform will parse and process all processes.xml files on the classpath of a process application. Composite process applications (WAR / EAR) may carry multiple subdeployments providing a META-INF/processes.xml file.
In an apache maven based project, add the the processes.xml file to the src/main/resources/META-INF folder.
Custom location for the processes.xml file
If you want to specify a custom location for the processes.xml file, you need to use the deploymentDescriptors property of the @ProcessApplication annotation:
@ProcessApplication(
    name="my-app",
    deploymentDescriptors={"path/to/my/processes.xml"}
)
public class MyProcessApp extends ServletProcessApplication {

}
The provided path(s) must be resolvable through the ClassLoader#getResourceAsStream(String)-Method of the classloader returned by the AbstractProcessApplication#getProcessApplicationClassloader() method of the process application.
Multiple distinct locations are supported.
Configuring process engines in the processes.xml file
The processes.xml file can also be used for configuring one or multiple process engine(s). The following is an example of a configuration of a process engine inside a processes.xml file:
<process-application
xmlns="http://www.camunda.org/schema/1.0/ProcessApplication"
xmlns:xsi="http://www.w3.org/2001/XMLSchema-instance">

  <process-engine name="my-engine">
    <configuration>org.camunda.bpm.engine.impl.cfg.StandaloneInMemProcessEngineConfiguration</configuration>
  </process-engine>

  <process-archive name="loan-approval">
    <process-engine>my-engine</process-engine>
    <properties>
      <property name="isDeleteUponUndeploy">false</property>
      <property name="isScanForProcessDefinitions">true</property>
    </properties>
  </process-archive>

</process-application>
The <configuration>...</configuration> property allows specifying the name of a process engine configuration class to be used when building the process engine.
Process Application Deployment
When deploying a set of BPMN 2.0 files to the process engine, a process deployment is created. The process deployment is performed to the process engine database so that when the process engine is stopped and restarted, the process definitions can be restored from the database and execution can continue. When a process application performs a deployment, in addition to the database deployment it will create a registration for this deployment with the process engine. This is illustrated in the following figure:
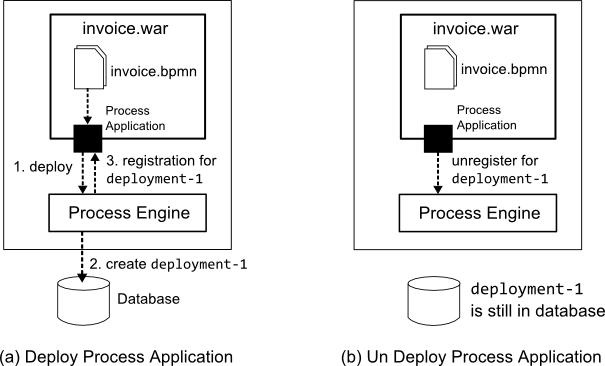
Deployment of the process application "invoice.war" is illustrated on the left hand side:
- The process application "invoice.war" deploys the invoice.bpmn file to the process engine.
- The process engine checks the database for a previous deployment. In this case, no such deployment exists. As a result, a new database deployment
deployment-1is created for the process definition. - The process application is registered for the
deployment-1and the registration is returned.
When the process application is undeployed, the registration for the deployment is removed (see right hand side of the illustration above). After the registration is cleared, the deployment is still present in the database.
The registration allows the process engine to load additional Java Classes and resources from the process application when executing the processes. In contrast to the database deployment, which can be restored whenever the process engine is restarted, the registration of the process application is kept as in-memory state. This in-memory state is local to an individual cluster node, allowing us to undeploy or redeploy a process application on a particular cluster node without affecting the other nodes and without having to restart the process engine. If the Job Executor is deployment aware, job execution will also stop for jobs created by this process application. However, as a consequence, the registration also needs to be re-created when the application server is restarted. This happens automatically if the process application takes part in the application server deployment lifecycle. For instance, ServletProcessApplications are deployed as ServletContextListeners and when the servlet context is started, it creates the deployment and registration with the process engine. The redeployment process is illustrated in the next figure:
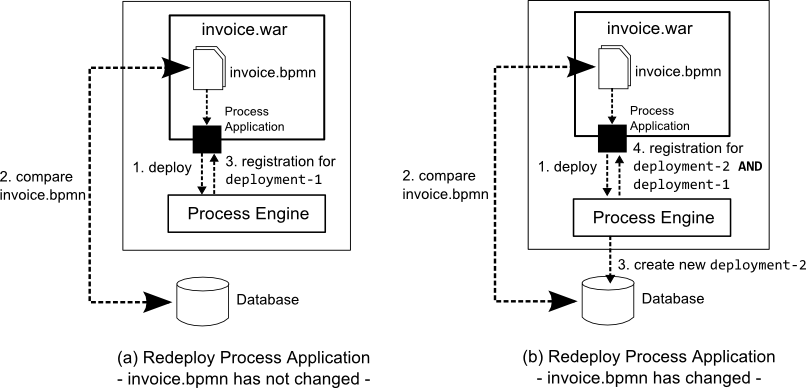
(a) Left hand side: invoice.bpmn has not changed:
- The process application "invoice.war" deploys the invoice.bpmn file to the process engine.
- The process engine checks the database for a previous deployment. Since
deployment-1is still present in the database, the process engine compares the xml content of the database deployment with the bpmn20.xml file from the process application. In this case, both xml documents are identical which means that the existing deployment can be resumed. - The process application is registered for the existing deployment
deployment-1.
(b) Right hand side: invoice.bpmn has changed:
- The process application "invoice.war" deploys the invoice.bpmn file to the process engine.
- The process engine checks the database for a previous deployment. Since
deployment-1is still present in the database, the process engine compares the xml content of the database deployment with the invoice.bpmn file from the process application. In this case, changes are detected which means that a new deployment must be created. - The process engine creates a new deployment
deployment-2, containing the updated invoice.bpmn process. - The process application is registered for the new deployment
deployment-2AND the existing deploymentdeployment-1.
The resuming of the previous deployment (deployment-1) is a feature called resumePreviousVersions and is activated by default. There are two different possibilities how to resume previous deployments.
The first one, which is the default way, is that a previous deployment will be resolved based on the process definition keys. Depending on the processes you deploy with your process application all deployments will be resumed that contain process definitions with the same key.
The second option is to resume deployments based on the deployment name (more precisely the value of the name attribute of the process archive). That way you can delete a process in a new deployment but the process application will register itself for the previous deployments and therefore also for the deleted process. This makes it possible that the running process instances of the deleted process can continue for this process application.
To activate this behavior you have set the property isResumePreviousVersions to true and the property resumePreviousBy to deployment-name:
<process-application
  xmlns="http://www.camunda.org/schema/1.0/ProcessApplication"
  xmlns:xsi="http://www.w3.org/2001/XMLSchema-instance">

  <process-archive name="loan-approval">
    ...
    <properties>
      ...
      <property name="isResumePreviousVersions">true</property>
      <property name="resumePreviousBy">deployment-name</property>
    </properties>
  </process-archive>

</process-application>
If you want to deactivate this feature, you have to set the property to false in processes.xml file:
<process-application
  xmlns="http://www.camunda.org/schema/1.0/ProcessApplication"
  xmlns:xsi="http://www.w3.org/2001/XMLSchema-instance">

  <process-archive name="loan-approval">
    ...
    <properties>
      ...
      <property name="isResumePreviousVersions">false</property>
    </properties>
  </process-archive>

</process-application>
Process Application Event Listeners
The process engine supports defining two types of event listeners: Task Event Listeners and Execution Event Listeners. Task Event listeners allow to react to Task Events (Task are Created, Assigned, Completed). Execution Listeners allow to react to events fired as execution progresses to the diagram: Activities are Started, Ended and Transitions are being taken.
When using the Process Application API, the process engine makes sure that Events are delegated to the right Process Application. For example, assume there is a Process Application deployed as "invoice.war" which deploys a process definition named "invoice". The invoice process has a task named "archive invoice". The application "invoice.war" further provides a Java Class implementing the ExecutionListener interface and is configured to be invoked whenever the END event is fired on the "archive invoice" activity. The process engine makes sure that the event is delegated to the listener class located inside the process application:
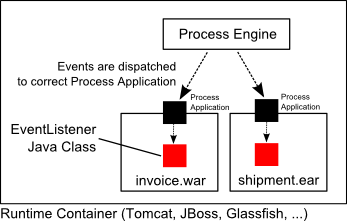
On top of the Execution and Task Listeners which are explicitly configured in the BPMN 2.0 Xml, the process application API supports defining a global ExecutionListener and a global TaskListener which are notified about all events happening in the processes deployed by a process application:
@ProcessApplication
public class InvoiceProcessApplication extends ServletProcessApplication {

  public TaskListener getTaskListener() {
    return new TaskListener() {
      public void notify(DelegateTask delegateTask) {
        // handle all Task Events from Invoice Process
      }
    };
  }

  public ExecutionListener getExecutionListener() {
    return new ExecutionListener() {
      public void notify(DelegateExecution execution) throws Exception {
        // handle all Execution Events from Invoice Process
      }
    };
  }
}
In order to use the global Process Application Event Listeners, you need to activate the corresponding Process Engine Plugin:
<process-engine name="default">
  ...
  <plugins>
    <plugin>
      <class>org.camunda.bpm.application.impl.event.ProcessApplicationEventListenerPlugin</class>
    </plugin>
  </plugins>
</process-engine>
Note that the plugin is activated by default in the pre-packaged Camunda BPM distributions.
The Process Application Event Listener interface is also a good place for adding the CdiEventListener bridge if you want to use CDI Events with in combination with the shared process engine.
Maven Project Templates (Archetypes)
We provide several project templates for Maven, which are also called Archetypes. They enable a quickstart for developing process applications using the camunda-BPM-platform.
Overview of available Maven Archetypes
The following archetypes are currently provided. They are distributed via our Maven repository: https://app.camunda.com/nexus/content/repositories/camunda-bpm/
| Archetype | Description |
|---|---|
| Camunda Cockpit Plugin | Plugin for Camunda Cockpit, contains REST-Backend, MyBatis database query, HTML and JavaScript frontend, Ant build script for one-click deployment |
| Process Application (EJB, WAR) | Process application that uses a shared camunda BPM engine in a Java EE Container, e.g. JBoss AS7. Contains: camunda EJB client, camunda CDI Integration, BPMN Process, Java Delegate as CDI bean, JSF-based start and task forms, configuration for JPA (Hibernate), JUnit Test with in-memory engine, Arquillian Test for JBoss AS7, Ant build script for one-click deployment in Eclipse |
| Process Application (Servlet, WAR) | Process application that uses a shared camunda BPM engine in a Servlet Container, e.g. Apache Tomcat. Contains: Servlet Process Application, BPMN Process, Java Delegate, HTML5-based start and task forms, JUnit Test with in-memory engine, Arquillian Test for JBoss AS7, Ant build script for one-click deployment in Eclipse |
Usage in Eclipse IDE
Summary
Add archetype catalog (Preferences -> Maven -> Archetypes -> Add Remote Catalog):
https://app.camunda.com/nexus/content/repositories/camunda-bpm/
- Create Maven project from archetype (File -> New -> Project... -> Maven -> Maven Project)
Detailed Instructions
- Go to Preferences -> Maven -> Archetypes -> Add Remote Catalog

Enter the following URL and description, click on Verify... to test the connection and if that worked on OK to save the catalog.
Catalog File: https://app.camunda.com/nexus/content/repositories/camunda-bpm/
Description: camunda BPM platform

Now you should be able to use the archetypes when creating a new Maven project in Eclipse:
- Go to File -> New -> Project... and select Maven -> Maven Project

- Select a location for the project or just keep the default setting.

- Select the archetype from the catalog that you created before.

- Specify Maven coordinates and camunda version and finish the project creation.

The resulting project should look like this:

Troubleshooting
Sometimes, the creation of the very first Maven project fails in Eclipse. If that happens to you, just try it again. Most of the times the second try works. If the problem persists, contact us.
Usage on Commandline
Interactive
Run the following command in a terminal to generate a project. Maven will allow you to select an archetype and ask you for all parameters needed to configure it:
mvn archetype:generate -Dfilter=org.camunda.bpm.archetype: -DarchetypeCatalog=https://app.camunda.com/nexus/content/repositories/camunda-bpm
Full Automation
The following command completely automates the project generation an can be used in shellscipts or Ant builds:
mvn archetype:generate \
  -DinteractiveMode=false \
  -DarchetypeRepository=https://app.camunda.com/nexus/content/repositories/camunda-bpm \
  -DarchetypeGroupId=org.camunda.bpm.archetype \
  -DarchetypeArtifactId=camunda-archetype-ejb-war \
  -DarchetypeVersion=7.0.0 \
  -DgroupId=org.example.camunda.bpm \
  -DartifactId=camunda-bpm-ejb-project \
  -Dversion=0.0.1-SNAPSHOT \
  -Dpackage=org.example.camunda.bpm.ejb
Source Code and Customization
You can also customize the project templates for your own technology stack. Just fork them on GitHub!
Runtime Container Integration
BPM Platform Services
To inspect the current state of configured process engines and deployed process applications, the class org.camunda.bpm.BpmPlatform offers access to the ProcessEngineService and the ProcessApplicationService.
ProcessEngineService
The ProcessEngineService can be accessed by calling BpmPlatform.getProcessEngineService(). It offers access to the default process engine, as well as any process engine by its name as specified in the process engine configuration. It returns ProcessEngine objects from which any services for a specific engine can be accessed.
ProcessApplicationService
The ProcessApplicationService is accessible via BpmPlatform.getProcessApplicationService(). It provides details on the process application deployments made on the application server it is running on. That means that it does not provide a global view across all nodes in a cluster.
Given a process application name, a ProcessApplicationInfo object can be retrieved that contains details on the deployments made by this process application. These correspond to the process archives declared in processes.xml.
Furthermore, application-specific properties can be retrieved such as the servlet context path in case of a servlet process application.
JNDI Bindings for BPM Platform Services
The BPM Platform Services (i.e. Process Engine Service and Process Application Service) are provided via JNDI Bindings with the following JNDI names:
- Process Engine Service:
java:global/camunda-bpm-platform/process-engine/ProcessEngineService!org.camunda.bpm.ProcessEngineService - Process Application Service:
java:global/camunda-bpm-platform/process-engine/ProcessApplicationService!org.camunda.bpm.ProcessApplicationService
On Glassfish 3.1.1 and on JBoss AS 7 / Wildfly 8 you can do a lookup with the JNDI names to get one of these BPM Platform Services. However, on Apache Tomcat 7 you have to do quite a bit more to be able to do a lookup to get one of these BPM Platform Services.
JNDI Bindings on Apache Tomcat 7
To use the JNDI Bindings for Bpm Platform Services on Apache Tomcat 7 you have to add the file META-INF/context.xml to your process application and add the following ResourceLinks:
<Context>
  <ResourceLink name="ProcessEngineService"
    global="global/camunda-bpm-platform/process-engine/ProcessEngineService!org.camunda.bpm.ProcessEngineService"
    type="org.camunda.bpm.ProcessEngineService" />

  <ResourceLink name="ProcessApplicationService"
    global="global/camunda-bpm-platform/process-engine/ProcessApplicationService!org.camunda.bpm.ProcessApplicationService"
    type="org.camunda.bpm.ProcessApplicationService" />
</Context>
These elements are used to create a link to the global JNDI Resources defined in $TOMCAT_HOME/conf/server.xml.
Furthermore, declare the dependency on the JNDI binding inside the WEB-INF/web.xml deployment descriptor.
<web-app>
  <resource-ref>
    <description>Process Engine Service</description>
    <res-ref-name>ProcessEngineService</res-ref-name>
    <res-type>org.camunda.bpm.ProcessEngineService</res-type>
    <res-auth>Container</res-auth>
  </resource-ref>
  <resource-ref>
    <description>Process Application Service</description>
    <res-ref-name>ProcessApplicationService</res-ref-name>
    <res-type>org.camunda.bpm.ProcessApplicationService</res-type>
    <res-auth>Container</res-auth>
  </resource-ref>
  ...
</web-app>Note: You can choose different resource link names for the Process Engine Service and Process Application Service. The resource link name has to match the value inside the <res-ref-name>-element inside the corresponding <resource-ref>-element in WEB-INF/web.xml. We propose the name ProcessEngineService for the Process Engine Service and ProcessApplicationService for the Process Application Service.
In order to do a lookup for a Bpm Platform Service you have to use the resource link name to get the linked global resource. For example:
- Process Engine Service:
java:comp/env/ProcessEngineService - Process Application Service:
java:comp/env/ProcessApplicationService
If you have declared other resource link names than we proposed, you have to use java:comp/env/$YOUR_RESOURCE_LINK_NAME to do a lookup to get the corresponding Bpm Platform Service.
Job Executor configuration on Apache Tomcat 7
Tomcat Default Job Executor
The BPM platform on Apache Tomcat 7.x uses the DefaultJobExecutor. The default job executor uses a ThreadPoolExecutor which manages a thread pool and a job queue.
The core pool size, queue size, maximum pool size and keep-alive-time can be configured in the bpm-platform.xml.
After configuring the job-acquisitions it is possible to set the values with the help of a <properties>
tag. The correct syntax can be found in the references.
All the previously mentioned properties except the queue size can be modified at runtime via the use of a JMX client.
Core Pool Size
The ThreadPoolExecutor automatically adjusts the size of the thread pool. The number of threads in the thread pool will tend to come to equilibrium with the number of threads set to core pool size. If a new job is presented to the job executor and the total number of threads in the pool is less than core, then a new thread will be created. Hence on initial use, the number of threads in the thread pool will ramp up to the core thread count.
- The core pool size defaults to 3.
Queue Size
The ThreadPoolExecutor includes a job queue for buffering jobs. Once the core number of threads has been reached (and in use), a new job presented to the job executor will result in the job being added to the ThreadPoolExecutor job queue.
- The default maximum length of the job queue is 3.
Maximum Pool Size
If the length of the queue were to exceed the maximum queue size, and the number of threads in the thread pool is less than the maximum pool size, then an additional thread is added to the thread pool. This will continue until the number of threads in the pool is equal to the maximum pool size:
- The default maximum pool size is 10.
KeepAlive
If a thread remains idle in the thread pool for longer than the keepalive time, and the number of threads exceeds core pool size, then the thread will be terminated. Hence the pool tends to settle around core thread count.
- The default keepalive time is 0.
Clustered Deployment
In a clustered deployment, multiple job executors will work with each other (Note: see Job Execution in Heterogeneous Clusters. On startup, each job executor allocates a UUID which is used for identifying locked job ownership in the job table. Hence in a two node cluster, the job executors may total up to 20 concurrent threads of execution.
The Camunda JBoss Subsystem
Distribution & Installation Guide
If you download a pre-packaged distribution from camunda.org, the Camunda JBoss subsystem is readily installed into the application server
Read the installation guide in order to learn how to install the Camunda JBoss subsystem into your JBoss AS 7 / Wildfly 8 Server.
Camunda BPM provides advanced integration for JBoss AS 7 / Wildfly 8 in the form of a custom JBoss Subsystem.
The most prominent features are:
- Deploy the process engine as shared jboss module.
- Configure the process engine in standalone.xml / domain.xml and administer it though the JBoss Management System.
- Process Engines are native JBoss Services with service lifecycle and dependencies.
- Automatic deployment of BPMN 2.0 processes (through the Process Application API).
- Use a managed Thread Pool provided by JBoss Threads in combination with the Job Executor.
Configuring a process engine in standalone.xml / domain.xml
Using the Camunda JBoss Subsystem, it is possible to configure and manage the process engine through the JBoss Management Model. The most straightforward way is to add the process engine configuration to the standalone.xml file of the JBoss AS 7 / Wildfly 8 Server:
<subsystem xmlns="urn:org.camunda.bpm.jboss:1.1">
    <process-engines>
        <process-engine name="default" default="true">
            <datasource>java:jboss/datasources/ProcessEngine</datasource>
            <history-level>full</history-level>
            <properties>
                <property name="jobExecutorAcquisitionName">default</property>
                <property name="isAutoSchemaUpdate">true</property>
                <property name="authorizationEnabled">true</property>
            </properties>
        </process-engine>
    </process-engines>
    <job-executor>
        <thread-pool-name>job-executor-tp</thread-pool-name>
        <job-acquisitions>
            <job-acquisition name="default">
                <acquisition-strategy>SEQUENTIAL</acquisition-strategy>
                <properties>
                    <property name="lockTimeInMillis">300000</property>
                    <property name="waitTimeInMillis">5000</property>
                    <property name="maxJobsPerAcquisition">3</property>
                </properties>
            </job-acquisition>
        </job-acquisitions>
    </job-executor>
</subsystem>
It should be easy to see that the configuration consists of a single process engine which uses the Datasource java:jboss/datasources/ProcessEngine and is configured to be the default process engine. In addition, the Job Executor currently uses a single Job Acquisition also named default.
If you start up your JBoss AS 7 / Wildfly 8 server with this configuration, it will automatically create the corresponding services and expose them through the management model.
Providing a custom process engine configuration class
It is possible to provide a custom Process Engine Configuration class on JBoss AS 7 / Wildfly 8 Application Server. To this extent, provide the fully qualified classname of the class in the standalone.xml file:
<process-engine name="default" default="true">
    <datasource>java:jboss/datasources/ProcessEngine</datasource>
    <configuration>org.my.custom.ProcessEngineConfiguration</configuration>
    <history-level>full</history-level>
    <properties>
        <property name="myCustomProperty">true</property>
        <property name="lockTimeInMillis">300000</property>
        <property name="waitTimeInMillis">5000</property>
    </properties>
</process-engine>
The class org.my.custom.ProcessEngineConfiguration must be a subclass of org.camunda.bpm.engine.impl.cfg.JtaProcessEngineConfiguration.
The properties map can be used for invoking primitive valued setters (Integer, String, Boolean) that follow the Java Bean conventions. In the case of the example above, the class would provide a method named
public void setMyCustomProperty(boolean boolean) {
  ...
}
Module dependency of custom configuration class
If you configure the process engine in standalone.xml and provide a custom configuration class packaged inside an own module, the camunda-jboss-subsystem module needs to have a module dependency on the module providing the class.
If you fail to do this, you will see the following error log:
Caused by: org.camunda.bpm.engine.ProcessEngineException: Could not load 'foo.bar': the class must be visible from the camunda-jboss-subsystem module.
        at org.camunda.bpm.container.impl.jboss.service.MscManagedProcessEngineController.createProcessEngineConfiguration(MscManagedProcessEngineController.java:187) [camunda-jboss-subsystem-7.0.0-alpha8.jar:]
        at org.camunda.bpm.container.impl.jboss.service.MscManagedProcessEngineController.startProcessEngine(MscManagedProcessEngineController.java:138) [camunda-jboss-subsystem-7.0.0-alpha8.jar:]
        at org.camunda.bpm.container.impl.jboss.service.MscManagedProcessEngineController$3.run(MscManagedProcessEngineController.java:126) [camunda-jboss-subsystem-7.0.0-alpha8.jar:]
Extending a process engine using process engine plugins
It is possible to extend a process engine using the process engine plugins concept.
You specify the process engine plugins in standalone.xml / domain.xml for each process engine separately as shown below:
<subsystem xmlns="urn:org.camunda.bpm.jboss:1.1">
    <process-engines>
        <process-engine name="default" default="true">
            <datasource>java:jboss/datasources/ProcessEngine</datasource>
            <history-level>full</history-level>
            <properties>
                ...
            </properties>
            <plugins>
                <plugin>
                    <class>org.camunda.bpm.engine.MyCustomProcessEnginePlugin</class>
                    <properties>
                        <property name="boost">10</property>
                        <property name="maxPerformance">true</property>
                        <property name="actors">akka</property>
                    </properties>
                </plugin>
            </plugins>
        </process-engine>
    </process-engines>
    ...
</subsystem>
You have to provide the fully qualified classname between the <class> tags. Additional properties can be specified using the <properties> element.
The restrictions, which apply for providing a custom process engine configuration class, are also valid for the process engine plugins:
- plugin class must be visible in the classpath for the Camunda-subsystem.
- properties map can be used for invoking primitive valued setters (Integer, String, Boolean) that follow the Java Bean conventions.
Looking up a Process Engine in JNDI
The Camunda JBoss subsystem provides the same JNDI bindings for the ProcessApplicationService and the ProcessEngineService as provided on other containers. In addition, the Camunda JBoss subsystem creates JNDI Bindings for all managed process engines, allowing us to look them up directly.
The global JNDI bindings for process engines follow the pattern
java:global/camunda-bpm-platform/process-engine/$PROCESS_ENGINE_NAME
If a process engine is named "engine1", it will be available using the name java:global/camunda-bpm-platform/process-engine/engine1.
Note that when looking up the process engine, using a declarative mechanism (like @Resource or referencing the resource in a deployment descriptor) is preferred over a programmatic way. The declarative mechanism makes the application server aware of our dependency on the process engine service and allows it to manage that dependency for us. See also: Managing Service Dependencies.
A declarative mechanism like @Resource could be
@Resource(mappedName = "java:global/camunda-bpm-platform/process-engine/$PROCESS_ENGINE_NAME"
Looking up a Process Engine from JNDI using Spring
On JBoss AS 7 / Wildfly 8, spring users should always create a resource-ref for the process engine in web.xml and then lookup the local name in the java:comp/env/ namespace. For an example, see this Quickstart.
Managing the process engine through the JBoss Management System
In oder to inspect and change the management model, we can use one of the multiple JBoss Management clients available.
Inspecting the configuration
It is possible to inspect the configuration using the CLI (Command Line Interface, jboss-cli.bat/sh):
You are disconnected at the moment. Type 'connect' to connect to the server or 'help' for the list of supported commands.
[disconnected /] connect
[standalone@localhost:9999 /] cd /subsystem=camunda-bpm-platform
[standalone@localhost:9999 subsystem=camunda-bpm-platform] :read-resource(recursive=true)
{
    "outcome" => "success",
    "result" => {
        "job-executor" => {"default" => {
            "thread-pool-name" => "job-executor-tp",
            "job-acquisitions" => {"default" => {
                "acquisition-strategy" => "SEQUENTIAL",
                "name" => "default",
                "properties" => {
                    "lockTimeInMillis" => "300000",
                    "waitTimeInMillis" => "5000",
                    "maxJobsPerAcquisition" => "3"
                }
            }}
        }},
        "process-engines" => {"default" => {
            "configuration" => "org.camunda.bpm.container.impl.jboss.config.ManagedJtaProcessEngineConfiguration",
            "datasource" => "java:jboss/datasources/ProcessEngine",
            "default" => true,
            "history-level" => "full",
            "name" => "default",
            "properties" => {
                "jobExecutorAcquisitionName" => "default",
                "isAutoSchemaUpdate" => "true"
            }
        }}
    }
}
Stopping a Process Engine through the JBoss Management System
Once the process engine is registered in the JBoss Management Model, it is possible to control it thorough the management API. For example, you can stop it through the CLI:
[standalone@localhost:9999 subsystem=camunda-bpm-platform] cd process-engines=default
[standalone@localhost:9999 process-engines=default] :remove
{"outcome" => "success"}
This removes the process engine and all dependent services. This means that if you remove a process engine the application server will stop all deployed applications which use the process engine.
Declaring Service Dependencies
In order for this to work, but also in order to avoid race conditions at deployment time, it is necessary that each application explicitly declares dependencies on the process engines it is using. Learn how to declare dependencies
Starting a Process Engine through the JBoss Management System
It is also possible to start a new process engine at runtime:
[standalone@localhost:9999 subsystem=camunda-bpm-platform] /subsystem=camunda-bpm-platform/process-engines=my-process-engine/:add(name=my-process-engine,datasource=java:jboss/datasources/ExampleDS)
{"outcome" => "success"}
One of the nice features of the JBoss AS 7 / Wildfly 8 Management System is that it will
- persist any changes to the model in the underlying configuration file. This means that if you start a process engine using the command line interface, the configuration will be added to
standalone.xml/domain.xmlsuch that it is available when the server is restarted. - distribute the configuration in the cluster and start / stop the process engine on all servers part of the same domain.
Using the JBoss JConsole Extensions
In some cases, you may find it more convenient to use the JBoss JConsole extension for starting a process engine.
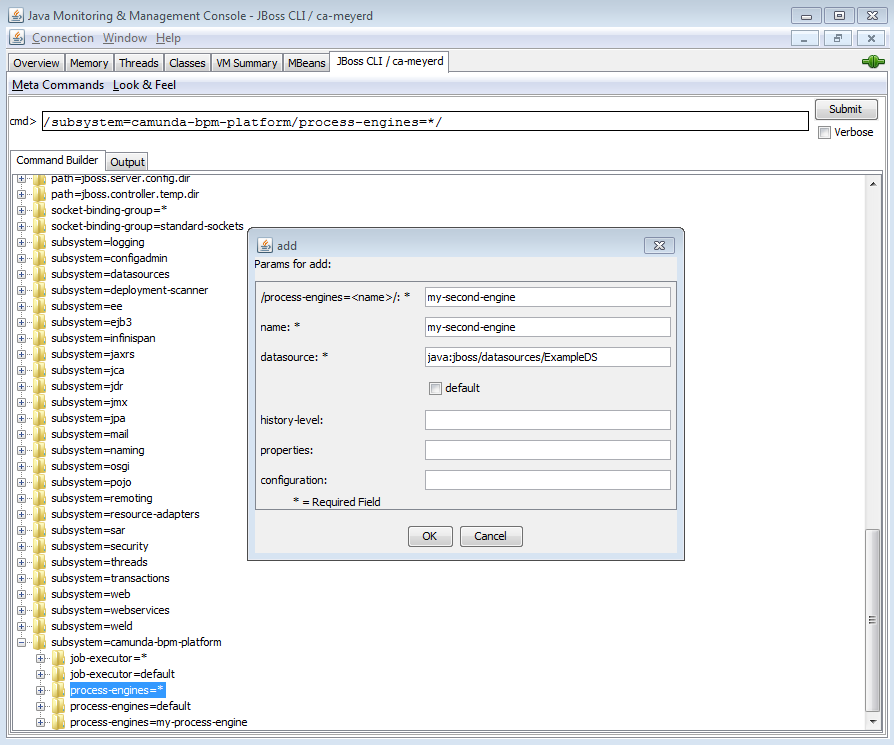
The JConsole plugin allows you to inspect the management model graphically and build operations using a wizard. In order to start the JBoss JConsole plugin, start the jconsole.bat/sh file provided in the JBoss distribution. More Information in the JBoss Docs.
Managing Classpath Dependencies
Implicit module dependencies
Classpath dependencies are automatically managed for you if you use the Process Application API.
When using the Camunda JBoss subsystem, the process engine classes are deployed as jboss module. The module is named
org.camunda.bpm.camunda-engine and is deployed in the folder $JBOSS_HOME/modules/org/camunda/bpm/camunda-engine.
By default, the Application server will not add this module to the classpath of applications. If an application needs to interact with the process engine, we must declare a module dependency in the application. This can be achieved using either an implicit or an explicit module dependency.
Implicit module dependencies with the Process Application API
When using the Process Application API (i.e., when deploying either a ServletProcessApplication or an EjbProcessApplication), the Camunda JBoss Subsystem will detect the @ProcessApplication class in the deployment and automatically add a module dependency between the application and the process engine module. As a result, we don't have to declare the dependency ourselves. It is called an implicit module dependency because it is not explicitly declared but can be derived by inspecting the application and seeing that it provides a @ProcessApplication class.
Explicit module dependencies
If an application does not use the process application API but still needs the process engine classes to be added to its classpath, an explicit module dependency is required. JBoss AS 7 / Wildfly 8 has different mechanisms for achieving this. The simplest way is to add a manifest entry to the MANIFEST.MF file of the deployment. The following example illustrates how to generate such a dependency using the maven WAR plugin:
<build>
...
<plugins>
<plugin>
<groupId>org.apache.maven.plugins</groupId>
<artifactId>maven-war-plugin</artifactId>
<configuration>
<archive>
<manifestEntries>
<Dependencies>org.camunda.bpm.camunda-engine</Dependencies>
</manifestEntries>
</archive>
</configuration>
</plugin>
</plugins>
</build>
As a result, the Application Service will add the process engine module to the classpath of the application.
Managing Service Dependencies
Implicit service dependencies
Service dependencies are automatically managed for you if you use the Process Application API.
The Camunda JBoss subsystem manages process engines as JBoss Services in the JBoss Module Service Container. In order for the Module Service Container to provide the process engine service(s) to the deployed applications, it is important that the dependencies are known. Consider the following example:
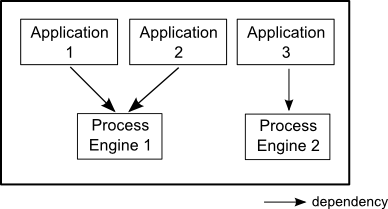
There are three applications deployed and two process engine services exist. Application 1 and Application 2 are using Process Engine 1 and Application 3 is using Process Engine 2.
Implicit Service Dependencies
When using the Process Application API (i.e. when deploying either a ServletProcessApplication or an EjbProcessApplication), the Camunda JBoss Subsystem will detect the @ProcessApplication class in the deployment and automatically add a service dependency between the process application component and the process engine module. This makes sure the process engine is available when the process application is deployed.
Explicit Service Dependencies
If an application does not use the process application API but still needs to interact with a process engine, it is important to declare the dependency on the process engine service explicitly. If we fail to declare the dependency, there is no guarantee that the process engine is available to the application.
- When the application server is started, it will bring up services concurrently. If it is not aware of the dependency between the application and the process engine, the application may start before the process engine, potentially resulting in exceptions if the process engine is accessed from some deployment listener (like a servlet context listener or a @PostConstruct callback of an Enterprise Bean).
- If the process engine is stopped while the application is deployed, the application server must stop the application as well.
The simplest way to add an explicit dependency on the process engine is to bind the process engine in application's local naming space. For instance, we can add the following resource reference to the web.xml file of a web application:
<resource-ref>
<res-ref-name>processEngine/default</res-ref-name>
<res-type>org.camunda.bpm.engine.ProcessEngine</res-type>
<mapped-name>java:global/camunda-bpm-platform/process-engine/default</mapped-name>
</resource-ref>
This way, the global process engine resource java:global/camunda-bpm-platform/process-engine/default is available locally under the name processEngine/default. Since the application server is aware of this dependency, it will make sure the process engine service exists before starting the application and it will stop the application if the process engine is removed.
The same effect can be achieved using the @Resource Annotation:
@Stateless
public class PaComponent {
@Resource(mappedName="java:global/camunda-bpm-platform/process-engine/default")
private ProcessEngine processEngine;
@Produces
public ProcessEngine getProcessEngine() {
return processEngine;
}
}Spring Framework Integration
Overview
The camunda-engine spring framework integration is located inside the camunda-engine-spring module and can be added to apache maven-based projects through the following dependency:
<dependency>
<groupId>org.camunda.bpm</groupId>
<artifactId>camunda-engine-spring</artifactId>
</dependency>The camunda-engine-spring artifact should be added as a library to the process application.
Process Engine Configuration
You can use a Spring application context Xml file for bootstrapping the process engine. You can bootstrap both application-managed and container-managed process engines through Spring.
Configuring an application-managed Process Engine
The ProcessEngine can be configured as a regular Spring bean. The starting point of the integration is the class org.camunda.bpm.engine.spring.ProcessEngineFactoryBean. That bean takes a process engine configuration and creates the process engine. This means that the creation and configuration of properties for Spring is the same as documented in the configuration section. For Spring integration the configuration and engine beans will look like this:
<bean id="processEngineConfiguration"
class="org.camunda.bpm.engine.spring.SpringProcessEngineConfiguration">
...
</bean>
<bean id="processEngine"
class="org.camunda.bpm.engine.spring.ProcessEngineFactoryBean">
<property name="processEngineConfiguration" ref="processEngineConfiguration" />
</bean>Note that the processEngineConfiguration bean uses the SpringProcessEngineConfiguration class.
Configuring a container-managed Process Engine as a Spring Bean
If you want the process engine to be registered with the BpmPlatform ProcessEngineService, you must use org.camunda.bpm.engine.spring.container.ManagedProcessEngineFactoryBean instead of the ProcessEngineFactoryBean shown in the example above. You will also need to ensure:
1) that none of your webapps include camunda-webapp*.jar within their own lib folder, this should be at a shared level.
2) that your server.xml contains JNDI entries for the 'ProcessEngineService' and 'ProcessApplicationService' as below:
<!-- Global JNDI resources
Documentation at /docs/jndi-resources-howto.html
-->
<GlobalNamingResources>
<Resource name="java:global/camunda-bpm-platform/process-engine/ProcessEngineService!org.camunda.bpm.ProcessEngineService" auth="Container"
type="org.camunda.bpm.ProcessEngineService"
description="camunda BPM platform Process Engine Service"
factory="org.camunda.bpm.container.impl.jndi.ProcessEngineServiceObjectFactory" />
<Resource name="java:global/camunda-bpm-platform/process-engine/ProcessApplicationService!org.camunda.bpm.ProcessApplicationService" auth="Container"
type="org.camunda.bpm.ProcessApplicationService"
description="camunda BPM platform Process Application Service"
factory="org.camunda.bpm.container.impl.jndi.ProcessApplicationServiceObjectFactory" />
...
</GlobalNamingResources>I that case the constructed process engine object is registered with the BpmPlatform and can be referenced for creating process application deployments and exposed through the runtime container integration.
Configuring a Process Engine Plugin in Spring
In Sping you can configure a process engine plugin by setting a list value to the
processEnginePlugins property of the processEngineConfiguration bean:
<bean id="processEngineConfiguration" class="org.camunda.bpm.engine.spring.SpringProcessEngineConfiguration">
...
<property name="processEnginePlugins">
<list>
<bean id="spinPlugin" class="org.camunda.spin.plugin.impl.SpinProcessEnginePlugin" />
</list>
</property>
</bean>Spring Transaction Integration
We'll explain the SpringTransactionIntegrationTest found in the Spring examples of the distribution step by step. Below is the Spring configuration file that we use in this example (you can find it in SpringTransactionIntegrationTest-context.xml). The section shown below contains the dataSource, transactionManager, processEngine and the process engine services.
When passing the DataSource to the SpringProcessEngineConfiguration (using property "dataSource"), the camunda engine uses a org.springframework.jdbc.datasource.TransactionAwareDataSourceProxy internally, which wraps the passed DataSource. This is done to make sure the SQL connections retrieved from the DataSource and the Spring transactions play well together. This implies that it's no longer needed to proxy the dataSource yourself in Spring configuration, although it's still allowed to pass a TransactionAwareDataSourceProxy into the SpringProcessEngineConfiguration. In this case no additional wrapping will occur.
Make sure when declaring a TransactionAwareDataSourceProxy in Spring configuration yourself, that you don't use it for resources that are already aware of Spring-transactions (e.g. DataSourceTransactionManager and JPATransactionManager need the un-proxied dataSource).
<beans xmlns="http://www.springframework.org/schema/beans"
xmlns:context="http://www.springframework.org/schema/context"
xmlns:tx="http://www.springframework.org/schema/tx"
xmlns:xsi="http://www.w3.org/2001/XMLSchema-instance"
xsi:schemaLocation="http://www.springframework.org/schema/beans http://www.springframework.org/schema/beans/spring-beans.xsd http://www.springframework.org/schema/context http://www.springframework.org/schema/context/spring-context-2.5.xsd http://www.springframework.org/schema/tx http://www.springframework.org/schema/tx/spring-tx-3.0.xsd">
<bean id="dataSource" class="org.springframework.jdbc.datasource.SimpleDriverDataSource">
<property name="driverClass" value="org.h2.Driver" />
<property name="url" value="jdbc:h2:mem:camunda;DB_CLOSE_DELAY=1000" />
<property name="username" value="sa" />
<property name="password" value="" />
</bean>
<bean id="transactionManager" class="org.springframework.jdbc.datasource.DataSourceTransactionManager">
<property name="dataSource" ref="dataSource" />
</bean>
<bean id="processEngineConfiguration" class="org.camunda.bpm.engine.spring.SpringProcessEngineConfiguration">
<property name="dataSource" ref="dataSource" />
<property name="transactionManager" ref="transactionManager" />
<property name="databaseSchemaUpdate" value="true" />
<property name="jobExecutorActivate" value="false" />
</bean>
<bean id="processEngine" class="org.camunda.bpm.engine.spring.ProcessEngineFactoryBean">
<property name="processEngineConfiguration" ref="processEngineConfiguration" />
</bean>
<bean id="repositoryService" factory-bean="processEngine" factory-method="getRepositoryService" />
<bean id="runtimeService" factory-bean="processEngine" factory-method="getRuntimeService" />
<bean id="taskService" factory-bean="processEngine" factory-method="getTaskService" />
<bean id="historyService" factory-bean="processEngine" factory-method="getHistoryService" />
<bean id="managementService" factory-bean="processEngine" factory-method="getManagementService" />
...
</beans>The remainder of that Spring configuration file contains the beans and configuration that we'll use in this particular example:
<beans>
...
<tx:annotation-driven transaction-manager="transactionManager"/>
<bean id="userBean" class="org.camunda.bpm.engine.spring.test.UserBean">
<property name="runtimeService" ref="runtimeService" />
</bean>
<bean id="printer" class="org.camunda.bpm.engine.spring.test.Printer" />
</beans>First the application context is created with any of the Spring ways to do that. In this example you could use a classpath XML resource to configure our Spring application context:
ClassPathXmlApplicationContext applicationContext =
new ClassPathXmlApplicationContext("mytest/SpringTransactionIntegrationTest-context.xml");or, since it is a test:
@ContextConfiguration("classpath:mytest/SpringTransactionIntegrationTest-context.xml")Then we can get the service beans and invoke methods on them. The ProcessEngineFactoryBean will have added an extra interceptor to the services that applies Propagation.REQUIRED transaction semantics on the engine service methods. So, for example, we can use the repositoryService to deploy a process like this:
RepositoryService repositoryService = (RepositoryService) applicationContext.getBean("repositoryService");
String deploymentId = repositoryService
.createDeployment()
.addClasspathResource("mytest/hello.bpmn20")
.addClasspathResource("mytest/hello.png")
.deploy()
.getId();The other way around also works. In this case, the Spring transaction will be around the userBean.hello() method and the engine service method invocation will join that same transaction.
UserBean userBean = (UserBean) applicationContext.getBean("userBean");
userBean.hello();The UserBean looks like this. Remember from above in the Spring bean configuration we injected the repositoryService into the userBean.
public class UserBean {
// injected by Spring
private RuntimeService runtimeService;
@Transactional
public void hello() {
// here you can do transactional stuff in your domain model
// and it will be combined in the same transaction as
// the startProcessInstanceByKey to the RuntimeService
runtimeService.startProcessInstanceByKey("helloProcess");
}
public void setRuntimeService(RuntimeService runtimeService) {
this.runtimeService = runtimeService;
}
}Automatic Resource Deployment
Spring integration also has a special feature for deploying resources. In the process engine configuration, you can specify a set of resources. When the process engine is created, all those resources will be scanned and deployed. There is filtering in place that prevents duplicate deployments. Only in case the resources have actually changed, new deployments will be deployed to the engine database. This makes sense in a lot of use cases, where the Spring container is rebooted often (e.g. testing).
Here's an example:
<bean id="processEngineConfiguration" class="org.camunda.bpm.engine.spring.SpringProcessEngineConfiguration">
...
<property name="deploymentResources" value="classpath*:/mytest/autodeploy.*.bpmn20" />
<property name="deploymentResources">
<list>
<value>classpath*:/mytest/autodeploy.*.bpmn20</value>
<value>classpath*:/mytest/autodeploy.*.png</value>
</list>
</property>
</bean>
<bean id="processEngine" class="org.camunda.bpm.engine.spring.ProcessEngineFactoryBean">
<property name="processEngineConfiguration" ref="processEngineConfiguration" />
</bean>Expression Resolving
When using the ProcessEngineFactoryBean, by default, all expressions in the BPMN processes will also 'see' all the Spring beans. It's possible to limit the beans you want to expose in expressions or even exposing no beans at all using a map that you can configure. The example below exposes a single bean (printer), available to use under the key "printer". To have NO beans exposed at all, just pass an empty list as 'beans' property on the SpringProcessEngineConfiguration. When no 'beans' property is set, all Spring beans in the context will be available.
<bean id="processEngineConfiguration"
class="org.camunda.bpm.engine.spring.SpringProcessEngineConfiguration">
...
<property name="beans">
<map>
<entry key="printer" value-ref="printer" />
</map>
</property>
</bean>
<bean id="printer" class="org.camunda.bpm.engine.spring.test.transaction.Printer" />Now the exposed beans can be used in expressions: for example, the SpringTransactionIntegrationTest hello.bpmn20.xml shows how a method on a Spring bean can be invoked using a UEL method expression:
<definitions id="definitions" ...>
<process id="helloProcess">
<startEvent id="start" />
<sequenceFlow id="flow1" sourceRef="start" targetRef="print" />
<serviceTask id="print" camunda:expression="#{printer.printMessage()}" />
<sequenceFlow id="flow2" sourceRef="print" targetRef="end" />
<endEvent id="end" />
</process>
</definitions>Where Printer looks like this:
public class Printer {
public void printMessage() {
System.out.println("hello world");
}
}And the Spring bean configuration (also shown above) looks like this:
<beans ...>
...
<bean id="printer" class="org.camunda.bpm.engine.spring.test.transaction.Printer" />
</beans>Expression resolving with the Shared Process Engine
In a shared process engine deployment scenario, you have a process engine which dispatches to multiple applications. In this case, there is not a single spring application context but each application may maintain its own application context. The process engine cannot use a single expression resolver for a single application context but must delegate to the appropriate process application, depending on which process is currently executed.
This functionality is provided by the org.camunda.bpm.engine.spring.application.SpringProcessApplicationElResolver. This class is a ProcessApplicationElResolver implementation delegating to the local application context. Expression resolving then works in the following way: the shared process engine checks which process application corresponds to the process it is currently executing. It then delegates to that process application for resolving expressions. The process application delegates to the SpringProcessApplicationElResolver which uses the local Spring application context for resolving beans.
The SpringProcessApplicationElResolver class is automatically detected if the camunda-engine-spring module is included as a library of the process application, not as a global library.
Spring-based Testing
When integrating with Spring, business processes can be tested very easily (in scope 2, see Testing Scopes) using the standard camunda testing facilities. The following example shows how a business process is tested in a typical Spring-based unit test:
@RunWith(SpringJUnit4ClassRunner.class)
@ContextConfiguration("classpath:org/camunda/bpm/engine/spring/test/junit4/springTypicalUsageTest-context.xml")
public class MyBusinessProcessTest {
@Autowired
private RuntimeService runtimeService;
@Autowired
private TaskService taskService;
@Autowired
@Rule
public ProcessEngineRule processEngineRule;
@Test
@Deployment
public void simpleProcessTest() {
runtimeService.startProcessInstanceByKey("simpleProcess");
Task task = taskService.createTaskQuery().singleResult();
assertEquals("My Task", task.getName());
taskService.complete(task.getId());
assertEquals(0, runtimeService.createProcessInstanceQuery().count());
}
}Note that for this to work, you need to define a ProcessEngineRule bean in the Spring configuration (which is injected by auto-wiring in the example above).
<bean id="processEngineRule" class="org.camunda.bpm.engine.test.ProcessEngineRule">
<property name="processEngine" ref="processEngine" />
</bean>CDI and Java EE Integration
Overview
The camunda-engine-cdi module provides programming model integration with CDI (Context and Dependency Injection). CDI is the Java EE 6 standard for Dependency Injection. The camunda-engine-cdi integration leverages both the configuration of the Camunda engine and the extensibility of CDI. The most prominent features are:
- A custom El-Resolver for resolving CDI beans (including EJBs) from the process,
- Support for @BusinessProcessScoped beans (CDI beans the lifecycle of which is bound to a process instance),
- Declarative control over a process instance using annotations,
- The Process Engine is hooked-up to the CDI event bus,
- Works with both Java EE and Java SE,
- Support for unit testing.
Maven Dependency
In order to use the camunda-engine-cdi module inside your application, you must include the following Maven dependency:
<dependency>
<groupId>org.camunda.bpm</groupId>
<artifactId>camunda-engine-cdi</artifactId>
</dependency>Replace 'x' with your Camunda BPM version.
camunda-archetype-ejb-war, which gives you a complete running project including the CDI integration.
Process Engine Configuration
Documentation for this part has yet to be written.
JTA Transaction Integration
The process engine transaction management can integrate with JTA. In order to use JTA transaction manager integration, you need to use the
org.camunda.bpm.engine.impl.cfg.JtaProcessEngineConfigurationfor JTA Integration onlyorg.camunda.bpm.engine.cdi.CdiJtaProcessEngineConfigurationfor additional CDI Expression resolving support.
Note 1: The shared process engine distributions for Java EE Application Servers (Wildfly, JBoss, Glassfish, IBM WebSphere Application Server, Oracle WebLogic Application Server) provide JTA integration out of the box.
Note 2: The process engine requires access to an implementation of
javax.transaction.TransactionManager. Not all application servers provide such an implementation. Most notably, IBM WebSphere and Oracle WebLogic historically did not provide this implementation. In order to achieve JTA Transaction Integration on these containers, users should use the Spring Framework Abstraction and configure the process engine using the SpringProcessEngineConfiguration.
Expression Resolving
The camunda-engine-cdi library exposes CDI beans via Expression Language, using a custom resolver. This makes it possible to reference beans from the process:
<userTask id="authorizeBusinessTrip" name="Authorize Business Trip"
camunda:assignee="#{authorizingManager.account.username}" />Where "authorizingManager" could be a bean provided by a producer method:
@Inject
@ProcessVariable
private Object businessTripRequesterUsername;
@Produces
@Named
public Employee authorizingManager() {
TypedQuery<Employee> query = entityManager.createQuery("SELECT e FROM Employee e WHERE e.account.username='"
+ businessTripRequesterUsername + "'", Employee.class);
Employee employee = query.getSingleResult();
return employee.getManager();
}We can use the same feature to call a business method of an EJB in a service task, using the camunda:expression="${myEjb.method()}"-extension.
Note that this requires a @Named-annotation on the MyEjb-class.
Contextual Programming Model
In this section we briefly look at the contextual process execution model used by the camunda-engine-cdi extension. A BPMN business process is typically a long-running interaction, comprised of both user and system tasks. At runtime, a process is split-up into a set of individual units of work, performed by users and/or application logic. In camunda-engine-cdi, a process instance can be associated with a CDI scope, the association representing a unit of work. This is particularly useful, if a unit of work is complex, for instance if the implementation of a UserTask is a complex sequence of different forms and "non-process-scoped" state needs to be kept during this interaction. In the default configuration, process instances are associated with the "broadest" active scope, starting with the conversation and falling back to the request if the conversation context is not active.
Associating a Conversation with a Process Instance
When resolving @BusinessProcessScoped beans, or injecting process variables, we rely on an existing association between an active CDI scope and a process instance. camunda-engine-cdi provides the org.camunda.bpm.engine.cdi.BusinessProcess bean for controlling the association, most prominently:
- the startProcessBy*(...)-methods, mirroring the respective methods exposed by the RuntimeService allowing to start and subsequently associating a business process,
- resumeProcessById(String processInstanceId), allowing to associate the process instance with the provided Id,
- resumeTaskById(String taskId), allowing to associate the task with the provided Id (and by extension, the corresponding process instance).
Once a unit of work (for example a UserTask) is completed, the completeTask() method can be called to disassociate the conversation/request from the process instance. This signals the engine that the current task is completed and makes the process instance proceed.
Note that the BusinessProcess-bean is a @Named bean, which means that the exposed methods can be invoked using expression language, for example from a JSF page. The following JSF2 snippet begins a new conversation and associates it with a user task instance, the Id of which is passed as a request parameter (e.g., pageName.jsf?taskId=XX):
<f:metadata>
<f:viewParam name="taskId" />
<f:event type="preRenderView" listener="#{businessProcess.startTask(taskId, true)}" />
</f:metadata>Declaratively controlling the Process
camunda-engine-cdi allows declaratively starting process instances and completing tasks using annotations. The @org.camunda.bpm.engine.cdi.annotation.StartProcess annotation allows to start a process instance either by "key" or by "name". Note that the process instance is started after the annotated method returns. Example:
@StartProcess("authorizeBusinessTripRequest")
public String submitRequest(BusinessTripRequest request) {
// do some work
return "success";
}Depending on the configuration of the Camunda engine, the code of the annotated method and the starting of the process instance will be combined in the same transaction. The @org.camunda.bpm.engine.cdi.annotation.CompleteTask-annotation works in the same way:
@CompleteTask(endConversation=false)
public String authorizeBusinessTrip() {
// do some work
return "success";
}The @CompleteTask annotation offers the possibility to end the current conversation. The default behavior is to end the conversation after the call to the engine returns. Ending the conversation can be disabled, as shown in the example above.
Working with @BusinessProcessScoped beans
Using camunda-engine-cdi, the lifecycle of a bean can be bound to a process instance. To this extent, a custom context implementation is provided, namely the BusinessProcessContext. Instances of BusinessProcessScoped beans are stored as process variables in the current process instance. BusinessProcessScoped beans need to be PassivationCapable (for example Serializable). The following is an example of a process scoped bean:
@Named
@BusinessProcessScoped
public class BusinessTripRequest implements Serializable {
private static final long serialVersionUID = 1L;
private String startDate;
private String endDate;
// ...
}Sometimes, we want to work with process scoped beans, in the absence of an association with a process instance, for example before starting a process. If no process instance is currently active, instances of BusinessProcessScoped beans are temporarily stored in a local scope (i.e., the Conversation or the Request, depending on the context.). If this scope is later associated with a business process instance, the bean instances are flushed to the process instance.
Built-In Beans
- The ProcessEngine as well as the services are available for injection:
@InjectProcessEngine, RepositoryService, TaskService, ... - A specific named ProcessEngine and its services can be injected by adding the qualifier
@ProcessEngineName('someEngine') - The current process instance and task can be injected: @Inject ProcessInstance, Task,
- The current business key can be injected: @Inject @BusinessKey String businessKey,
- The current process instance id be injected: @Inject @ProcessInstanceId String pid.
Process variables are available for injection. camunda-engine-cdi supports
- type-safe injection of
@BusinessProcessScopedbeans using@Inject [additional qualifiers] Type fieldName unsafe injection of other process variables using the
@ProcessVariable(name?)qualifier:@Inject @ProcessVariable private Object accountNumber; @Inject @ProcessVariable("accountNumber") private Object account;
In order to reference process variables using EL, we have similar options:
@Named @BusinessProcessScopedbeans can be referenced directly,- other process variables can be referenced using the ProcessVariables-bean:
#{processVariables['accountNumber']}
Injecting a process engine based on contextual data
While a specific process engine can be accessed by adding the qualifier @ProcessEngineName('name') to the injection point, this requires that it is known which process engine is used at design time. A more flexible approach is to resolve the process engine at runtime based on contextual information such as the logged in user. In this case, @Inject can be used without a @ProcessEngineName annotation.
To implement resolution from contextual data, the producer bean org.camunda.bpm.engine.cdi.impl.ProcessEngineServicesProducer must be extended. The following code implements a contextual resolution of the engine by the currently authenticated user. Note that which contextual data is used and how it is accessed is entirely up to you.
@Specializes
public class UserAwareEngineServicesProvider extends ProcessEngineServicesProducer {
// User can be any object containing user information from which the tenant can be determined
@Inject
private UserInfo user;
@Specializes @Produces @RequestScoped
public ProcessEngine processEngine() {
// okay, maybe this should involve some more logic ;-)
String engineForUser = user.getTenant();
ProcessEngine processEngine = BpmPlatform.getProcessEngineService().getProcessEngine(engineForUser);
if(processEngine != null) {
return processEngine;
} else {
return ProcessEngines.getProcessEngine(engineForUser, false);
}
}
@Specializes @Produces @RequestScoped
public RuntimeService runtimeService() {
return processEngine().getRuntimeService();
}
@Specializes @Produces @RequestScoped
public TaskService taskService() {
return processEngine().getTaskService();
}
...
}The above code makes selecting the process engine based on the current user's tenant completely transparent. For each request, the currently authenticated user is retrieved and the correct process engine is looked up. Note that the class UserInfo represents any kind of context object that identifies the current tenant. For example, it could be a JAAS principal. The produced engine can be accessed in the following way:
@Inject
private RuntimeService runtimeService;CDI Event Bridge
The Process engine can be hooked-up to the CDI event-bus. We call this the "CDI Event Bridge". This allows us to be notified of process events using standard CDI event mechanisms. In order to enable CDI event support for an embedded process engine, enable the corresponding parse listener in the configuration:
<property name="postParseListeners">
<list>
<bean class="org.camunda.bpm.engine.cdi.impl.event.CdiEventSupportBpmnParseListener" />
</list>
</property>Now the engine is configured for publishing events using the CDI event bus.
Note: The above configuration can be used in combination with an embedded process engine. If you want to use this feature in combination with the shared process engine in a multi application environment, you need to add the CdiEventListener as Process Application event listener. See next section.
The following gives an overview of how process events can be received in CDI beans. In CDI, we can declaratively specify event observers using the @Observes-annotation. Event notification is type-safe. The type of process events is org.camunda.bpm.engine.cdi.BusinessProcessEvent. The following is an example of a simple event observer method:
public void onProcessEvent(@Observes BusinessProcessEvent businessProcessEvent) {
// handle event
}This observer would be notified of all events. If we want to restrict the set of events the observer receives, we can add qualifier annotations:
@BusinessProcessDefinition: restricts the set of events to a certain process definition. Example:public void onProcessEvent(@Observes @BusinessProcessDefinition("billingProcess") BusinessProcessEvent businessProcessEvent) { // handle event }@StartActivity: restricts the set of events by a certain activity. For example:public void onActivityEvent(@Observes @StartActivity("shipGoods") BusinessProcessEvent businessProcessEvent) { // handle event }is invoked whenever an activity with the id "shipGoods" is entered.
@EndActivity: restricts the set of events by a certain activity. The following method is invoked whenever an activity with the id "shipGoods" is left:public void onActivityEvent(@Observes @EndActivity("shipGoods") BusinessProcessEvent businessProcessEvent) { // handle event }@TakeTransition: restricts the set of events by a certain transition.@CreateTask: restricts the set of events by a certain task. The following is invoked whenever a task with the definition key (id in BPMN XML) "approveRegistration" is created:public void onTaskEvent(@Observes @CreateTask("approveRegistration") BusinessProcessEvent businessProcessEvent) { // handle event }@AssignTask: restricts the set of events by a certain task. The following is invoked whenever a task with the definition key (id in BPMN XML) "approveRegistration" is assigned:public void onTaskEvent(@Observes @AssignTask("approveRegistration") BusinessProcessEvent businessProcessEvent) { // handle event }@CompleteTask: restricts the set of events by a certain task. The following is invoked whenever a task with the definition key (id in BPMN XML) "approveRegistration" is completed:public void onTaskEvent(@Observes @CompleteTask("approveRegistration") BusinessProcessEvent businessProcessEvent) { // handle event }@DeleteTask: restricts the set of events by a certain task. The following is invoked whenever a task with the definition key (id in BPMN XML) "approveRegistration" is deleted:public void onTaskEvent(@Observes @DeleteTask("approveRegistration") BusinessProcessEvent businessProcessEvent) { // handle event }
The qualifiers named above can be combined freely. For example, in order to receive all events generated when leaving the "shipGoods" activity in the "shipmentProcess", we could write the following observer method:
public void beforeShippingGoods(@Observes @BusinessProcessDefinition("shippingProcess") @EndActivity("shipGoods") BusinessProcessEvent evt) {
// handle event
}In the default configuration, event listeners are invoked synchronously and in the context of the same transaction. CDI transactional observers (only available in combination with JavaEE / EJB), allow to control when the event is handed to the observer method. Using transactional observers, we can for example assure that an observer is only notified if the transaction in which the event is fired succeeds:
public void onShipmentSuceeded(
@Observes(during=TransactionPhase.AFTER_SUCCESS) @BusinessProcessDefinition("shippingProcess") @EndActivity("shipGoods") BusinessProcessEvent evt) {
// send email to customer
}Note: BusinessProcessEvent.getTask will return an instance of DelegateTask (in case the event is a task event). If the listener is invoked after the transaction has completed, the DelegateTask object cannot be used for modifying variables.
The CDI Event Bridge in a Process Application
In order to use the CDI Event Bridge in combination with a multi-application deployment and the shared process engine, the CdiEventListener needs to be added as a Process Application Execution Event Listener.
Example configuration for Servlet Process Application:
@ProcessApplication
public class InvoiceProcessApplication extends ServletProcessApplication {
protected CdiEventListener cdiEventListener = new CdiEventListener();
public ExecutionListener getExecutionListener() {
return cdiEventListener;
}
public TaskListener getTaskListener() {
return cdiEventListener;
}
}Example configuration for Ejb Process Application:
@Singleton
@Startup
@ConcurrencyManagement(ConcurrencyManagementType.BEAN)
@TransactionAttribute(TransactionAttributeType.REQUIRED)
@ProcessApplication
@Local(ProcessApplicationInterface.class)
public class MyEjbProcessApplication extends EjbProcessApplication {
protected CdiEventListener cdiEventListener = new CdiEventListener();
@PostConstruct
public void start() {
deploy();
}
@PreDestroy
public void stop() {
undeploy();
}
public ExecutionListener getExecutionListener() {
return cdiEventListener;
}
public TaskListener getTaskListener() {
return cdiEventListener;
}
}Testing
Overview
When testing Process Applications you first have to be clear on what scope you want to test. Often Process Applications orchestrate various existing services which means that a Process Application test quickly becomes an integration test. The following picture show the scopes we differentiate when testing Process Applications:
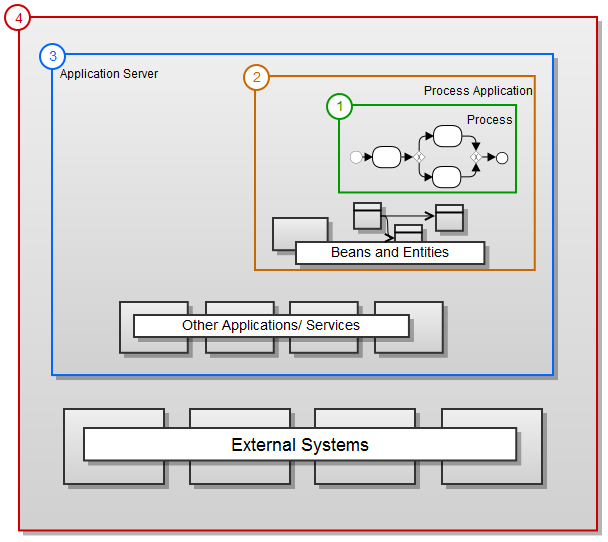
- Testing process definitions only, as isolated as possible.
- Testing your process application including e.g. CDI or EJB beans.
- Integration testing of your applications with other deployments or services (maybe deployed as mock services) on your application server.
- End-to-end integration test including all external systems.
Unit Testing
Business processes are an integral part of software projects and they should be tested in the same way normal application logic is tested: with unit tests. Since the camunda engine is an embeddable Java engine, writing unit tests for business processes is as simple as writing regular unit tests.
camunda supports both JUnit versions 3 and 4 styles of unit testing. In the JUnit 3 style, the ProcessEngineTestCase must be extended. This will make the ProcessEngine and the services available through protected member fields. In the setup() of the test, the processEngine will be initialized by default with the camunda.cfg.xml resource on the classpath. To specify a different configuration file, override the getConfigurationResource() method. Process engines are cached statically over multiple unit tests when the configuration resource is the same.
By extending ProcessEngineTestCase, you can annotate test methods with Deployment. Before the test is run, a resource file of the form testClassName.testMethod.bpmn20.xml, in the same package as the test class, will be deployed. At the end of the test the deployment will be deleted, including all related process instances, tasks, etc. The Deployment annotation also supports setting the resource location explicitly. See the Javadocs for more details.
Taking all that into account, a JUnit 3 style test looks as follows:
public class MyBusinessProcessTest extends ProcessEngineTestCase {
@Deployment
public void testSimpleProcess() {
runtimeService.startProcessInstanceByKey("simpleProcess");
Task task = taskService.createTaskQuery().singleResult();
assertEquals("My Task", task.getName());
taskService.complete(task.getId());
assertEquals(0, runtimeService.createProcessInstanceQuery().count());
}
}To get the same functionality when using the JUnit 4 style of writing unit tests, the ProcessEngineRule Rule must be used. Through this rule, the process engine and services are available through getters. As with the ProcessEngineTestCase (see above), including this Rule will enable the use of the Deployment annotation (see above for an explanation of its use and configuration) and it will look for the default configuration file on the classpath. Process engines are statically cached over multiple unit tests when using the same configuration resource.
The following code snippet shows an example of using the JUnit 4 style of testing and the usage of the ProcessEngineRule.
public class MyBusinessProcessTest {
@Rule
public ProcessEngineRule processEngineRule = new ProcessEngineRule();
@Test
@Deployment
public void ruleUsageExample() {
RuntimeService runtimeService = processEngineRule.getRuntimeService();
runtimeService.startProcessInstanceByKey("ruleUsage");
TaskService taskService = processEngineRule.getTaskService();
Task task = taskService.createTaskQuery().singleResult();
assertEquals("My Task", task.getName());
taskService.complete(task.getId());
assertEquals(0, runtimeService.createProcessInstanceQuery().count());
}
}Debugging unit tests
When using the in-memory H2 database for unit tests, the following instructions allow to easily inspect the data in the engine database during a debugging session. The screenshots here are taken in Eclipse, but the mechanism should be similar for other IDEs.
Suppose we have put a breakpoint somewhere in our unit test. In Eclipse this is done by double-clicking in the left border next to the code:

If we now run the unit test in debug mode (right-click in test class, select 'Run as' and then 'JUnit test'), the test execution halts at our breakpoint, where we can now inspect the variables of our test as shown in the right upper panel.
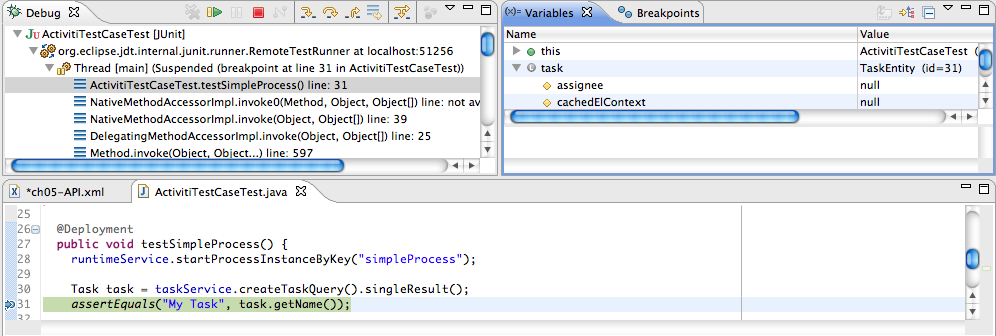
To inspect the data, open up the 'Display' window (if this window isn't there, open Window->Show View->Other and select Display.) and type (code completion is available) org.h2.tools.Server.createWebServer("-web").start()
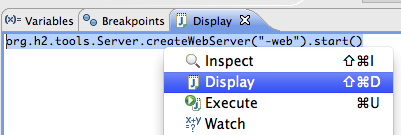
Select the line you've just typed and right-click on it. Now select 'Display' (or execute the shortcut instead of right-clicking)

Now open up a browser and go to http://localhost:8082, and fill in the JDBC URL to the in-memory database (by default this is jdbc:h2:mem:camunda), and hit the connect button.
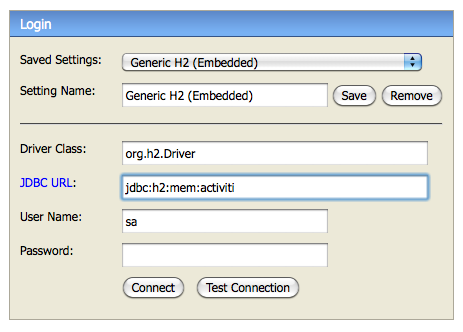
You can now see the engine database and use it to understand how and why your unit test is executing your process in a certain way.
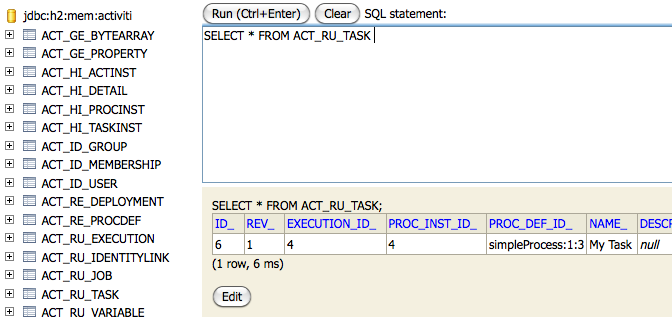
Using Mocks to test your Process Application
Using Arquillian to test your Process Application
In Java EE environments we recently use JBoss Arquillian pretty often to test Process Applications, because it makes bootstrapping the engine pretty simple. We will add more documentation on this here soon - for the moment please refer to the Arquillian Getting Started Guide.
Best Practices
Assertions
Apart from JUnit assertions, there is the community extension camunda-bpm-assert that adds a fluent API for asserting typical scenarios in a process integrating with AssertJ.
Writing Focused Tests
The feature to start a process instance at a set of activities can be used to to create a very specific scenario without much setup. Similarly, certain activities can be skipped by using process instance modification.
BPMN model API
Overview
The camunda BPMN model API provides a simple and lightweight library for parsing, creating, editing and writing of BPMN 2.0 XML files. The model API enables an easy extraction of information from an existing process definition or to create a complete new one without manual XML parsing. The BPMN model API is based on a general XML model API which is useful for general XML processing.
Note: Currently the BPMN model API does not fully support the whole BPMN 2.0 specification. The list of already supported BPMN 2.0 elements can be found in the source code package org.camunda.bpm.model.bpmn.instance.
Creating a model
To create a new BPMN model from scratch you have to create a empty BPMN model instance with the following method.
BpmnModelInstance modelInstance = Bpmn.createEmptyModel();The next step is to create a BPMN definitions element, set the target namespace on it and add it to the newly created empty model instance.
Definitions definitions = modelInstance.newInstance(Definitions.class);
definitions.setTargetNamespace("http://camunda.org/examples");
modelInstance.setDefinitions(definitions);After that you usually want to add a process to your model. This follows the same 3 steps as the creation of the BPMN definitions element:
- create a new instance of the BPMN element
- set attributes and child elements of the element instance
- add the newly created element instance to the corresponding parent element
Process process = modelInstance.newInstance(Process.class);
process.setId("process");
definitions.addChildElement(process);To simplify this repeating procedure you can use a helper method like this one.
protected <T extends BpmnModelElementInstance> T createElement(BpmnModelElementInstance parentElement, String id, Class<T> elementClass) {
T element = modelInstance.newInstance(elementClass);
element.setAttributeValue("id", id, true);
parentElement.addChildElement(element);
return element;
}After you created the elements of your process like start event, tasks, gateways and end event you have to connect the elements with sequence flows. Again, this follows the same 3 steps of element creation and can be simplified by the following helper method.
public SequenceFlow createSequenceFlow(Process process, FlowNode from, FlowNode to) {
String identifier = from.getId() + "-" + to.getId();
SequenceFlow sequenceFlow = createElement(process, identifier, SequenceFlow.class);
process.addChildElement(sequenceFlow);
sequenceFlow.setSource(from);
from.getOutgoing().add(sequenceFlow);
sequenceFlow.setTarget(to);
to.getIncoming().add(sequenceFlow);
return sequenceFlow;
}After you created your process you can validate the model against the BPMN 2.0 specification and convert it to a XML string or save it to a file or stream.
// validate the model
Bpmn.validateModel(modelInstance);
// convert to string
String xmlString = Bpmn.convertToString(modelInstance);
// write to output stream
OutputStream outputStream = new OutputStream(...);
Bpmn.writeModelToStream(outputStream, modelInstance);
// write to file
File file = new File(...);
Bpmn.writeModelToFile(file, modelInstance);Example 1: Create a simple process with one user task
With the basic helper methods from above it is very easy and straightforward to create simple processes. First create a process with a start event, user task and a end event.
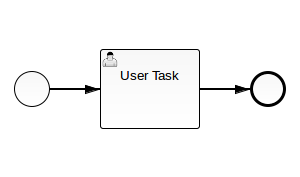
The following code creates this process using the helper methods from above (without the DI elements).
// create an empty model
BpmnModelInstance modelInstance = Bpmn.createEmptyModel();
Definitions definitions = modelInstance.newInstance(Definitions.class);
definitions.setTargetNamespace("http://camunda.org/examples");
modelInstance.setDefinitions(definitions);
// create the process
Process process = createElement(definitions, "process-with-one-task", Process.class);
// create start event, user task and end event
StartEvent startEvent = createElement(process, "start", StartEvent.class);
UserTask task1 = createElement(process, "task1", UserTask.class);
task1.setName("User Task");
EndEvent endEvent = createElement(process, "end", EndEvent.class);
// create the connections between the elements
createSequenceFlow(process, startEvent, task1);
createSequenceFlow(process, task1, endEvent);
// validate and write model to file
Bpmn.validateModel(modelInstance);
File file = File.createTempFile("bpmn-model-api-", ".bpmn");
Bpmn.writeModelToFile(file, modelInstance);Example 2: Create a simple process with two parallel tasks
Even complexer processes can be created with a few lines of code with the standard BPMN model API.
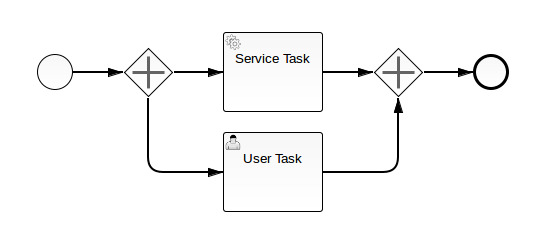
// create an empty model
BpmnModelInstance modelInstance = Bpmn.createEmptyModel();
Definitions definitions = modelInstance.newInstance(Definitions.class);
definitions.setTargetNamespace("http://camunda.org/examples");
modelInstance.setDefinitions(definitions);
// create elements
StartEvent startEvent = createElement(process, "start", StartEvent.class);
ParallelGateway fork = createElement(process, "fork", ParallelGateway.class);
ServiceTask task1 = createElement(process, "task1", ServiceTask.class);
task1.setName("Service Task");
UserTask task2 = createElement(process, "task2", UserTask.class);
task2.setName("User Task");
ParallelGateway join = createElement(process, "join", ParallelGateway.class);
EndEvent endEvent = createElement(process, "end", EndEvent.class);
// create flows
createSequenceFlow(process, startEvent, fork);
createSequenceFlow(process, fork, task1);
createSequenceFlow(process, fork, task2);
createSequenceFlow(process, task1, join);
createSequenceFlow(process, task2, join);
createSequenceFlow(process, join, endEvent);
// validate and write model to file
Bpmn.validateModel(modelInstance);
File file = File.createTempFile("bpmn-model-api-", ".bpmn");
Bpmn.writeModelToFile(file, modelInstance);Reading a model
If you already created a BPMN model and want to process it by the BPMN model API you can import it with the following methods.
// read a model from a file
File file = new File("PATH/TO/MODEL.bpmn");
BpmnModelInstance modelInstance = Bpmn.readModelFromFile(file);
// read a model from a stream
InputStream stream = [...]
BpmnModelInstance modelInstance = Bpmn.readModelFromStream(stream);After you imported your model you can search for elements by their id or by the type of elements.
// find element instance by ID
StartEvent start = (StartEvent) modelInstance.getModelElementById("start");
// find all elements of the type task
ModelElementType taskType = modelInstance.getModel().getType(Task.class);
Collection<ModelElementInstance> taskInstances = modelInstance.getModelElementsByType(taskType);For every element instance you can now read and edit the attribute values. You can do this by either using the provided helper methods or the generic XML model API. If you added custom attributes to the BPMN elements you can always access them with the generic XML model API.
StartEvent start = (StartEvent) modelInstance.getModelElementById("start");
// read attributes by helper methods
String id = start.getId();
String name = start.getName();
// edit attributes by helper methods
start.setId("new-id");
start.setName("new name");
// read attributes by generic XML model API (with optional namespace)
String custom1 = start.getAttributeValue("custom-attribute");
String custom2 = start.getAttributeValueNs("custom-attribute-2", "http://camunda.org/custom");
// edit attributes by generic XML model API (with optional namespace)
start.setAttributeValue("custom-attribute", "new value");
start.setAttributeValueNs("custom-attribute", "http://camunda.org/custom", "new value");Uou can also access the child elements of an element or references to other elements. For example a sequence flow references a source and a target element while a flow node (like start event, tasks etc.) has child elements for incoming and outgoing sequence flows.
For example the following BPMN model was created by the BPMN model API as an example for a simple process.
<?xml version="1.0" encoding="UTF-8" standalone="no"?>
<definitions targetNamespace="http://camunda.org/examples" xmlns="http://www.omg.org/spec/BPMN/20100524/MODEL">
<process id="process-with-one-task">
<startEvent id="start">
<outgoing>start-task1</outgoing>
</startEvent>
<userTask id="task1">
<incoming>start-task1</incoming>
<outgoing>task1-end</outgoing>
</userTask>
<endEvent id="end">
<incoming>task1-end</incoming>
</endEvent>
<sequenceFlow id="start-task1" sourceRef="start" targetRef="task1"/>
<sequenceFlow id="task1-end" sourceRef="task1" targetRef="end"/>
</process>
</definitions>You can now use the BPMN model API to get the source and target flow node of the sequence flow with the ID start-task1.
// read bpmn model from file
BpmnModelInstance modelInstance = Bpmn.readModelFromFile(new File("/PATH/TO/MODEL.bpmn"));
// find sequence flow by id
SequenceFlow sequenceFlow = (SequenceFlow) modelInstance.getModelElementById("start-task1");
// get the source and target element
FlowNode source = sequenceFlow.getSource();
FlowNode target = sequenceFlow.getTarget();
// get all outgoing sequence flows of the source
Collection<SequenceFlow> outgoing = source.getOutgoing();
assert(outgoing.contains(sequenceFlow));With these references you can easily create helper methods for different use cases. For example if you want to find the following flow nodes of an task or a gateway you can use a helper method like the following.
public Collection<FlowNode> getFlowingFlowNodes(FlowNode node) {
Collection<FlowNode> followingFlowNodes = new ArrayList<FlowNode>();
for (SequenceFlow sequenceFlow : node.getOutgoing()) {
followingFlowNodes.add(sequenceFlow.getTarget());
}
return followingFlowNodes;
}Fluent builder API
To create simple BPMN processes we provide a fluent builder API. With this API you can easily create basic processes in a few lines of code. In the generate process fluent api quickstart we demonstrate how to create a rather complex process with 5 tasks and 2 gateways within less than 50 lines of code.
The fluent builder API is not nearly complete but provides you with the following basic elements:
- process
- start event
- exclusive gateway
- parallel gateway
- script task
- service task
- user task
- end event
- subprocess
Create a process with the fluent builder API
To create a empty model instance with a new process the method Bpmn.createProcess() is used. After this
you can add as many tasks and gateways as you like. At the end you must call done() to return the generated
model instance. So for example a simple process with one user task can be created like this:
BpmnModelInstance modelInstance = Bpmn.createProcess()
.startEvent()
.userTask()
.endEvent()
.done();To add a new element you have to call a function which is named like the element to add. Additionally you can set attributes of the last created element.
So for example let's set the name of the process and mark it as executable and also give the user task a name.
BpmnModelInstance modelInstance = Bpmn.createProcess()
.name("Example process")
.executable()
.startEvent()
.userTask()
.name("Some work to do")
.endEvent()
.done();As you can see, a sequential process is really simple and straightforward to model but often you want
branches and a parallel execution path, which is also possible with the fluent builder API. Just add
a parallel or exclusive gateway and model the first path till an end event or another gateway. After that,
call the moveToLastGateway() method and you return to the last gateway and can model the next path.
BpmnModelInstance modelInstance = Bpmn.createProcess()
.startEvent()
.userTask()
.parallelGateway()
.scriptTask()
.endEvent()
.moveToLastGateway()
.serviceTask()
.endEvent()
.done();This example models a process with a user task after the start event followed by a parallel gateway with two parallel outgoing execution paths, each with a task and an end event.
Normally you want to add conditions on outgoing flows of an exclusive gateway which is also simple with
the fluent builder API. Just use the method condition() and give it a label and an expression.
BpmnModelInstance modelInstance = Bpmn.createProcess()
.startEvent()
.userTask()
.exclusiveGateway()
.name("What to do next?")
.condition("Call an agent", "#{action = 'call'}")
.scriptTask()
.endEvent()
.moveToLastGateway()
.condition("Create a task", "#{action = 'task'}")
.serviceTask()
.endEvent()
.done();If you want to use the moveToLastGateway() method but have multiple incoming
sequence flows at your current position you have to use the generic
moveToNode method with the id of the gateway. This could for example happen
if you add a join gateway to your process. For this purpose and for loops we
added the connectTo(elementId) method.
BpmnModelInstance modelInstance = Bpmn.createProcess()
.startEvent()
.userTask()
.parallelGateway("fork")
.serviceTask()
.parallelGateway("join")
.moveToNode("fork")
.userTask()
.connectTo("join")
.moveToNode("fork")
.scriptTask()
.connectTo("join")
.endEvent()
.done()This example creates a process with three parallel execution paths which all
join in the second gateway. Notice that the first call of moveToNode is not
necessary, because at this point the joining gateway only has one incoming sequence
flow, but was used for consistency.
BpmnModelInstance modelInstance = Bpmn.createProcess()
.startEvent()
.userTask()
.id("question")
.exclusiveGateway()
.name("Everything fine?")
.condition("yes", "#{fine}")
.serviceTask()
.userTask()
.endEvent()
.moveToLastGateway()
.condition("no", "#{!fine}")
.userTask()
.connectTo("question")
.done()This example creates a parallel gateway with a feedback loop in the second execution path.
To create an embedded subprocess with the fluent builder you can directly add it to your process building or you could detach it and create flow elements of the subprocess later on.
// Directly define the subprocess
BpmnModelInstance modelInstance = Bpmn.createProcess()
.startEvent()
.subProcess()
.camundaAsync()
.embeddedSubProcess()
.startEvent()
.userTask()
.endEvent()
.subProcessDone()
.serviceTask()
.endEvent()
.done();
// Detach the subprocess building
modelInstance = Bpmn.createProcess()
.startEvent()
.subProcess("subProcess")
.serviceTask()
.endEvent()
.done();
SubProcess subProcess = (SubProcess) modelInstance.getModelElementById("subProcess");
subProcess.builder()
.camundaAsync()
.embeddedSubProcess()
.startEvent()
.userTask()
.endEvent();Extend a process with the fluent builder API
With the fluent builder API you can not only create processes, you can also extend existing processes.
For example imagine a process containing a parallel gateway with the id gateway. You now want to
add another execution path to it for a new service task which has to be executed every time.
BpmnModelInstance modelInstance = Bpmn.readModelFromFile(new File("PATH/TO/MODEL.bpmn"));
ParallelGateway gateway = (ParallelGateway) modelInstance.getModelElementById("gateway");
gateway.builder()
.serviceTask()
.name("New task")
.endEvent();Another use case is to insert new tasks between existing elements. Imagine a process
containing a user task with the id task1 which is followed by a service task. And now
you want to add a script task and a user task between these two.
BpmnModelInstance modelInstance = Bpmn.readModelFromFile(new File("PATH/TO/MODEL.bpmn"));
UserTask userTask = (UserTask) modelInstance.getModelElementById("task1");
SequenceFlow outgoingSequenceFlow = userTask.getOutgoing().iterator().next();
FlowNode serviceTask = outgoingSequenceFlow.getTarget();
userTask.getOutgoing().remove(outgoingSequenceFlow);
userTask.builder()
.scriptTask()
.userTask()
.connectTo(serviceTask.getId());Delegation Code
If you use Delegation Code you can access the BPMN model instance and current element of the executed process. If a BPMN model is accessed it will be cached to avoid redundant database queries.
Java Delegate
If your class implements the org.camunda.bpm.engine.delegate.JavaDelegate interface you can access the BPMN model instance
and the current flow element. In the following example the JavaDelegate was added to a service task in the BPMN model.
Therefore the returned flow element can be casted to a ServiceTask.
public class ExampleServiceTask implements JavaDelegate {
public void execute(DelegateExecution execution) throws Exception {
BpmnModelInstance modelInstance = execution.getBpmnModelInstance();
ServiceTask serviceTask = (ServiceTask) execution.getBpmnModelElementInstance();
}
}Execution Listener
If your class implements the org.camunda.bpm.engine.delegate.ExecutionListener interface you can access the BPMN model instance
and the current flow element. As an Execution Listener can be added to several elements like process, events, tasks, gateways
and sequence flows it can not be guaranteed which type the flow element will be.
public class ExampleExecutionListener implements ExecutionListener {
public void notify(DelegateExecution execution) throws Exception {
BpmnModelInstance modelInstance = execution.getBpmnModelInstance();
FlowElement flowElement = execution.getBpmnModelElementInstance();
}
}Task Listener
If your class implements the org.camunda.bpm.engine.delegate.TaskListener interface you can access the BPMN model instance
and the current user task since a Task Listener can only be added to a user task.
public class ExampleTaskListener implements TaskListener {
public void notify(DelegateTask delegateTask) {
BpmnModelInstance modelInstance = delegateTask.getBpmnModelInstance();
UserTask userTask = delegateTask.getBpmnModelElementInstance();
}
}Repository Service
It is also possible to access the BPMN model instance by the process definition id using the Repository Service. As the following incomplete test sample code shows. Please see the generate-jsf-form quickstart for a complete example.
public void testRepositoryService() {
runtimeService.startProcessInstanceByKey(PROCESS_KEY);
String processDefinitionId = repositoryService.createProcessDefinitionQuery()
.processDefinitionKey(PROCESS_KEY).singleResult().getId();
BpmnModelInstance modelInstance = repositoryService.getBpmnModelInstance(processDefinitionId);
}Extension Elements
Custom extension elements are a standardized way to extend the BPMN model. The camunda extension elements are fully implemented in the BPMN model API but unknown extension elements can also easily be accessed and added.
Every BPMN BaseElement can have a child element of the type extensionElements.
This element can contain all sorts of extension elements. To access the
extension elements you have to call the getExtensionElements() method and
if no such child element exists you must create one first.
StartEvent startEvent = modelInstance.newInstance(StartEvent.class);
ExtensionElements extensionElements = startEvent.getExtensionElements();
if (extensionElements == null) {
extensionElements = modelInstance.newInstance(ExtensionElements.class);
startEvent.setExtensionElements(extensionElements);
}
Collection<ModelElementInstance> elements = extensionElements.getElements();After that you can add or remove extension elements to the collection.
CamundaFormData formData = modelInstance.newInstance(CamundaFormData.class);
extensionElements.getElements().add(formData);
extensionElements.getElements().remove(formData);You can also access a query-like interface to filter the extension elements.
extensionElements.getElementsQuery().count();
extensionElements.getElementsQuery().list();
extensionElements.getElementsQuery().singleResult();
extensionElements.getElementsQuery().filterByType(CamundaFormData.class).singleResult();Additionally, their are some shortcuts to add new extension elements. You can use
the namespaceUri and the elementName to add your own extension elements. Or
you can use the class of a known extension element type, e.g. the camunda
extension elements. The extension element is added to the BPMN element and returned
so that you can set attributes or add child elements.
ModelElementInstance element = extensionElements.addExtensionElement("http://example.com/bpmn", "myExtensionElement");
CamundaExecutionListener listener = extensionElements.addExtensionElement(CamundaExecutionListener.class);Another helper method exists for the fluent builder API which allows you to add prior defined extension elements.
CamundaExecutionListener camundaExecutionListener = modelInstance.newInstance(CamundaExecutionListener.class);
camundaExecutionListener.setCamundaClass("org.camunda.bpm.MyJavaDelegte");
startEvent.builder()
.addExtensionElement(camundaExecutionListener);Data Formats (XML, JSON, Other)
Overview
While camunda BPM is a Java platform, process data is not always represented by Java objects. When interacting with external systems, serialized formats such as JSON or XML are often used. While such process variables can be treated by the engine as plain String objects, there is a significant effort required to process such data like parsing, manipulating or mapping from/to Java objects. Thus, Camunda BPM offers an optional component that eases the work with this kind of data in the process engine.
The camunda Spin project provides data format functionality and can be plugged into the engine. It is a wrapper around well-known libraries for processing data formats like XML and JSON and integrates with the engine's data handling functionality. Spin is designed to be extensible so that custom data formats can be added to those provided out of the box.
As an introductory example, assume a process instance that retrieves a customer's profile by invoking a RESTful XML web service and that stores the result in a variable called customer. Let the customer variable have the following content:
<?xml version="1.0" encoding="UTF-8"?>
<customer xmlns="http://camunda.org/example" name="Jonny">
<address>
<street>12 High Street</street>
<postcode>1234</postcode>
</address>
</customer>With Spin integrated into the engine, the following expression can be used to evaluate the customer's post code in a conditional sequence flow:
${XML(customer).xPath("/customer/address/postcode").element().textContent() == "1234"}Camunda Spin provides the following engine functionality:
- Fluent APIs for reading, manipulating and writing text-based data formats like JSON and XML wherever code is plugged into a process
- Integration of the Spin API functions into the expression language
- Integration of the Spin API functions into scripting environments
- Native JSON and XML variable value types
- Serializing Java process variables by mapping objects to Spin data formats like JSON and XML
Configuring Spin Integration
In order to use Spin with a process engine, the relevant Spin libraries have to be on the engine's classpath. Furthermore, the process engine plugin provided by Spin has to be registered with the engine. When using a pre-built Camunda distribution, Spin is already integrated.
There are two types of Spin artifacts:
camunda-spin-core: a jar that contains only the core Spin classes. In addition tocamunda-spin-core, single data format artifacts likecamunda-spin-dataformat-json-jacksonandcamunda-spin-dataformat-xml-domexist that provide the JSON and XML functionality. These dependencies should be used when the default data formats have to be reconfigured or when custom data formats are used.camunda-spin-dataformat-all: a single jar without dependencies that contains the XML and JSON data formats.camunda-engine-plugin-spin: a process engine plugin which adds Spin to the Camunda BPM platform.
Maven coordinates
camunda-spin-core
camunda-spin-core contains Spin's core classes that every data format implementation requires. Additionally, XML and JSON data formats can be included with the dependencies camunda-spin-dataformat-json-jackson and camunda-spin-dataformat-xml-dom. These artifacts will transitively pull in their dependencies, like Jackson in the case of the JSON data format. For integration with the engine, the artifact camunda-engine-plugin-spin is needed. Given that the BOM is imported, the Maven coordinates are as follows:
<dependency>
<groupId>org.camunda.spin</groupId>
<artifactId>camunda-spin-core</artifactId>
</dependency><dependency>
<groupId>org.camunda.spin</groupId>
<artifactId>camunda-spin-dataformat-json-jackson</artifactId>
</dependency><dependency>
<groupId>org.camunda.spin</groupId>
<artifactId>camunda-spin-dataformat-xml-dom</artifactId>
</dependency><dependency>
<groupId>org.camunda.bpm</groupId>
<artifactId>camunda-engine-plugin-spin</artifactId>
</dependency>camunda-spin-dataformat-all
This artifact contains the XML and JSON dataformats as well as their dependencies. To avoid conflicts with other versions of these dependencies, Spin's dependencies are relocated to different packages. camunda-spin-dataformat-all has the following Maven coordinates:
<dependency>
<groupId>org.camunda.spin</groupId>
<artifactId>camunda-spin-dataformat-all</artifactId>
</dependency>Configuring the Spin Process Engine Plugin
camunda-engine-plugin-spin contains a class called org.camunda.spin.plugin.impl.SpinProcessEnginePlugin that can be registered with a process engine using the plugin mechanism. For example, a bpm-platform.xml file with the plugin enabled would look as follows:
<?xml version="1.0" encoding="UTF-8"?>
<bpm-platform xmlns="http://www.camunda.org/schema/1.0/BpmPlatform"
xmlns:xsi="http://www.w3.org/2001/XMLSchema-instance"
xsi:schemaLocation="http://www.camunda.org/schema/1.0/BpmPlatform http://www.camunda.org/schema/1.0/BpmPlatform ">
...
<process-engine name="default">
...
<plugins>
<plugin>
<class>org.camunda.spin.plugin.impl.SpinProcessEnginePlugin</class>
</plugin>
</plugins>
...
</process-engine>
</bpm-platform>When using a pre-built distribution of Camunda BPM, the plugin is already pre-configured.
Data Formats in Processes
The main entry point to Spin's functionality is the static function org.camunda.spin.Spin.S that can be used to process documents or to map java objects to a document format. The returned value of this function is a Spin wrapper, which is an intermediary representation of a document and that offers functions for manipulation of the underlying document. Additionally, the functions org.camunda.spin.Spin.XML and org.camunda.spin.Spin.JSON can be used that return a strongly-typed Spin wrapper of the provided documents which is useful when writing Java. Refer to the Spin reference documentation on how these methods can be used and what API is offered by the Spin wrappers.
The following subsections describe the integration points of the process engine and Spin. For specific documentation on data formats like XML and JSON, please refer to the XML section and the JSON section.
Expression Language Integration
The Spin engine plugin registers the Spin API entry functions in the context used for expression evaluation. It can therefore be used at all points where the engine allows expression language.
Scripting Integration
Similar to the EL integration, the Spin functions can be accessed from custom scripts in the supported languages JavaScript, Groovy, Python and Ruby. See the scripting section on how scripting is configured in general in Camunda BPM.
Native JSON and XML Variable Values
When working with JSON or XML payload it wouldn't be convenient to treat the payload as strings because then features like path-expressions and accessing properties couldn't be used. Additionally, you do not always need or want a class in your system to represent the JSON/XML.
That is why Spin provides native variable values to work with JSON and XML. The Spin API enables access and manipulation of the data in an easy way. Parsing and Serialization can be done with a single command.
Serializing Process Variables
Whenever custom Java objects are set as process variables, they have to be persisted to the database. Thus, a Java object instance has to be serialized. The engine's default serialization uses standard Java object serialization which ends up as machine-readable bytes in the database. This approach is limited in that the database values cannot be introspected and that a client reading the object has to possess the respective Java class. To alleviate these issues, by using the Spin engine plugin, variables can be serialized using Spin's data formats. The plugin registers a serializer that looks up all available data formats and offers them for serialization.
XML
For working with XML, the Spin functions org.camunda.spin.Spin.S and org.camunda.spin.Spin.XML can be used as entry points. The latter offers strongly-typed access to Spin's XML API and is preferable when writing Java code. In scripting environments, only the S function is available. The returned Spin wrapper offers methods for manipulating and writing XML as well as mapping XML to Java. Furthermore, the entry functions can be provided with Java objects that get implicitly converted to Spin's intermediary XML format.
The following provides examples on how camunda Spin can be used in the process engine to work with XML data. For illustration purposes, let us assume that a String process variable customer containing XML exists. It has the following content:
<?xml version="1.0" encoding="UTF-8"?>
<customer xmlns="http://camunda.org/example" name="Jonny">
<address>
<street>12 High Street</street>
<postCode>1234</postCode>
</address>
</customer>Expression Language Integration
The Spin entry functions can be used wherever the process engine allows expression language. The following BPMN snippet shows a conditional sequence flow expression based on the customer's post code:
...
<sequenceFlow>
<conditionExpression xsi:type="tFormalExpression">
${XML(customer).xPath("/customer/address/postCode").element().textContent() == "1234"}
</conditionExpression>
</sequenceFlow>
...If your variable is already a XML variable value and not a string like in the previous example you can omit the XML(...) call and directly access the variable:
...
<sequenceFlow>
<conditionExpression xsi:type="tFormalExpression">
${customer.xPath("/customer/address/postCode").element().textContent() == "1234"}
</conditionExpression>
</sequenceFlow>
...Scripting Integration
The following example is a script implemented in JavaScript. The script makes use of the Spin API to extract the address object from the customer, add a city name and set it as a process variable:
...
<scriptTask id="task" name="Script Task" scriptFormat="javascript">
<script>
<![CDATA[
var address = S(customer).element("address");
var city = XML("<city>New York</city>");
address.append(city);
execution.setVariable("address", address.toString());
]]>
</script>
</scriptTask>
...Native XML Variable Value
The native variable value for XML makes it possible to easily parse a XML string and wrap it inside an object without the need to have a class representing the XML. Suppose we want to save the XML inside a process variable for later use, we could do the following inside a JavaDelegate:
public class MyDelegate implements JavaDelegate {
@Override
public void execute(DelegateExecution execution) throws Exception {
String xml = "<customer xmlns=\"http:\\/\\/camunda.org/example\" name=\"Jonny\">"
+ "<address>"
+ "<street>12 High Street</street>"
+ "<postCode>1234</postCode>"
+ "</address>"
+ "</customer>";
XmlValue xmlValue = SpinValues.xmlValue(xml).create();
execution.setVariable("customerJonny", xmlValue);
}
}The call to SpinValues.xmlValue(...).create() will transform the string into a DomXML object wrapped by Spin.
If we wanted to retrieve the XML in another JavaDelegate and e.g. add some more information we could do this easily:
public class AddDataDelegate implements JavaDelegate {
@Override
public void execute(DelegateExecution execution) throws Exception {
XmlValue customer = execution.getVariableTyped("customerJonny");
SpinXmlElement xmlElement = customer.getValue().append(Spin.XML("<creditLimit>1000.00</creditLimit>"));
customer = SpinValues.xmlValue(xmlElement).create();
execution.setVariable("customerJonny", customer);
//<?xml version="1.0" encoding="UTF-8"?><customer xmlns="http:\/\/camunda.org/example" name="Jonny"><address><street>12 High Street</street><postCode>1234</postCode></address><creditLimit xmlns="">1000.00</creditLimit></customer>
}
}When retrieving the XML value via execution.getVariableTyped() there are two options: serialized and deserialized.
Retrieving the variable deserialized by calling ether getVariableTyped("name") or getVariableTyped("name", true) the XmlValue contains the wrapped DomXML object to represent the XML data. Calling getVariableTyped("name", false) results in XmlValue containing only the raw string, which is advantageous if you only need the string to pass it to another API e.g.
Serializing Process Variables
A Java object can be serialized using Spin's built-in XML data format. Let us assume that there are two Java classes, com.example.Customer and com.example.Address. Spin's default XML format relies on JAXB which is why JAXB annotations like @XmlRootElement, @XmlAttribute, and @XmlElement can be used to configure the serialization process. Note though that these annotations are not required. The classes look as follows:
@XmlRootElement(namespace = "http://camunda.org/example")
public class Customer {
protected String name;
protected Address address;
@XmlAttribute
public String getName() { .. }
@XmlElement(namespace = "http://camunda.org/example")
public Address getAddress() { .. }
/* constructor and setters omitted for brevity */
}
public class Address {
protected String street;
protected int postCode;
@XmlElement(namespace = "http://camunda.org/example")
public String getStreet() { .. }
@XmlElement(namespace = "http://camunda.org/example")
public int getPostCode() { .. }
/* constructor and setters omitted for brevity */
}The following Java code sets a process variable to a Customer object that is serialized using Spin's XML data format:
Address address = new Address("12 High Street", 1234);
Customer customer = new Customer("jonny", address);
ProcessInstance processInstance = runtimeService.startProcessInstanceByKey("aProcess");
ObjectValue typedCustomerValue =
Variables.objectValue(customer).serializationDataFormat("application/xml").create();
runtimeService.setVariable(processInstance.getId(), "customer", typedCustomerValue);The decisive statement is
ObjectValue typedCustomerValue =
Variables.objectValue(customer).serializationDataFormat("application/xml").create();This creates a variable value from the customer object. The invocation serializationDataFormat("application/xml") tells the process engine in which format the variable should be serialized. This name must match the name of a data format known to Spin. For example, application/xml is the name of the built-in XML data format.
Once the variable is set, its serialized value can be retrieved using the type variable API. For example:
ObjectValue customer = runtimeService.getVariableTyped(processInstance.getId(), "customer");
String customerXml = customer.getValueSerialized();
/*
customerXml matches:
<?xml version="1.0" encoding="UTF-8"?>
<customer xmlns="http://camunda.org/example" name="Jonny">
<address>
<street>12 High Street</street>
<postCode>1234</postCode>
</address>
</customer>
*/The engine can be configured to persist all objects for which no explicit data format is specified as XML. The process engine configuration offers a property defaultSerializationFormat. To configure default XML serialization, set this property to application/xml. Now, the invocation runtimeService.setVariable(processInstance.getId(), "customer", new Customer()) directly serializes the Customer object as XML without explicit declaration of the format.
JSON
For working with JSON, the Spin functions org.camunda.spin.Spin.S and org.camunda.spin.Spin.JSON can be used as entry points. The latter offers strongly-typed access to Spin's JSON API and is preferable when writing Java code. In scripting environments, only the S function is available. The returned Spin wrapper offers methods for manipulating and writing JSON as well as mapping JSON to Java. Furthermore, the entry functions can be provided with Java objects that get implicitly converted to Spin's intermediary JSON format.
The following provides examples on how Camunda Spin can be used in the process engine to work with JSON data. For illustration purposes, let us assume that a String process variable customer containing JSON exists. It has the following content:
{
"name" : "jonny",
"address" : {
"street" : "12 High Street",
"post code" : 1234
}
}If you want to learn how to use JSON objects inside an embedded form please take a look in the Embedded Forms Reference.
Expression Language Integration
The Spin entry functions can be used wherever the process engine allows expression language. The following BPMN snippet shows a conditional sequence flow expression based on the customer's post code:
...
<sequenceFlow>
<conditionExpression xsi:type="tFormalExpression">
${S(customer).prop("address").prop("post code").numberValue() == 1234}
</conditionExpression>
</sequenceFlow>
...If your variable is already a JSON variable value and not a string like in the previous example you can omit the S(...) call and directly access the variable:
...
<sequenceFlow>
<conditionExpression xsi:type="tFormalExpression">
${customer.jsonPath("$.adress.post code").numberValue() == 1234}
</conditionExpression>
</sequenceFlow>
...Scripting Integration
The following example is a script implemented in JavaScript. The script makes use of the Spin API to extract the address object from the customer, add a city name and set it as a process variable:
...
<scriptTask id="task" name="Script Task" scriptFormat="javascript">
<script>
<![CDATA[
var address = S(customer).prop("address");
address.prop("city", "New York");
execution.setVariable("address", address.toString());
]]>
</script>
</scriptTask>
...Native JSON Variable Value
The native variable value for JSON makes it possible to easily parse a JSON string and wrap it inside an object without the need to have a class representing the JSON. Suppose we want to save the JSON inside a process variable for later use, we could do the following inside a JavaDelegate:
public class MyDelegate implements JavaDelegate {
@Override
public void execute(DelegateExecution execution) throws Exception {
String json = "{\"name\" : \"jonny\","
+ "\"address\" : {"
+ "\"street\" : \"12 High Street\","
+ "\"post code\" : 1234"
+ "}"
+ "}";
JsonValue jsonValue = SpinValues.jsonValue(json).create();
execution.setVariable("customerJonny", jsonValue);
}
}The call to SpinValues.jsonValue(...).create() will transform the string into a Jackson object wrapped by Spin.
If we wanted to retrieve the JSON in another JavaDelegate and e.g. add some more information we could do this easily:
public class AddDataDelegate implements JavaDelegate {
@Override
public void execute(DelegateExecution execution) throws Exception {
JsonValue customer = execution.getVariableTyped("customerJonny");
customer.getValue().prop("creditLimit", 1000.00);
//{"name":"jonny","address":{"street":"12 High Street","post code":1234},"creditLimit":1000.0}
}
}When retrieving the JSON value via execution.getVariableTyped() there are two options: serialized and deserialized.
Retrieving the variable deserialized by calling ether getVariableTyped("name") or getVariableTyped("name", true) the JsonValue contains the wrapped Jackson object to represent the JSON data. Calling getVariableTyped("name", false) results in JsonValue containing only the raw string, which is advantageous if you only need the string to pass it to another API e.g.
Serializing Process Variables
A Java object can be serialized using Spin's built-in JSON data format. Let us assume that there are two java classes, com.example.Customer and com.example.Address, with the following structure:
public class Customer {
protected String name;
protected Address address;
/* constructor, getters and setters omitted for brevity */
}
public class Address {
protected String street;
protected int postCode;
/* constructor, getters and setters omitted for brevity */
}The following Java code sets a process variable to a Customer object that is serialized using Spin's JSON data format:
Address address = new Address("12 High Street", 1234);
Customer customer = new Customer("jonny", address);
ProcessInstance processInstance = runtimeService.startProcessInstanceByKey("aProcess");
ObjectValue typedCustomerValue =
Variables.objectValue(customer).serializationDataFormat("application/json").create();
runtimeService.setVariable(processInstance.getId(), "customer", typedCustomerValue);The decisive statement is
ObjectValue typedCustomerValue =
Variables.objectValue(customer).serializationDataFormat("application/json").create();This creates a variable value from the customer object. The invocation serializationDataFormat("application/json") tells the process engine in which format the variable should be serialized. This name must match the name of a data format known to Spin. For example, application/json is the name of the built-in JSON data format.
Once the variable is set, its serialized value can be retrieved using the type variable API. For example:
ObjectValue customer = runtimeService.getVariableTyped(processInstance.getId(), "customer");
String customerJson = customer.getValueSerialized();
/*
customerJson matches:
{
"name" : "jonny",
"address" : {
"street" : "12 High Street",
"postCode" : 1234
}
}
*/The engine can be configured to persist all objects for which no explicit data format is specified as JSON. The process engine configuration offers a property defaultSerializationFormat. To configure default JSON serialization, set this property to application/json. Now, the invocation runtimeService.setVariable(processInstance.getId(), "customer", new Customer()) directly serializes the Customer object as JSON without explicit declaration of the format.
Task Forms
Overview
There are different types of forms which are primarily used in the Tasklist. To implement a Task Form in your application you have to connect the form resource with the BPMN 2.0 element in your process diagram. Suitable BPMN 2.0 elements for calling Tasks Forms are the Start Event and the User Task.
Out of the box, the Camunda Tasklist supports four different kinds of task forms:
- Embedded Task Forms: HTML-based task forms displayed embedded inside the Tasklist.
- Generated Task Forms: Like embedded task forms but generated from XML Metadata inside BPMN 2.0 XML.
- External Task Forms: The user is directed to another application to complete the task.
- Generic Task Forms: If no task form exists, a generic form is displayed for editing the process variables.
Embedded Task Forms
Embedded task forms are HTML and JavaScript forms which can be displayed directly inside the tasklist.
To add an embedded task form to your application, simply create an HTML file and attach it to a User
Task or a Start
Event in your process model. Add a folder
src/main/webapp/forms to your project folder and create a FORM_NAME.html file containing the
relevant content for your form. The following example shows a simple form with two input fields:
<form role="form" name="form">
<div class="form-group">
<label for="customerId-field">Customer ID</label>
<input required
cam-variable-name="customerId"
cam-variable-type="String"
class="form-control" />
</div>
<div class="form-group">
<label for="amount-field">Amount</label>
<input cam-variable-name="amount"
cam-variable-type="Double"
class="form-control" />
</div>
</form>To configure the form in your process, open the process in your Eclipse IDE with the Camunda Modeler and select the desired User
Task or Start
Event. Open the properties view and enter
embedded:app:forms/FORM_NAME.html as Form Key. The relevant XML tag looks like this:
<userTask id="theTask" camunda:formKey="embedded:app:forms/FORM_NAME.html"
camunda:candidateUsers="John, Mary"
name="my Task">Generated Task Forms
The Camunda process engine supports generating HTML Task Forms based on Form Data Metadata provided in BPMN 2.0 XML. Form Data Metadata is a set of BPMN 2.0 vendor extensions provided by Camunda, allowing you to define form fields directly in BPMN 2.0 XML:
<userTask id="usertask" name="Task">
<extensionElements>
<camunda:formData>
<camunda:formField
id="firstname" label="Firstname" type="string">
<camunda:validation>
<camunda:constraint name="maxlength" config="25" />
<camunda:constraint name="required" />
</camunda:validation>
</camunda:formField>
<camunda:formField
id="lastname" label="Lastname" type="string">
<camunda:validation>
<camunda:constraint name="maxlength" config="25" />
<camunda:constraint name="required" />
</camunda:validation>
</camunda:formField>
<camunda:formField
id="dateOfBirth" label="Date of Birth" type="date" />
</camunda:formData>
</extensionElements>
</userTask>Camunda Modeler: Form metadata can be graphically edited using the Camunda Modeler.
This form would look like this in the Camunda Tasklist:

As you can see, the <camunda:formData ... /> element is provided as a child element of the BPMN <extensionElements> element. Form metadata consists of multiple form fields which represent individual input fields where a user has to provide some value or selection.
Form Fields
A form field can have the following attributes:
| Attribute | Explanation |
|---|---|
| id | Unique id of the form field, corresponding to the name of the process variable to which the value of the form field is added when the form is submitted. |
| label | The label to be displayed next to the form field. |
| type | The data type of the form field. The following types are supported out of the box:
|
| defaultValue | Value to be used as a default (pre-selection) for the field. |
Form Field Validation
Validation can be used for specifying frontend and backend validation of form fields. Camunda BPM provides a set of built-in form field validators and an extension point for plugging in custom validators.
Validation can be configured for each form field in BPMN 2.0 XML:
<camunda:formField
id="firstname" name="Firstname" type="string">
<camunda:validation>
<camunda:constraint name="maxlength" config="25" />
<camunda:constraint name="required" />
</camunda:validation>
</camunda:formField>As you can see, you can provide a list of validation constraints for each form field.
The following built-in validators are supported out of the box:
| Validator | Explanation |
|---|---|
| required |
Applicable to all types. Validates that a value is provided for the form field. Rejects 'null' values and empty strings.
|
| minlength |
Applicable to string fields. Validates minlength of text content. Accepts 'null' values.
|
| maxlength |
Applicable to string fields. Validates maxlength of text content. Accepts 'null' values.
|
| min |
Applicable to numeric fields. Validates the min value of a number. Accepts 'null' values.
|
| max |
Applicable to numeric fields. Validates the max value of a number. Accepts 'null' values.
|
| readonly |
Applicable to all type. Makes sure no input is submitted for given form field.
|
Camunda BPM supports custom validators. Custom validators are referenced using their fully qualified classname or an expression. Expressions can be used for resolving Spring or CDI @Named beans:
<camunda:formField
id="firstname" name="Firstname" type="string">
<camunda:validation>
<camunda:constraint name="validator" config="com.asdf.MyCustomValidator" />
<camunda:constraint name="validator" config="${validatorBean}" />
</camunda:validation>
</camunda:formField>A custom validator implements the org.camunda.bpm.engine.impl.form.validator.FormFieldValidator interface:
public class CustomValidator implements FormFieldValidator {
public boolean validate(Object submittedValue, FormFieldValidatorContext validatorContext) {
// ... do some custom validation of the submittedValue
// get access to the current execution
DelegateExecution e = validatorContext.getExecution();
// get access to all form fields submitted in the form submit
Map<String,Object> completeSubmit = validatorContext.getSubmittedValues();
}
}If the process definition is deployed as part of a ProcessApplication deployment, the validator instance is resolved using the process application classloader and / or the process application Spring Application Context / CDI Bean Manager in case of an expression.
External Task Forms
If you want to call a task form that is not part of your application you can add a reference to the desired form. The referenced task form will be configured in a way similar to the embedded task form. Open the properties view and enter FORM_NAME.html as form key. The relevant XML tag looks like this:
<userTask id="theTask" camunda:formKey="app:FORM_NAME.html"
camunda:candidateUsers="John, Mary"
name="my Task">The tasklist creates the URL by the pattern:
"../.." + contextPath (of process application) + "/" + "app" + formKey (from BPMN 2.0 XML) + "processDefinitionKey=" + processDefinitionKey + "&callbackUrl=" + callbackUrl;When you have completed the task the call back URL will be called.
Generic Task Forms
The generic form will be used whenever you have not added a dedicated form for a User Task or a Start Event.
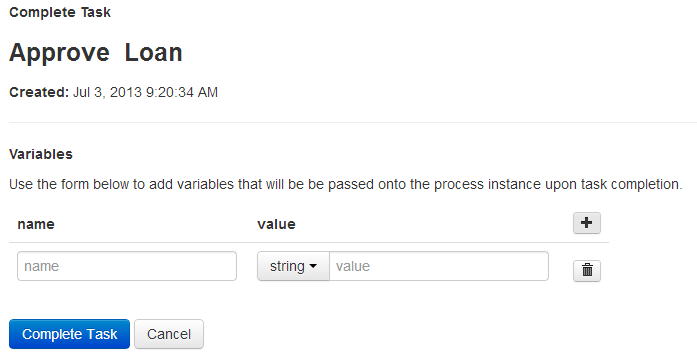
Add a variable button to add a variable that will be passed to the process instance upon task completion. State a variable name, select the type and enter the desired value. Enter as many variables as you need.
After hitting the Complete button the process instance contains the entered values. Generic Task Forms can be very helpful during the development stage, so you do not need to implement all Task Forms before you can run a workflow. For debugging and testing this concept has many benefits as well.
You can also retrieve already existing variables of the process instance by clicking the Load Variables button.
Cycle
What is Cycle?
Note
With Camunda BPM 7.2.0 we have migrated Camunda Cycle into a standalone project. We did this to reduce the tight coupling between Camunda Cycle and the Camunda BPM platform. This eases our development efforts for Cycle and allows others to increase participation. Here you can find the installation guide for Camunda Cycle.
With Cycle you can synchronize the BPMN diagrams in your business analyst's BPMN tool with the technically executable BPMN 2.0 XML files your developers edit with their modeler (e.g. in Eclipse). Depending on your tool we can realize forward- and a reverse engineering, while you can store your BPMN 2.0 XML files in different repositories (e.g. SVN, file system or FTP servers).
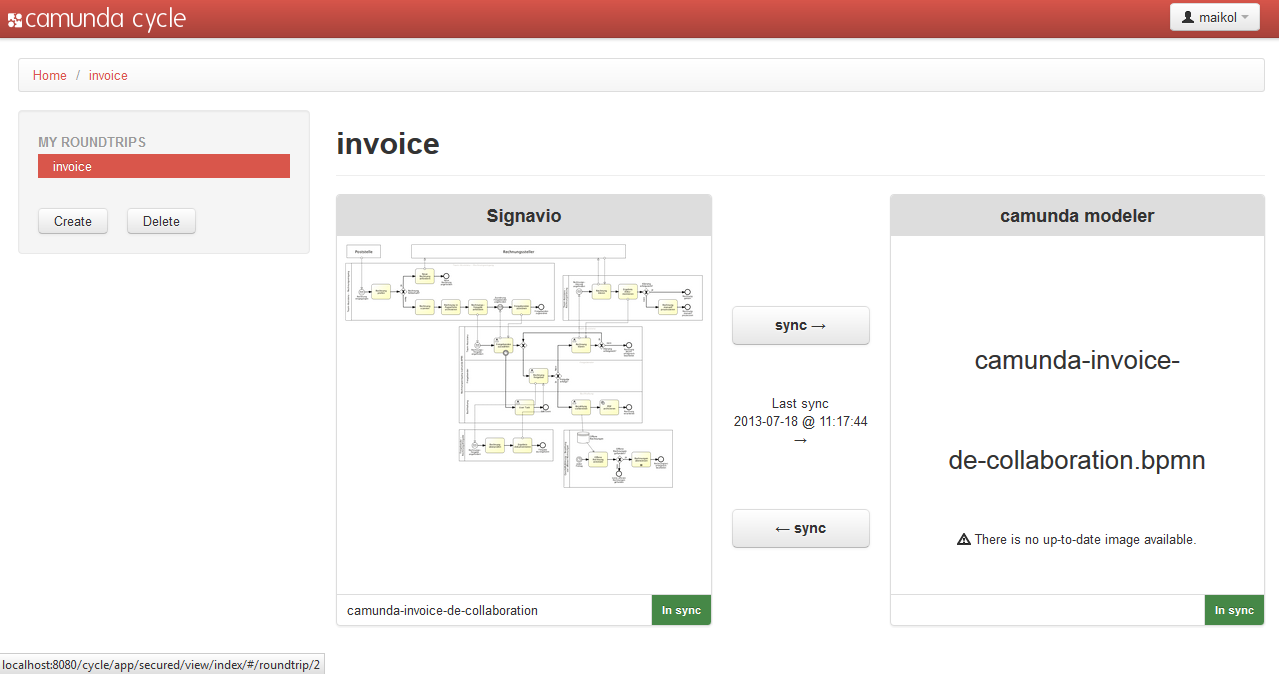
Although business and IT use different BPMN tools, the process models stay in sync: with camunda Cycle you can synchronize BPMN diagrams in the tool chain any time, for forward engineering as well as reverse engineering. By connecting and continuously synchronizing the process models in both environments, we keep business and IT aligned. This is what we call a full working BPM roundtrip.
The typical use cases are:
- Synchronize a BPMN 2.0 diagram with an executable diagram (Forward Engineering)
- Update the executable diagram and synchronize the changes with the origin BPMN 2.0 diagram (Reverse Engineering)
- Create executable diagrams out of the BPMN 2.0 diagram (Forward Engineering)
Cycle is a standalone application and must be downloaded separately from the camunda BPM distribution. After the installation of cycle it is ready to use by opening http://localhost:8180/cycle. At the first start up you will be prompted to create an admin user. If you are new to Cycle have a look at our Hands-On Cycle Tutorial.
Connector Configuration
To connect Cycle to a suitable repository you can set up one of the following connectors:
In addition, more BPMN 2.0 tool vendors contribute their connectors in the cycle community extension.
Furthermore you get information about how to configure User Credentials for your connector.
Signavio Connector
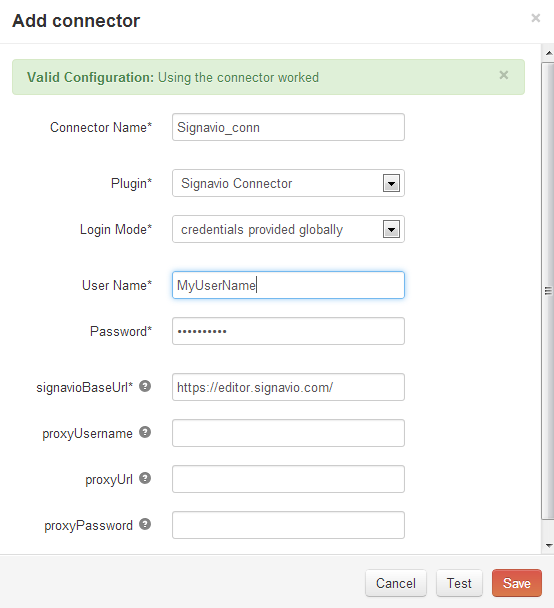
For directly accessing your process models stored in Signavio, you must set up a Signavio Connector. The picture to the left shows a connector setup for Signavio's SaaS edition with globally provided credentials, meaning that every Cycle user connects to the repository with the same credentials. If you are behind a proxy, you could configure that here as well.
Hit Test to check if Cycle can find the folder you specified.
Subversion Connector

Use the subversion plugin to connect to a subversion repository like SVN. You must specify the URL (including subfolders, if you want to directly point to a certain folder in the subversion repository). If user credentials are mandatory, you can provide them either globally or individually for each Cycle user. In the picture to the left you see a connector setup for a GitHub repository. The user credentials are provided globally.
Hit Test to check if Cycle can find the folder you specified.
File System Connector
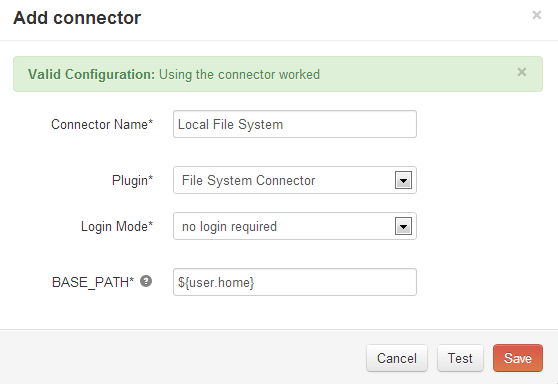
Use the File System Connector to use models stored on your local system. Select the File System Connector as connector plugin. The variable ${user.home} points to the directory of your OS user account. You can also choose an absolute path like C:\MyFolder.
Hit Test to check if Cycle can find the folder you specified.
GitHub Connector

Use the GitHub Connector to connect to a GitHub repository. You must specify the URL. If [user credentials]({{< relref "#user-credentials" >}}) are mandatory, you can provide them either globally or individually for each Cycle user. In the image above you see a connector setup for a GitHub repository. The user credentials are provided globally.
Hit Test to check if Cycle can find the repository you specified.
User Credentials
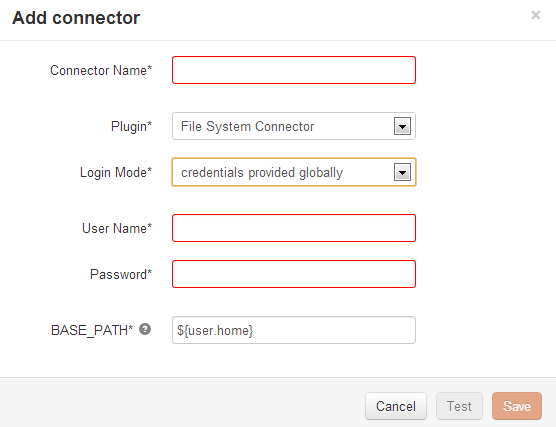
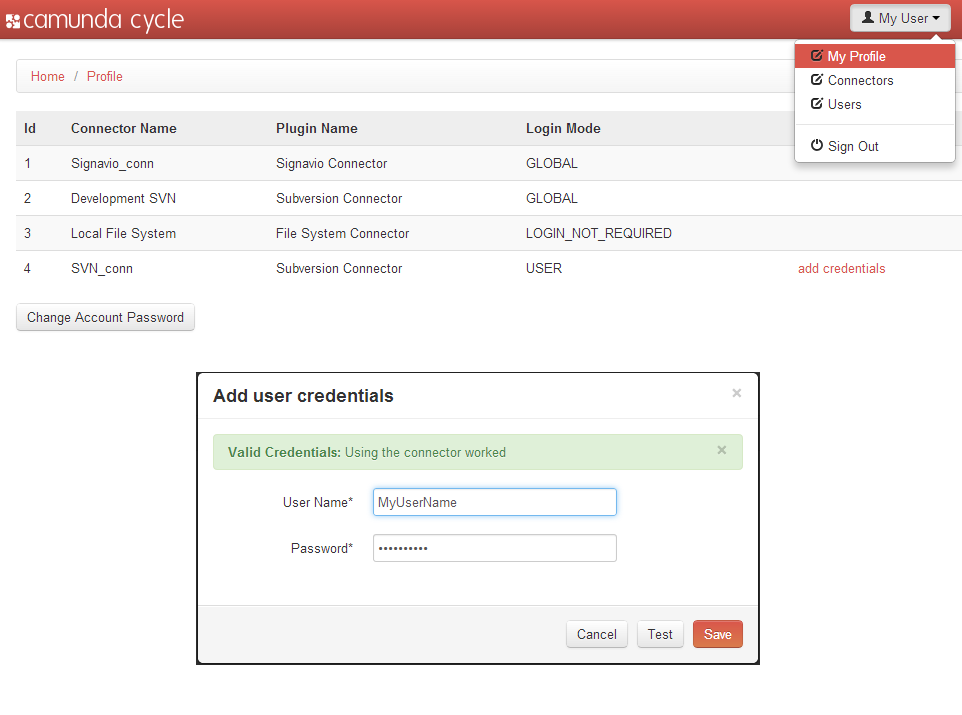
To set up credentials provided by the user you need to enter the My Profile menu and select add credentials for your connector.
Hit Test to check if the credentials are valid.
BPMN 2.0 Roundtrip
When we are talking about a Roundtrip we are talking about the synchronization of BPMN 2.0 diagrams between the business perspective and the technical perspective. This synchronization is based on the standard BPMN 2.0 XML format. As on the technical side only executable processes matter, Cycle provides the functionality to extract these processes out of models from the business side where manual processes (not executable) can be modeled as well. This extraction mechanism is what we call Pool Extraction. With Cycle, you can do this synchronization in both directions.
Step 1: Setup the Connector
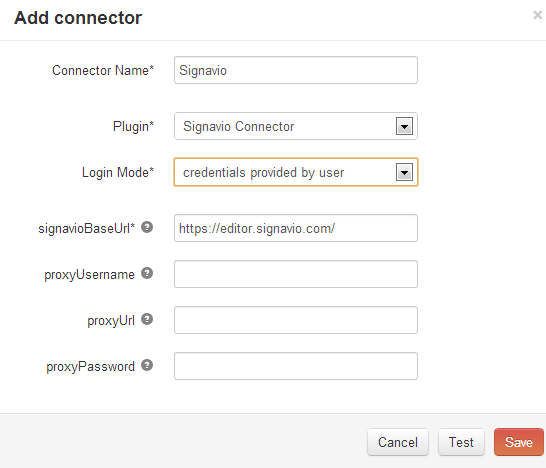
Set up a suitable connector for your repository as described in the section Connector Configuration. In this walkthrough we use a Signavio Connector with user provided credentials.
Hit Test to check if Cycle can access your Signavio account.
Step 2: Add process model from the repository
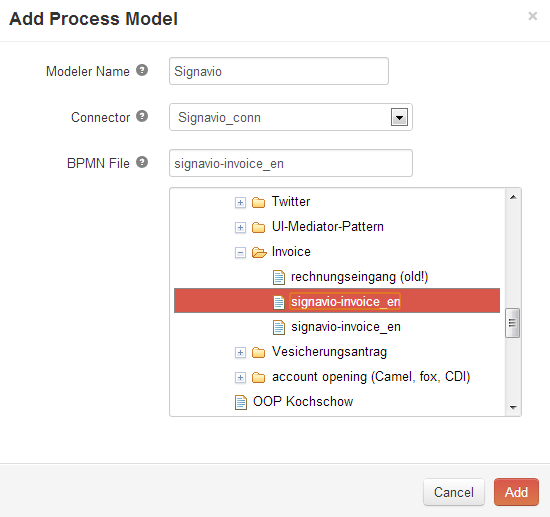
In the left box of your roundtrip, click on Add Process Model, pick a name for your modeling tool and choose the Signavio connector from the connector's dropdown. Cycle now connects with Signavio, so after a short time you can navigate through the chosen repository to select your process model.
After you hit Add, Cycle will save a link to the process model you selected and offer you a preview image in the left box of your roundtrip. It also says that the process model has not yet been synchronized, which is true. Changes on the diagram in Signavio will be updated automatically by Cycle.
Step 3: Create BPMN file for execution
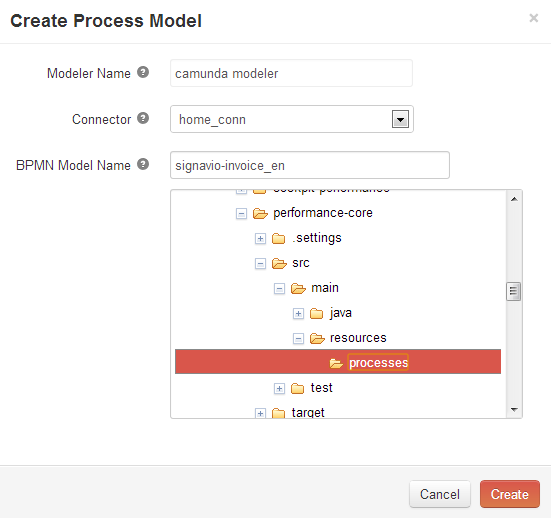
Hit Create and choose the location you want the BPMN 2.0 XML file to be stored to. In our example, we want to store it on our local file system, in a workspace we use with our Eclipse IDE. After hitting Create, Cycle will connect to Signavio, request the BPMN 2.0 XML and save it to the location you specified. Please note that no diagram picture will be displayed until an image file of the diagram is stored in the folder. Cycle indicates that both models are in "in sync" now.
Heads up! If your process model is a collaboration diagram, Cycle will do a Pool Extraction which means that only pools that are executable will be regarded.
Step 4: Edit BPMN File

Now Cycle shows you that your roundtrip consists of the BPMN diagram stored in Signavio (left side) and the BPMN 2.0 file stored in your file repository (right side). You can also see that the two process models are currently in sync, and the date and time since the last sync has been made.
You can now either check out the BPMN 2.0 - XML from your subversion or open it directly on your local drive. In both cases, you can now edit it inside your Eclipse IDE using the camunda Modeler.
Step 5: Reverse Engineering
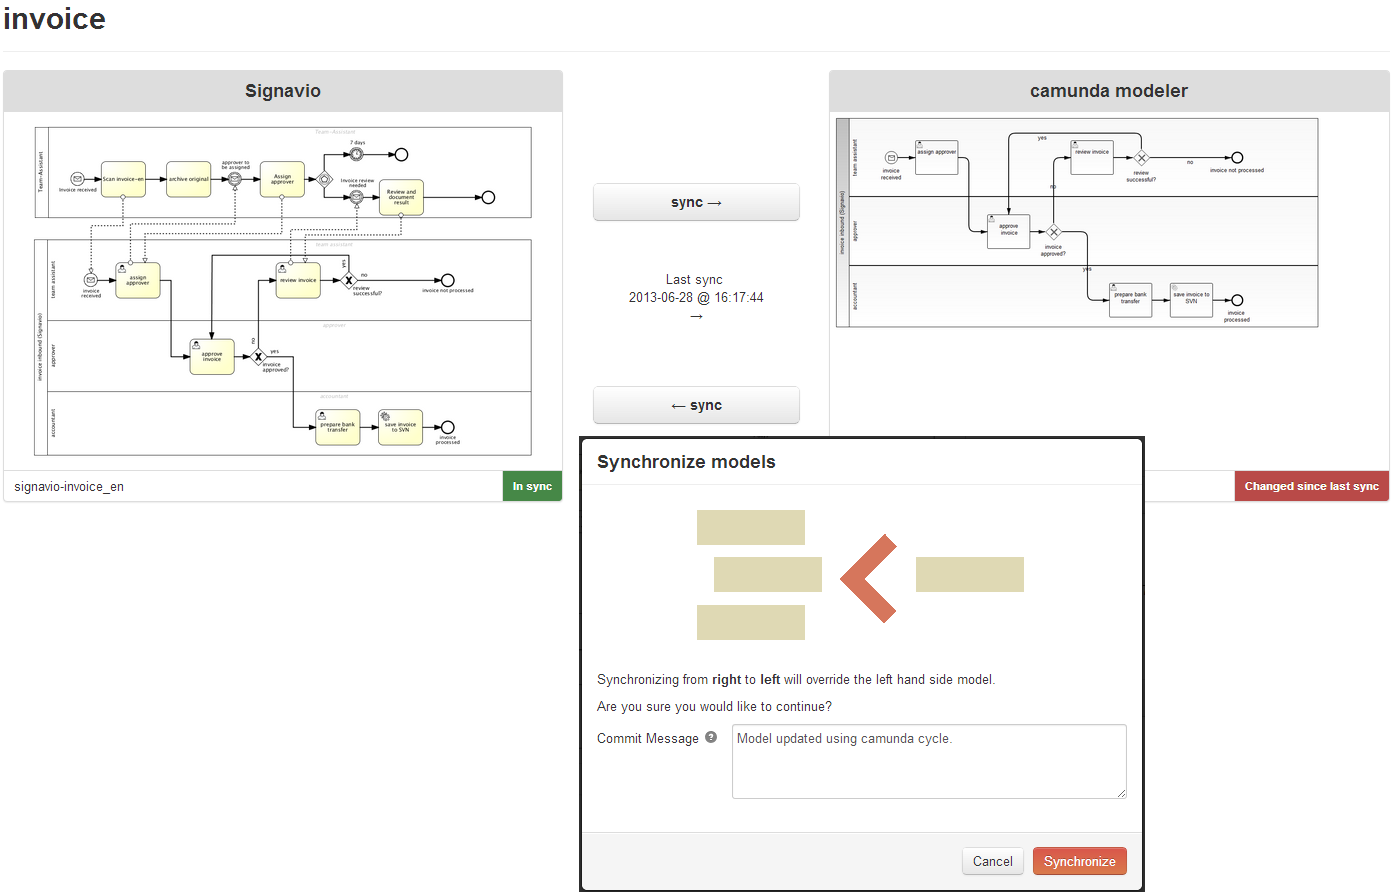
After you have worked on the executable process model the models are out of sync, indicated by the red label "change since last sync" on the side where the change happened.
You can now hit the sync button in the corresponding direction (in our case from right to left). Afterwards you will be prompted to confirm the synchronization with the option to add a commit message.
Now both models are synchronized again, indicated by green labels "in sync" on both sites.
Pool Extraction
During a roundtrip from a business perspective to a technical process diagram Cycle checks which pools are flagged as "executable". Only those pools will actually be synchronized for the executable process model, so you don't have to bother with huge diagrams describing manual flows. We call this feature "Pool Extraction". When you synchronize the executable diagram again with the origin diagram the "non-executable" pools will be merged back into the diagram. No information gets lost.
The following example shows a relevant xml tag:
<process id="sid-8E90631B-169F-4CD8-9C6B-1F31121D0702" name="MyPool" isExecutable="true">Engine Attributes
An executable process model usually contains engine specific attributes in the BPMN 2.0 XML. So we have to make sure that these attributes are not lost during a roundtrip with an other tool. The BPMN 2.0 Standard explicitly defines an extension mechanism for these attributes in the XML. That means that a proper BPMN 2.0 import and export functionality must maintain the engine attributes, even if they are added as an engine extension.
The camunda BPM Process Engine uses multitude attributes for configuration purposes which can be set up in the camunda Modeler. Cycle retains these attributes during the roundtrip. Here is an example:
The xml export from Signavio modeler contains no engine attributes:
<serviceTask completionQuantity="1" id="sid-01234"
implementation="webService"
isForCompensation="false"
name="MyService"
startQuantity="1"/>After the update with camunda Modeler, class and failedJobRetryTimeCycle were added as camunda specific engine attributes:
<definitions ... xmlns:camunda="http://activiti.org/bpmn" xmlns:fox="http://www.camunda.com/fox">
...
<serviceTask id="sid-01234" camunda:class="java.lang.Object"
camunda:asyncBefore="true"
name="MyService"
implementation="webService">
<extensionElements>
<fox:failedJobRetryTimeCycle>R3/PT10M</fox:failedJobRetryTimeCycle>
</extensionElements>
<incoming>sid-3DED1BA0-77FC-4768-AA3E-0B60A81850EA</incoming>
<outgoing>sid-E6D3AB73-386C-4260-82B9-CB740B82001F</outgoing>
</serviceTask>
...
</definitions>After synchronization back to Signavio the original Signavio-information like completionQuantity, isForCompensation and startQuantity were merged back:
<definitions ... xmlns:camunda="http://activiti.org/bpmn" xmlns:fox="http://www.camunda.com/fox">
...
<serviceTask camunda:asyncBefore="true" camunda:class="java.lang.Object"
completionQuantity="1"
id="sid-01234"
isForCompensation="false"
name="MyService"
startQuantity="1">
<extensionElements>
<fox:failedJobRetryTimeCycle>R3/PT10M</fox:failedJobRetryTimeCycle>
</extensionElements>
<incoming>sid-3DED1BA0-77FC-4768-AA3E-0B60A81850EA</incoming>
<outgoing>sid-E6D3AB73-386C-4260-82B9-CB740B82001F</outgoing>
</serviceTask>
...
</definitions>Tasklist
What is Tasklist?
Tasklist is a web application that provides you with the possibility to work on User Tasks. Tasklist is part of the Camunda BPM distribution and ready to use by opening http://localhost:8080/camunda/app/tasklist.

Working with Tasklist
In the following example we will walk through a typical human workflow scenario. In our prepackaged distribution the Tasklist has four demo users which belong to different user groups. Sign in with the user demo.
Start a Process
To start a process instance via Tasklist, hit the button on the dashboard and select a process out of the displayed list of process definitions. If no process definitions are listed here, please verify that your process application is deployed correctly. For our example, start the invoice receipt process.
After selecting the process to start, you have to insert the desired values in the start form and hit Start to continue to the next step in our example.
Create a Filter
On the dashboard you can now create a filter which displays this task. For our example, we will create a filter to display all tasks assigned to the currently signed in user and which belong to the process definition invoice receipt. To do so, click on Create a Filter and insert a name for the filter, e.g., My invoice tasks. Then click on Criteria and on Add Criterion. Next, click on the empty Key field, select Name in the Process Definition submenu and insert invoice receipt into the Value field. Click on Add Criterion again, select Assignee in the User/Group submenu of the key field and insert ${ currentUser() } into the value field. We want to publish this filter to our colleagues as well. To do this, click on Authorizations and on Add Rule. Here we will add a * as a wildcard into the User/Group field to make the filter visible to all users. As a final step, click on Save to create the filter.
Now you can see the filter on the left side of the dashboard. Click on the filter to display the user tasks.
See this section for more information about Filters in Tasklist.
Working on Tasks
After creating the filter, we now want to start working on a task. We can do so by selecting the task in the filter results. On the right side, you will see the task form to work on as an embedded form.
In our example task form you are asked to assign an approver for your invoice. In our example, select the demo user from the dropdown menu and complete the task. Then have a look at the dashboard. Now you will see that the Assign Approver task has been completed and a new task, Approve Invoice has been created and assigned to the demo user.
When you submit the task form, the task is completed and the process continues in the engine. Furthermore, you can visualize the process model by clicking on the Diagram tab in the task view section of the dashboard.
See this section for more information about task forms.
Set Follow-Up Date
Let's assume that this task was assigned to the user just before the end of his working day. Because we want to hurry out, we will set a follow-up date (reminder) for this task so that we don't forget about it when we get back to the office. To do so, click on Set follow-up date in the task view section and select a date in the calendar that is displayed. We can also set an exact time for the follow-up.
See this section for more information about setting follow-up dates.
Reassign tasks
Next we will reassign this task to another user (e.g., Mary) for further handling. To do so, click on the user name demo in the task view section and insert the user that this task should be assigned to, e.g., Mary.
See this section for more information about claiming, unclaiming and reassigning tasks.
Comment a task
Now that we have assigned the task to Mary, we want to add a comment for her to see. To do so, click on Add Comment at the top of the task view section and insert the comment, e.g., "Hi Mary, please handle this task". The comment can now be seen in the task history.
See this section for more information about comments in tasks.
Set Due Date
Last but not least, we want to set a due date for this task, to ensure that the task is handled on time. To do so, click on Set due date in the task view section and select a date in the calendar that is displayed. You can also set an exact time.
See this section for more information about setting due dates.
This concludes our example task. Now we will elaborate on the functions that Tasklist offers.
Dashboard

On the dashboard of Tasklist you see an overview of pending tasks. On the left side of the screen, an overview of the filters is displayed. On the top right side of the screen, you can set a follow-up or due date and you can claim and unclaim tasks. Underneath that section, the embedded form is displayed (please note that external task forms cannot be displayed here), you can switch to the task history, you can see the diagram view or you can view the description of the user task.
Toggle view

Tasklist offers you the option of toggling the view options on the dashboard. You can select to have a focus on the filters, the filter results, the task view or to display the full dashboard. To do so, hit the respective  button (see the image on the left). At any time, you can also choose to instantly set full focus on the task view by hitting the button.
Start a process
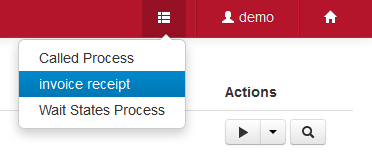
To start a process instance via Tasklist, hit the button and select a process out of the displayed list of process definitions. If no process definitions are listed here, please verify that your process application is deployed correctly.
Depending on whether you have defined a start form for your process it will be displayed now. Otherwise you get a notification that no form has been defined for starting the process. In this case, a generic start form will be displayed and Tasklist will offer the option of adding variables to the process instance.
Filter Results

Here you can see an overview of all tasks for the selected filter. By default the filter with the lowest priority is displayed first. After selecting the appropriate filter, you will see an overview of all tasks, sorted by a specified criteria (by default it is sorted by the creation date). You can change the sorting of the tasks by clicking on the name of the sorting property. You can toggle between ascending and descending order by clicking on the arrow (, respectively ).
You can sort by more than one property by adding more properties with the button. You can also sort by the value of variables, which allows for use cases like sorting invoices by the value of their amount. To remove a sort parameter you can click on the .
To start working on the task, simply select the task.
Search for Tasks

Above the filter results, you have the option of searching for user tasks within the selected filter results. To do so, click in the search box and select the parameters to search for. You can also begin typing to find the required parameter faster. Depending on the selected property, you have to specify the value of the property. Some properties also allow operators other than equal, e.g., 'like', which allows to search for a task where the entered value is a substring of the property value. If you are searching for variables, you also have to enter the variable name you want to search for. If the filter you have selected has defined labels for variables, you can select the label of the variable as variable name. Otherwise (if there is no label definition for a variable), you have to enter the variable name to search for it. If you change the filter selection, the search will be performed on the selected filter and the results will be updated accordingly.
If you are searching for a variable of type string, which has a numeric, boolean or null value, you have to wrap the value in single quotes (e.g., '93288' or 'NULL').
Task view

On the right section of the dashboard, you can see the task view. Here you can work on tasks and perform the following operational actions.
Set Due dates and follow-up dates
In the upper section of the task view, you can set a due date and follow-up date for the selected task. A due date can be set to determine when the task needs to be completed and a follow-up date can be set as a reminder or for monitoring purposes.
Claim, unclaim and reassign Tasks
Within the task view, you can claim, unclaim and reassign tasks. To claim a task, simply select Claim. Unclaim a task by hitting the button next to the username of a claimed task and reassign a task to a different user by clicking on the username and inserting the username of the user you want to assign the task to. You can also assign tasks to user groups by clicking on Add Groups.
Comments
In Tasklist you can add and view comments on specific tasks. After selecting a task from the filter results, click on Add Comment at the top of the task view section to add a comment to the selected task. The comments of a task can be viewed in the task history.
Task Detail Tabs
In the lower section of the task view there are several tabs which can be selected to display both the task form itself and additional information related to this user task.
- Task form view - The Form tab, which is selected by default, displays the task form (provided that the task form is an embedded, generated or generic task form). Here you can work on and complete the task.
- Task history - The History tab displays the history of this user task. Here you can see detailed information, such as the assignment history, updates to the due date and follow-up dates and claiming and unclaiming of tasks.
- Diagram view - The Diagram tab shows the diagram of the process definition. The current user task is highlighted in this diagram.
- Task description - Open the Description tab to see the description of the user task. See this section for more information about description of tasks.
Filters

In the Tasklist, you can create and select Filters. You can use these Filters to create lists of tasks, sorted by specified criteria. To create a filter, select Create a Filter. You will then see a screen as depicted in the image to the left. You have several options to configure your filter:
- General - Here you can specify the name and description of the filter as well as assigning a color. Assign a priority to determine the order in which the filters are displayed on the dashboard. You can choose to have the filter automatically refresh the filter results by selecting the checkbox Auto-Refresh.
- Permissions - Here you can specify which users or groups can see the filter. You can set the filter as globally accessible by selecting the checkbox Accessible by all users. A permission that is set here is equivalent to a READ permission which can also be set in Camunda Admin. In case you want to assign other permissions, you can do so in the Authorizations tab in Camunda Admin.
- Criteria - Here you can specify which tasks will be displayed when selecting the filter. A Key and a Value must be inserted. There are various Keys which can be selected from the categories Process Instance (ID, Business Key), Process Definition (ID, Key, Name), Case Instance (ID, Business Key), Case Definition (ID, Key, Name), Other (Process Instance state, Activity instance ID, Execution ID), User/Group (Assignee, Owner, Candidate User or Group, Involved user, Unassigned, Delegation State), Task (Definition Key, Name, Description, Priority) and Dates (Created date, Due date, Follow up date). Keys marked with a * accept expressions as value.
- Variables - Here you can specify which variables are displayed in the filter results section of the dashboard. Setting variables here has no influence on which tasks are displayed. To set the variables, you need to insert a Name, which is the coded name of the variable, and a Label, which defines what the variable will be named in the filter results.
Expressions in Filters
Several of the filter criteria accept expressions as values. These expressions are in the JUEL language. In filters which are related to times and dates, you can use the dateTime class, which returns a Joda-Time DateTime object.
Filter expressions can be abused to execute arbitrary code when the query is evaluated. It is therefore required that any user authorized to create filters is trusted in this respect. The default behavior of evaluating filter expressions can be deactivated in the process engine configuration. See the section on security considerations for custom code for details.
Common Filters

Here we will show you some of the more common and useful filters that you can create in Camunda Tasklist and how to set them up.
| Filter name | Description |
Criterion Key |
Criterion Value |
|---|---|---|---|
| All my tasks | Displays all tasks assigned to the currently logged in user | Assignee |
$ { currentUser() }
|
| Tasks of a specific user | Displays all tasks assigned to a specified user | Assignee |
User ID of the user (e.g., demo)
|
| All my groups | Displays all tasks assigned to a user group of which the currently logged on user is a member | Candidate Groups |
${ currentUserGroups() }
|
| Tasks of a specific group | Displays all tasks assigned to a specific user group | Candidate Groups |
Group name (e.g., accounting)
|
| Unclaimed tasks of a specific group | Displays all tasks assigned to a specific user group which have not been claimed yet |
Candidate Groups, Unassigned |
Group name (e.g., accounting),true
|
| Unassigned tasks | Displays all tasks that have not yet been claimed | Unassigned |
true
|
| Overdue tasks | Displays all tasks that have a due date set in the past | Due Before |
${ now() }
|
| Tasks due today | Displays all tasks that have a due date set for the current date |
Due After, Due Before |
${ dateTime().withTimeAtStartOfDay() },${ dateTime().withTimeAtStartOfDay()
|
| Tasks due after a specific date | Displays all tasks that have a due date set after a specified date | Due After |
The specified date in accordance with ISO 8601 (e.g., 2015-01-01T00:00:01)
|
| Tasks due within a specific timespan | Displays all tasks that have a due date set within a specified timespan (in this example, within 2 days) |
Due After, Due Before |
Expressions specifying the timespans (e.g., ${ now() }, ${ dateTime().plusDays(2) })
|
| Tasks due after a specific timespan | Displays all tasks that have a due date set after a specified timespan (in this example, after 2 days) | Due After |
An expression specifying the timespan (e.g., ${ dateTime().plusDays(2) })
|
| Tasks with a certain priority | Displays all tasks that are marked with a specified priority (in this example, priority 10) | Priority |
10
|
| Follow-up tasks | Displays all tasks that have a follow-up date set in the past | Follow Up Before |
${ now() }
|
User Assignment
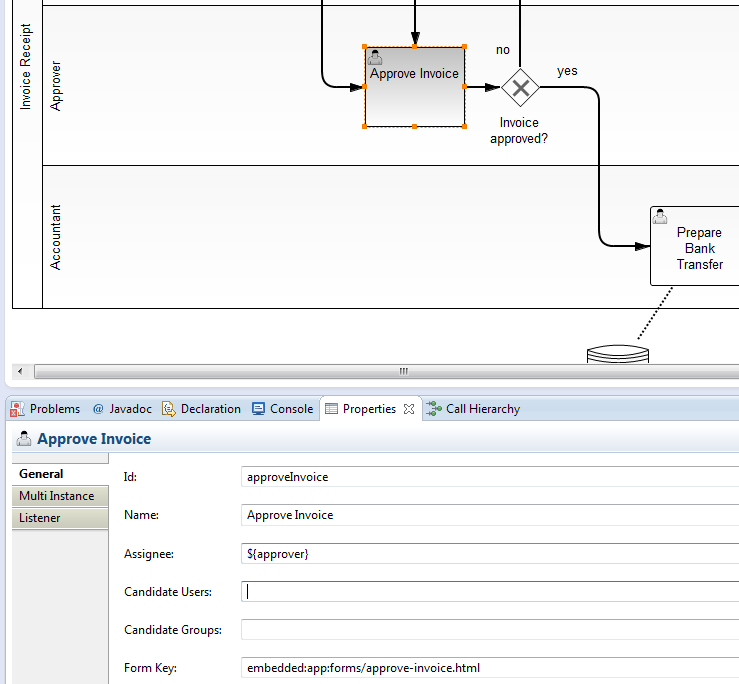
Tasks can be directly assigned to a user or to a group. Compared to the direct assignment of tasks, the tasks of groups are not yet assigned. They must be claimed before a user can work on the form. Depending on this affiliation the Tasklist displays tasks in different filters.
Task Lifecycle
The diagram below shows the task lifecycle and supported transitions supported by camundaBPM. To get to know how to programmatically work with the lifecycle in your application refer to the Java-API Reference.
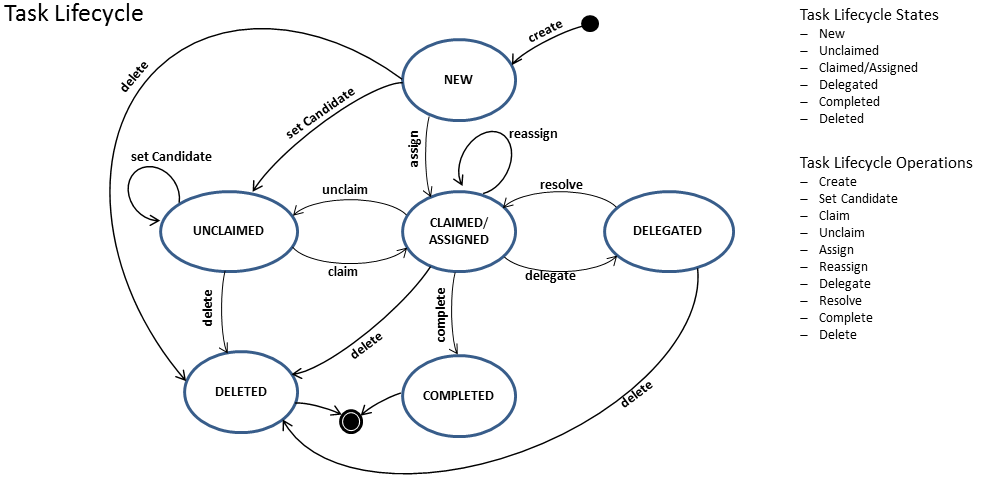
Customizing
You can override the default configuration of Tasklist using a central configuration file
located in app/tasklist/scripts/config.js. Currently, the following configuration options are
available:
Date Format
Dates can be configured by specifying a dateFormat object. The values of the properties of this
object must be strings representing date formats in accordance to
moment.js. Following date formats are used within the tasklist:
monthNamerepresents the name of a month (e.g., January).dayrepresents the number of a day in a month (1..31).abbrrepresents a short format of a date including time.normalrepresents the standard format of a date including time.longrepresents a verbose format of a date including time and day of the week.shortrepresents a short format of a date excluding time.
Example
"dateFormat": {
"monthName": "MMM",
"long": "LLLL"
}Localization
The localization of Tasklist is contained in the app/tasklist/locales/ directory. This
directory contains a separate localization file for every available language. The file name
consists of the language code and the suffix .json (e.g. en.json).
Tasklist uses a locale file corresponding to the language settings of the browser. You can
set the availableLocales property in the configuration file to provide a list of available
locales. The path to this configuration file is mentioned above.
Every locale which is contained in this list must have a locale file in the locales
directory with the corresponding language code.
If the browser uses a language which is not available, Tasklist uses the locale which is
defined via the fallbackLocale property in the configuration file:
"locales": {
"availableLocales": ["en", "de"],
"fallbackLocale": "en"
}To create a new localization for Tasklist, copy the provided language file, translate it and save it as new localization file with the corresponding language code. To make the new translation available, add it to the list of available locales in the configuration file.
Custom scripts
If you want to add scripts (in order to add new AngularJS directives or
other libraries) you should add a customScripts property to the app/tasklist/scripts/config.js
file with something like that:
var camTasklistConf = {
// ...
customScripts: {
// names of angular modules defined in your custom script files.
// will be added to the 'cam.tasklist.custom' as dependencies
ngDeps: ['my.custom.module'],
// RequireJS modules to load.
deps: ['custom-ng-module'],
// RequreJS path definitions
paths: {
'custom-ng-module': '../custom-ng-module/script'
}
}
};This includes a custom-ng-module/script.js file. The path is relative to the
app/tasklist/scripts folder in the camunda webapp .war file.
Note: The content of the customScripts property will be treated as a
RequireJS configuration except for the
nodeIdCompat and skipDataMain which are irrelevant and deps which will be used like:
require(config.deps, callback);In your scripts, you can add a controller and directive like that:
'use strict';
define('custom-ng-module', [
'angular'
], function (angular) {
// define a new angular module named my.custom.module
// it will be added as angular module dependency to builtin 'cam.tasklist.custom' module
// see the config.js entry above
var customModule = angular.module('my.custom.module', []);
// ...so now, you can safely add your controllers...
customModule.controller('customController', ['$scope', function ($scope) {
$scope.var1 = 'First variable';
$scope.var2 = 'Second variable';
}]);
// ...directives or else.
customModule.directive('customDirective', function () {
return {
template: 'Directive example: "{{ var1 }}", "{{ var2 }}"'
};
});
// it is not necessary to 'return' the customModule but it might come handy
return customModule;
});And finally, in your UI or embedded forms, you can use the new features like that:
<div ng-controller="customController">
<div custom-directive> - (in this case; will be overwritten) - </div>
</div>Logo and Header Color
To change visual aspects of Tasklist, you can edit the user stylesheet file located in
app/tasklist/styles/user-styles.css. This file contains CSS which is loaded into Tasklist
and can override the standard styles.
To display your own logo in the top-left corner, edit the background-image property of the
.navbar-brand to point to the URL of your logo image.
To set the color of the navigation bar (header), multiple properties have to be overwritten. You
can find an example in the default user-styles.css file.
Advanced styles customization
In addition to the basic user-styles.css file, you can edit the source style- and layout files
using less to change the overall appearance of Tasklist.
If you want to customize the interface with less, you should probably start by having a look at the variables defined in the client/styles/styles.less and client/bower_components/bootstrap/less/variables.less files.
A sample file with variable overrides is available in the client/styles directory. To enable it,
uncomment the line:
// @import "_variables-override"; in client/styles/styles.less
and re-compile the source.
Compiling using grunt
From within the camunda-tasklist-ui directory:
grunt buildThe command will build the whole frontend assets, styles included.
Plugins
Tasklist uses the concept of plugins to add own functionality without being forced to extend or hack the Tasklist web application.
For further details about the concepts behind plugins please read the plugins section inside the cockpit chapter.
Difference between Cockpit and Tasklist plugins:
- To publish the plugin with Tasklist, its class name must be put into a file called
org.camunda.bpm.tasklist.plugin.spi.TasklistPluginthat resides in the directoryMETA-INF/services. - The plugin mechanism of Tasklist does not allow to provide additinal SQL queries by using MyBatis mappings.
Plugin points
Here you can see the various points at which you are able to add your own plugins.

tasklist.navbar.action.

tasklist.task.action.

tasklist.task.detail.

tasklist.list.
Here is an example of how to configure where you place your plugin:
var ViewConfig = [ 'ViewsProvider', function(ViewsProvider) {
ViewsProvider.registerDefaultView('tasklist.task.detail', {
id: 'sub-tasks',
priority: 20,
label: 'Sub Tasks'
});
}];For more information on creating and configuring your own plugin, please have a look into the followings examples:
Cockpit
What is Cockpit?
With camunda BPM Cockpit you can monitor and administrate your running process instances. The Cockpit architecture allows you to use plugins to extend the functionality, so you can individually adapt the tool to your personal requirements.
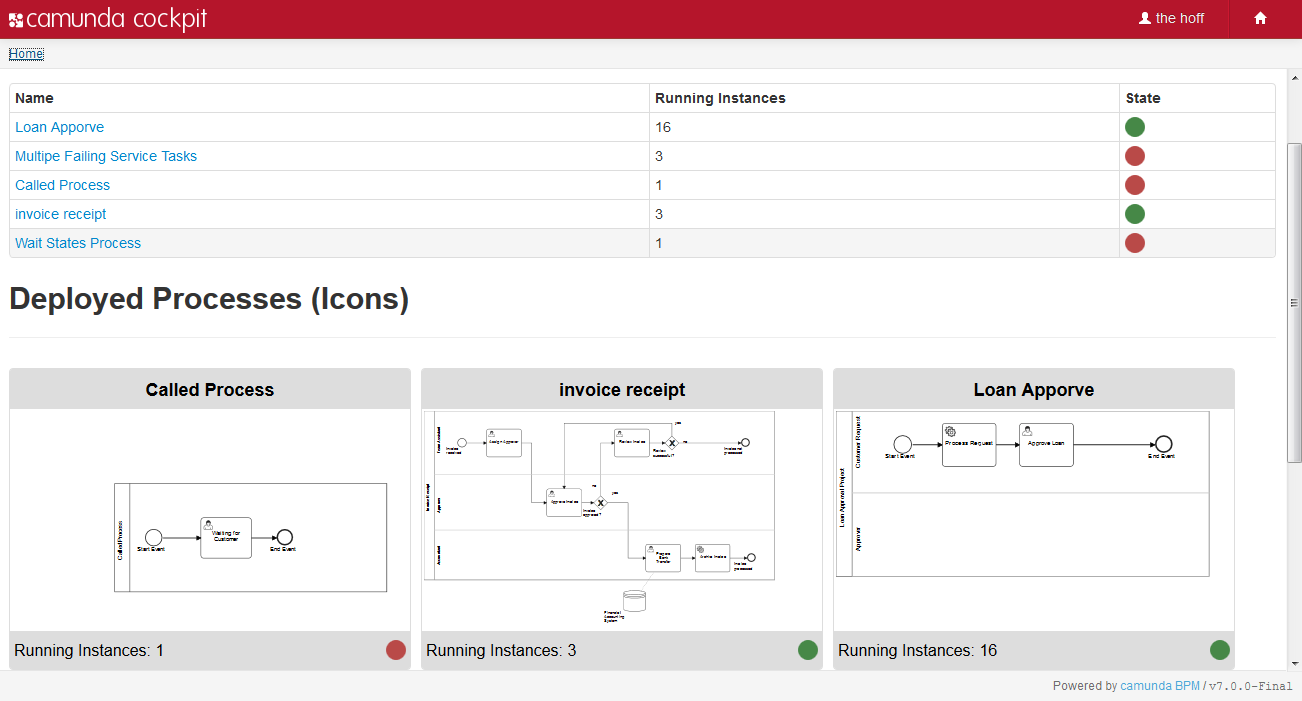
Dashboard
The dashboard of Cockpit is your entry point for process monitoring. It comes with a pre-installed plugin, which lets you see deployed process defintions. Additional plugins can be added to the dashboard.
Deployed Processes
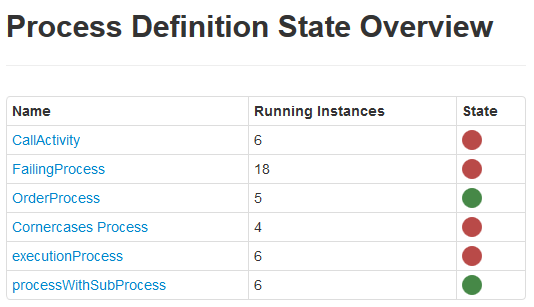
With this plugin you can easily observe the state of a processes definition. Green and red dots signalize running and failed jobs. At this observing level a red dot signifies that there is at least one process instance or a sub process instance which has an unresolved incident. You can localize the problem by using the Process Definition View.
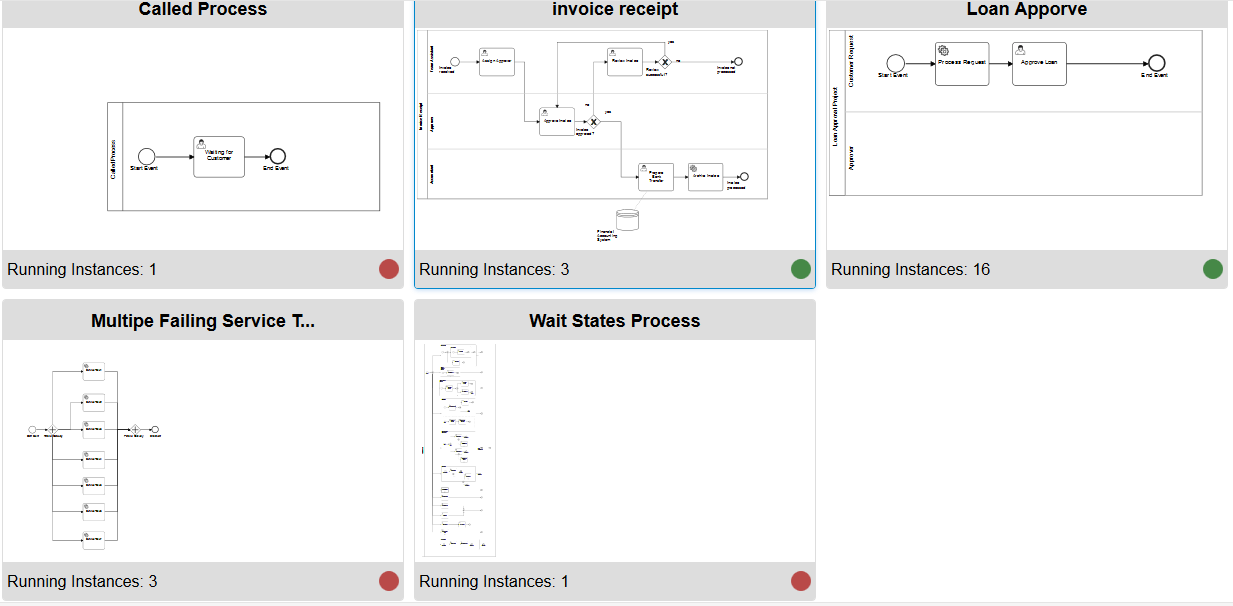
You can also switch to the preview tab which includes the rendered process model of each deployed process. Additionally, you get information about how many instances of the process are currently running and about the process state. Green and red dots signalize running and failed jobs. Click on the model to get to the Process Definition View.
Multi Tenancy
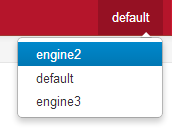
Search
Enterprise Feature
Please note that this feature is only included in the enterprise edition of the camunda BPM platform, it is not available in the community edition.Check the camunda enterprise homepage for more information or get your free trial version.

At the top of the dashboard page, you can search for process instances and incidents which fulfill certain search criteria. To do so, click in the search box and select the parameters to search for. You can also begin typing to find the required parameter faster. Depending on the selected property, you have to specify the value of the property. Some properties also allow operators other than equal, e.g., 'like', which allows to search for process instances where the entered value is a substring of the property value. If you are searching for process variables, you also have to enter the variable name you want to search for.
If you are searching for a variable of type string, which has a numeric, boolean or null value, you have to wrap the value in single quotes (e.g., '93288' or 'NULL').
You can always either search for process instances or for incidents. When you add a parameter for an incidents search, you can not add a second parameter which would search for a process instance and vice versa.
Process Definition View
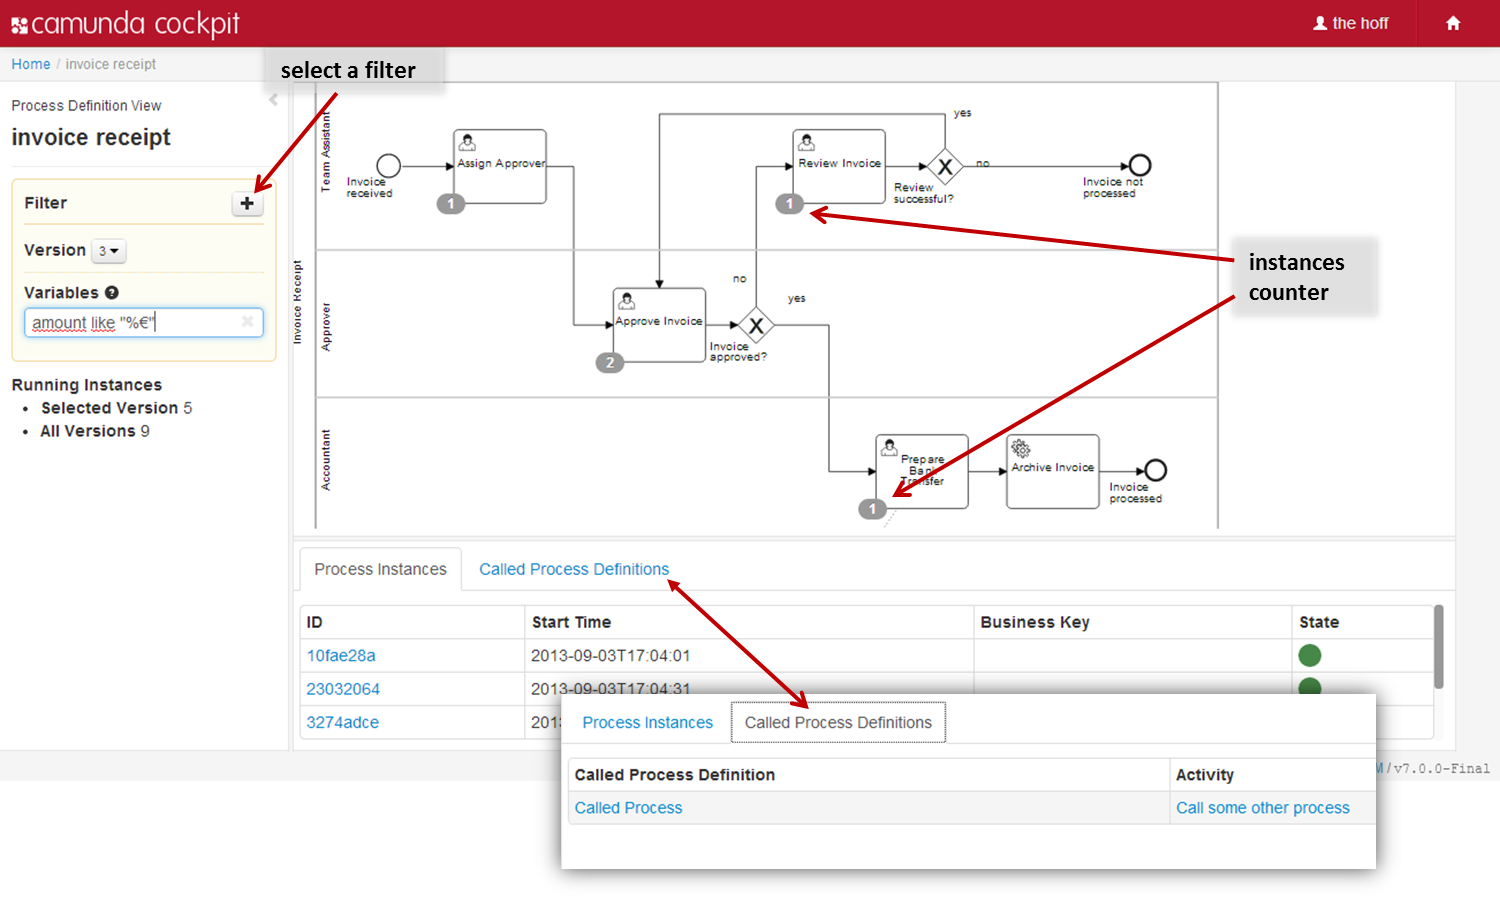
The Process Definition View provides you with information about the definition and the status of a process. On the left hand side you can easily survey the versions of the process and how many instances of the version are running. Incidents of all running process instances are displayed together with an instances counter label in the corresponding rendered diagram. So it is easy to locate failed activities in the process. Use the mouse to navigate through the diagram. By turning the mouse wheel you can zoom in out. Hold the left mouse button pressed to pan the diagram in the desired direction.
In the tab Process Instances all running instances are listed in a tabular view. Besides information about start time, business key and state you can select an instance by ID and go down to the Process Instance View.
The tab Called Process Definitions displays the called child processes. In the column Called Process Definition the names of the called sub processes are listed. Click on the name to display the process in the Process Definition View. Please note that a filter called Parent is automatically set for the process so that you only see the instances that belong to the parent process. In the column Activity you can select the instance that is calling the child process.
The tab Job Definitions displays the Job Definitions that are linked to this Process Definition. You can see the name of the activity, the type of job, the configuration thereof and the state thereof. You can also suspend and re-activate the job definition (see Job Definition Suspension for more information).
Filter
The filter function on the left hand side of the Process Definition View allows you to find certain instances by filtering for variables, business keys, start time and date, end time and date (enterprise edition) or by selecting the version of a process. Beyond that you can combine different filters as logical AND relation. Filter expressions on variables must be specified as variableName OPERATOR value where the operator may be one of the following terms =, !=, >, >=, <, <=, like. Apart from the like operator, the operator expressions do not have to be separated by spaces.
The like operator is for string variables only. You can use % as wildcard in the value expression. String and date values must be properly enclosed in " ".
Note: Please be aware that complex data types are not supported in this feature.

Filtering for process instances
In the image on the left you can see how to add a filter to the Process Definition View. You can select to add a filter for variables, the start date and time or the business key of process instances.

Business Key
Here you can filter for process instances by Business Key.

Start Date and Time
Here you can filter for process instances by start date. Please note that the date must be set in accordance to the ISO 8601 standard.

String variable
Here you can filter for process instances by filtering for a 'string' value. Please note that you need to encase the value in quotation marks.

Boolean variable
Here you can filter for process instances by filtering for a 'boolean' value.

Date variable
Here you can filter for process instances by filtering for a 'date' value. Please note that the date value must be set in accordance to the ISO 8601 standard and that you need to encase the value in quotation marks.

Numeric variable
Here you can filter for process instances by filtering for a 'numeric' (double, integer, long or short) value.
Enterprise Feature
Please note that the following feature is only included in the enterprise edition of the camunda BPM platform, it is not available in the community edition.Check the camunda enterprise homepage for more information or get your free trial version.

Filtering for completed and running process instances
In the image on the left you can see how to add a filter to the Process Definition Historical View. You can select to add a filter for variables, the start date and time, the end date and time or the business key of process instances.

End Date and Time
Here you can filter for process instances by end date. Please note that the date must be set in accordance to the ISO 8601 standard and that this option is only available in the Process Definition Historical View.
Cancel multiple process instances
Enterprise Feature
Please note that the following feature is only included in the enterprise edition of the camunda BPM platform, it is not available in the community edition.Check the camunda enterprise homepage for more information or get your free trial version.

You can cancel multiple process instances at once by using this feature. In the process definition view, hit the button on the right hand side. This opens a confirmation screen in which you can select which process instances to cancel. After you have selected which instances to cancel and confirmed the cancellation, the runtime data of the canceled instances will be deleted. Please note that only process instances in the current view can be canceled, i.e., a maximum of 50 process instances at once.
Process Instance Detail View
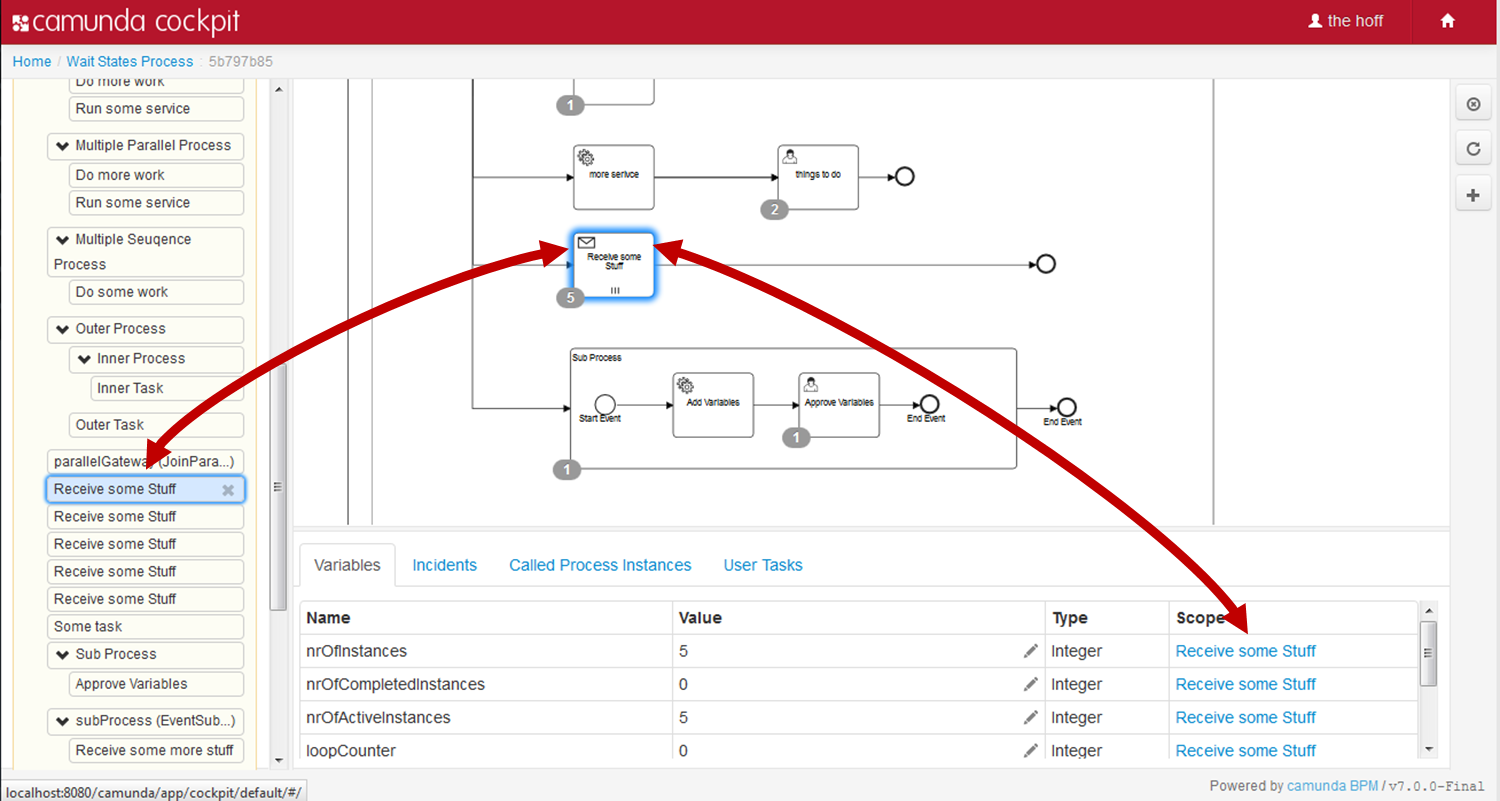
Open the Process Instance View by selecting a process instance from the Process Definition View instance list. This view allows you to drill down into a single process instance and explore its running activities as well as the variables, tasks, jobs, etc.
Beside the diagram view the process will be displayed as an Activity Instance Tree View. Variables that belong to the instance will be listed in a variables table of the Detailed Information Panel. Now you can select single or multiple ('ctrl + click') flow nodes in the interactive BPMN 2.0 diagram or you can select an activity instance within the activity tree view. As diagram, tree view and variables table correspond with each other the selected flow node will also be selected in the tree and the associated variables will be shown and vice versa.
Activity Instance Tree
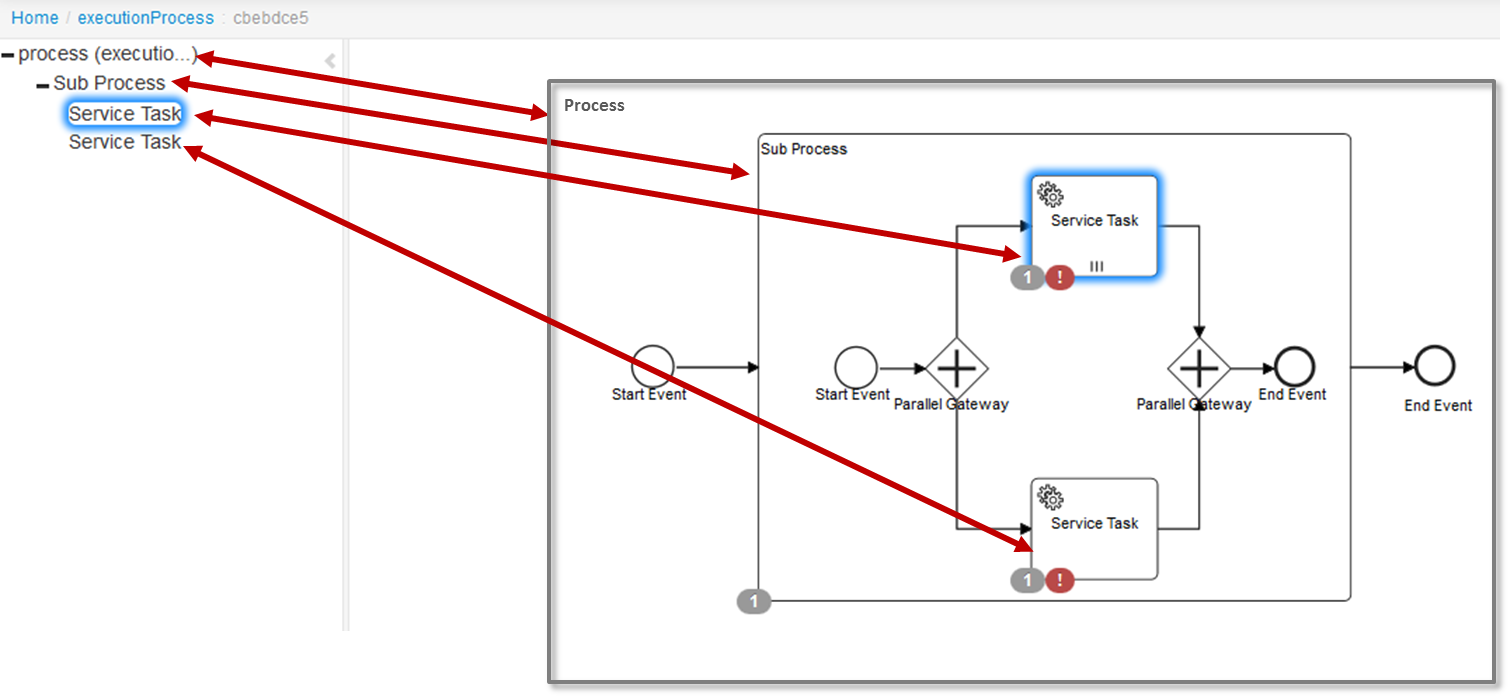
The activity instance tree contains a node for each activity that is currently active in the process instance. It allows you to select activity instances to explore their details. Concurrently the selected instance will be marked in the rendered process diagram and the corresponding variables will be listed in the Detailed Information Panel.
Detailed Information Panel
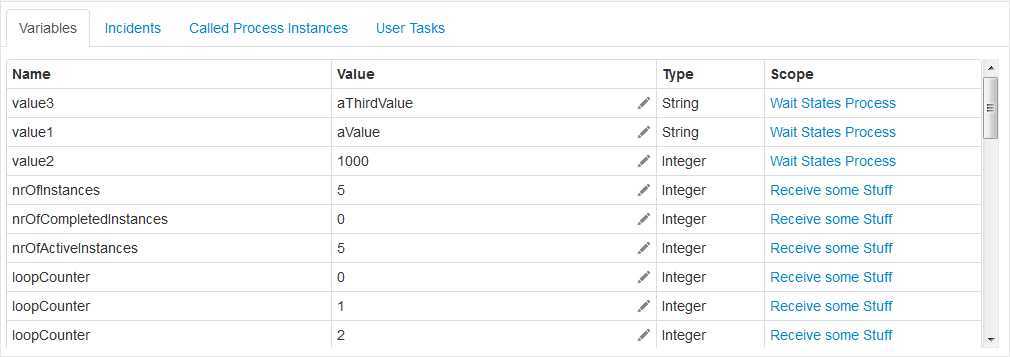
Use the Detailed Information Panel to get an overview of the variables, incidents, called process instances and user tasks that the process instance contains. Depending on the selected activity instance in the rendered diagram, the panel lists the corresponding information. You can also focus on the activity instance via a scope link in the table.
In addition to the instance information you can edit variables or change the assignees of user tasks.
In the Incidents tab you can click on the Incident message name, which will open the stacktrace of the selected incident. In the Incidents tab you can also increment the number of retries for a failed job by hitting the button and in the User Tasks tab you can manage the groups for the selected user task by hitting the button.
Adding Variables
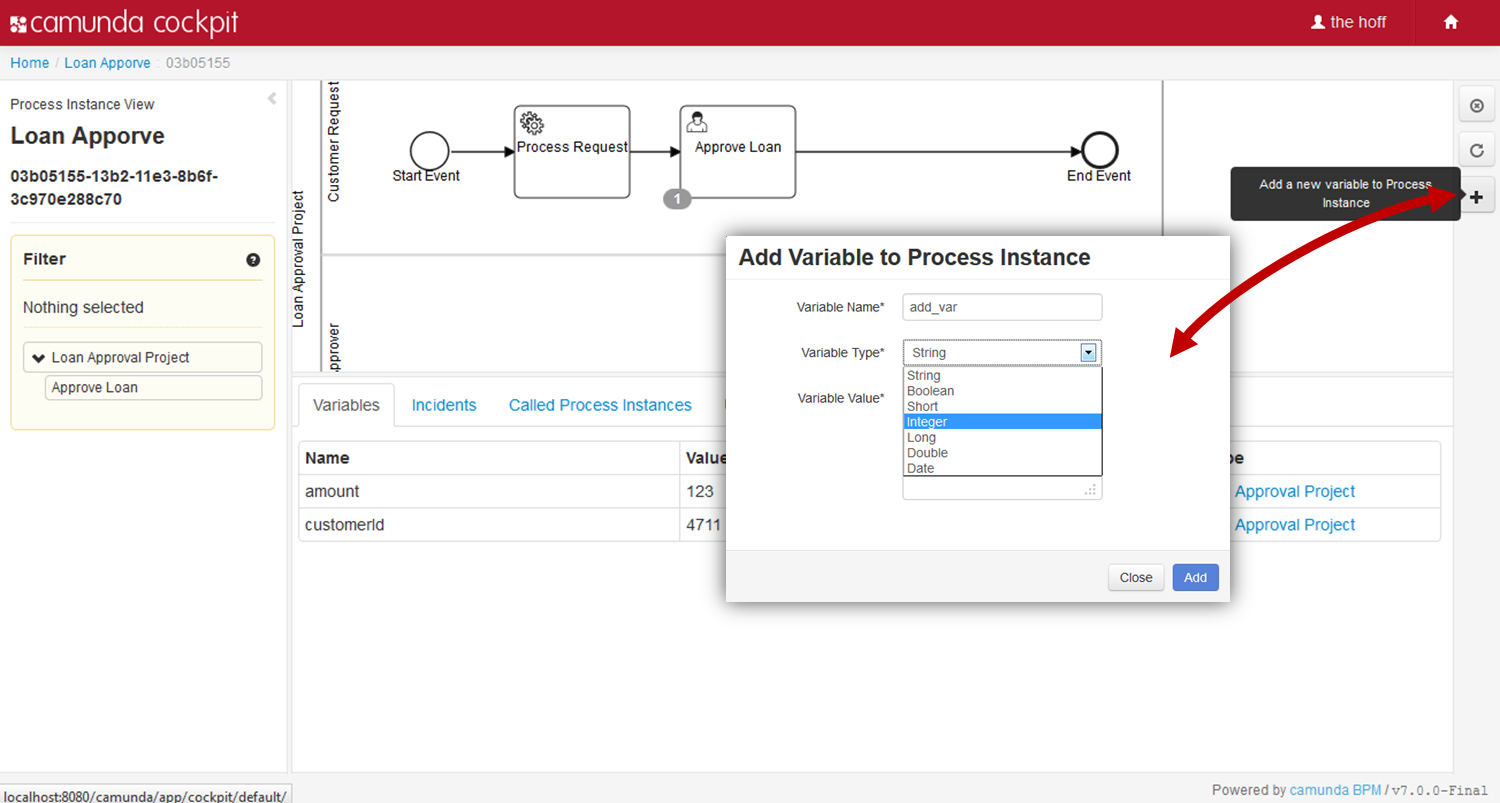
Hit the button on the right hand side to add variables to a process instance. You can choose between different data types. Please note that variables will be overwritten if you add a new variable with an existing name.
Editing Variables
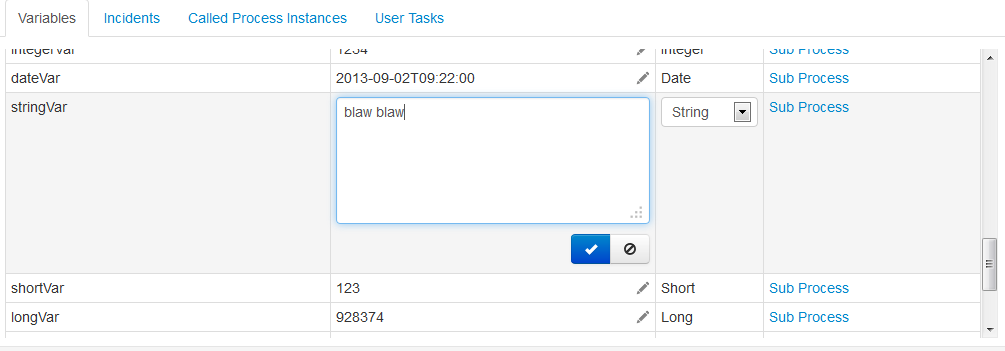
Hit the symbol in the Detailed Information Panel to edit variables. This feature allows you to change the value of variables as well as the type. A validation of the date format and for the value of integers happens on client side. If you enter NULL the variable will be converted to a string type.
Cancel a Process Instance
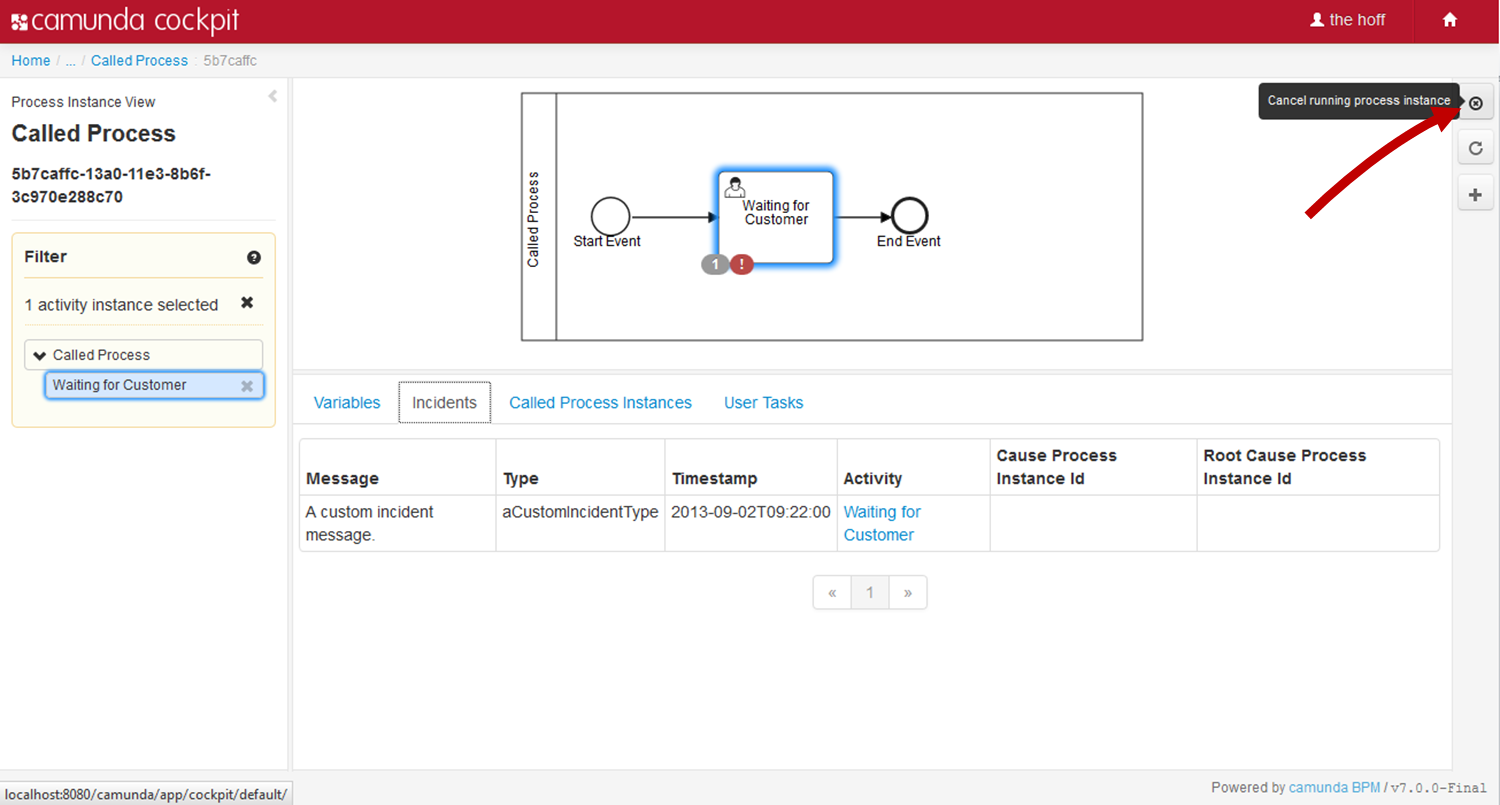
Process Instance Modification
Enterprise Feature
Please note that this feature is only included in the enterprise edition of the camunda BPM platform, it is not available in the community edition.Check the camunda enterprise homepage for more information or get your free trial version.

- Starting execution before an activity
- Starting execution after an activity on its single outgoing sequence flow
- Canceling an activity instance or all instances of an activity
Perform a Modification
A modification consists of multiple instructions, which are displayed in the modification tab at the bottom half of the screen (1). To add an instruction to the modification, hover over an activity of the process instance diagram. Using the button (2), you can select the operation to be performed with this activity. In the top-left corner of the activity, a modification badge will appear, indicating how many new instances of this activity will be created and how many activity instances will be canceled when applying this modification (3). This number represents the directly created/canceled instances only. Instances created during the modification (e.g., by service tasks) are not counted.
The option to cancel an activity or activity instance is only available if there are running instances of this activity.
You can also drag an instance badge (4) from one activity to another to create a "move token" operation which is represented by start and cancel operations.
When executing a modification, the instructions are applied in the specified order. You can change the order of instructions by using the up- and down-arrows on the left (5). You can also remove an instruction from the modification (6).
In the modification tab you can then configure the specification of the instruction depending on its type:
Cancel Running Activity Instances

When canceling activity instances you can select the instances of the activity you want to cancel. You can select them by their instance ID using the Select Instances button on the right. To better distinguish between activity instances, you can also show variables assigned to this instance using the button.
When canceling all instances of an activity using the All button, all instances which exist at the moment this instruction is executed will be canceled. This will also cancel instances which were created in the same modification (e.g., using a startBefore instruction before the cancel instruction). In most cases, you probably want to explicitly state the instances to cancel.
Start New Activity Instances

When starting a new activity instance, you have the option to start before or start after the activity. Using startBefore, the activity will be executed. StartAfter is only possible if there is only one sequence flow going out of the activity. In both cases you have the option to create new variables which are created or updated with the creation of the activity. Starting an activity instantiates all parent scopes (e.g., embedded sub process that contains the activity) that are not instantiated yet before the actual activity is executed.
Additionally, you can specify the ancestor of the new activity instance if it is created in an embedded sub-process or part of a multi-instance scenario. For every ancestor, the variables are displayed. When an activity is instantiated with a specific ancestor activity instance, all scopes between the ancestor's activity and the target activity are instantiated.
When starting activities with a multi-instance flag, there is the option to either start a new multi-instance body of the activity (which executes the entire multi-instance construct and therefore creates the number of child activities specified in the multi-instance configuration for this task) or a new single instance of the activity in an already existing multi-instance body.
Review Modification Instructions

At any point during the creation of the modification, you can show the payload of the modification by clicking the button. This will show the request payload that will be sent via the REST API.
To perform the modification, you have to click on the Apply modifications button. Then you have a last chance to review the changes you are about to make and also review the request payload. After confirming the change, the modification is executed and the page is updated with the new execution state of the process instance.
The exact semantics of process instance modification as well as the underlying REST and Java API can be read about in the Process Instance Modification section of this guide.
History view
Enterprise Feature
Please note that this feature is only included in the enterprise edition of the camunda BPM platform, it is not available in the community edition.Check the camunda enterprise homepage for more information or get your free trial version.
At the top right of the Process Definition View and the Process Instance View, you can hit the History Button to access the historical view.
Process definition historical view

In the historical view of the Process Definition you see an overview of all of the running and completed process instances. On the left side of the screen, a Filter can be applied and you have the option of selecting to only see process instances in a specific state. Running and completed instances can be selected.
At the bottom of the screen you can also select the Job Log tab to see jobs related events of all process instances, including state, time, the corresponding activity and job ID, the type, configuration and message. You can also access the stracktrace of a failed job.
Process instance historical view

In the historical view of the process instance you see instance-specific information. On the left side of the screen, a Filter can be applied and you have the option of selecting to only see process instances in specific states. Running, completed and canceled process instances can be viewed as well as task-specific activity states.
You can access various information regarding the specific instance by selecting the applicable tab at the bottom of the screen:
Audit Log
In the Audit Log you can find a detailed overview of the activities that took place within the process instance, including start time, end time, activity instance ID and the current state.
Variables
In the Variables tab you can see an overview of the variables used within the process instances, including the name, last value, variable type, scope and actions of the variables.
Called Process Instances
In the Called Process Instances tab you can find an overview of other process instances which were called by this specific process instance. You can see the Name of the called process instances, the process definition and the activity.
Incidents
In the Incidents tab you can find a listing of all incidents related to this process instance and the details thereof. This includes the message type, the time the incident was created, the end time, the actual activity, the cause process instance ID, the root cause process instance ID, the incident type and the current state.
User Tasks
In the User Tasks tab you can find an overview of all the user tasks related to this process instance and the details of the specific user tasks, such as the activity, the assignee, owner, creation date, completion date, the duration, due date, follow up date, the priority of the user task and the unique task ID. You can also see the user task log for each specific user task.
Job Log
In the Job Log tab you can find an overview of all job related events of this process instance and the details of the specific jobs, such as state, time, the corresponding activity and job ID, the type, configuration and message. You can also access the stracktrace of a failed job.
Failed Jobs
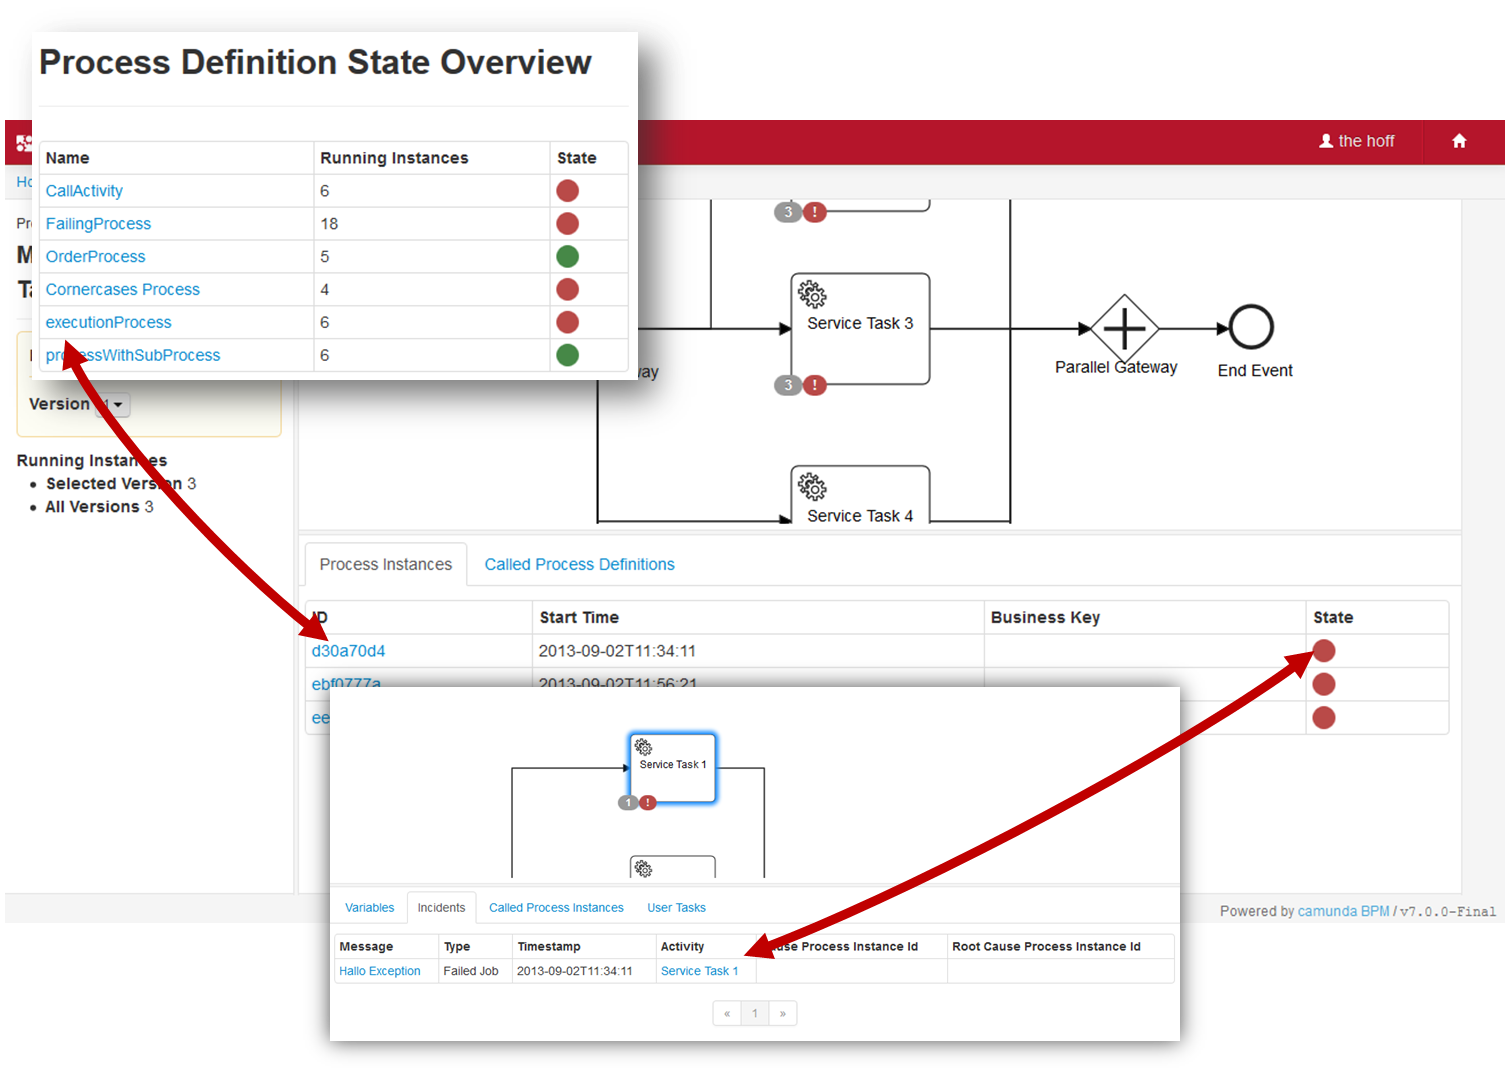
Unresolved incidents of a process instance or a sub process instance are indicated by Cockpit as failed jobs. To localize which instance of a process failed, Cockpit allows you to drill down to the unresolved incident by using the process status dots. Hit a red status dot of the affected instance in the Process Definition View to get an overview of all incidents. The Incidents tab in the Detailed Information Panel lists the failed activities with additional information. Furthermore, you have the possibility of going down to the failing instance of a sub process.
Retry a Failed Job
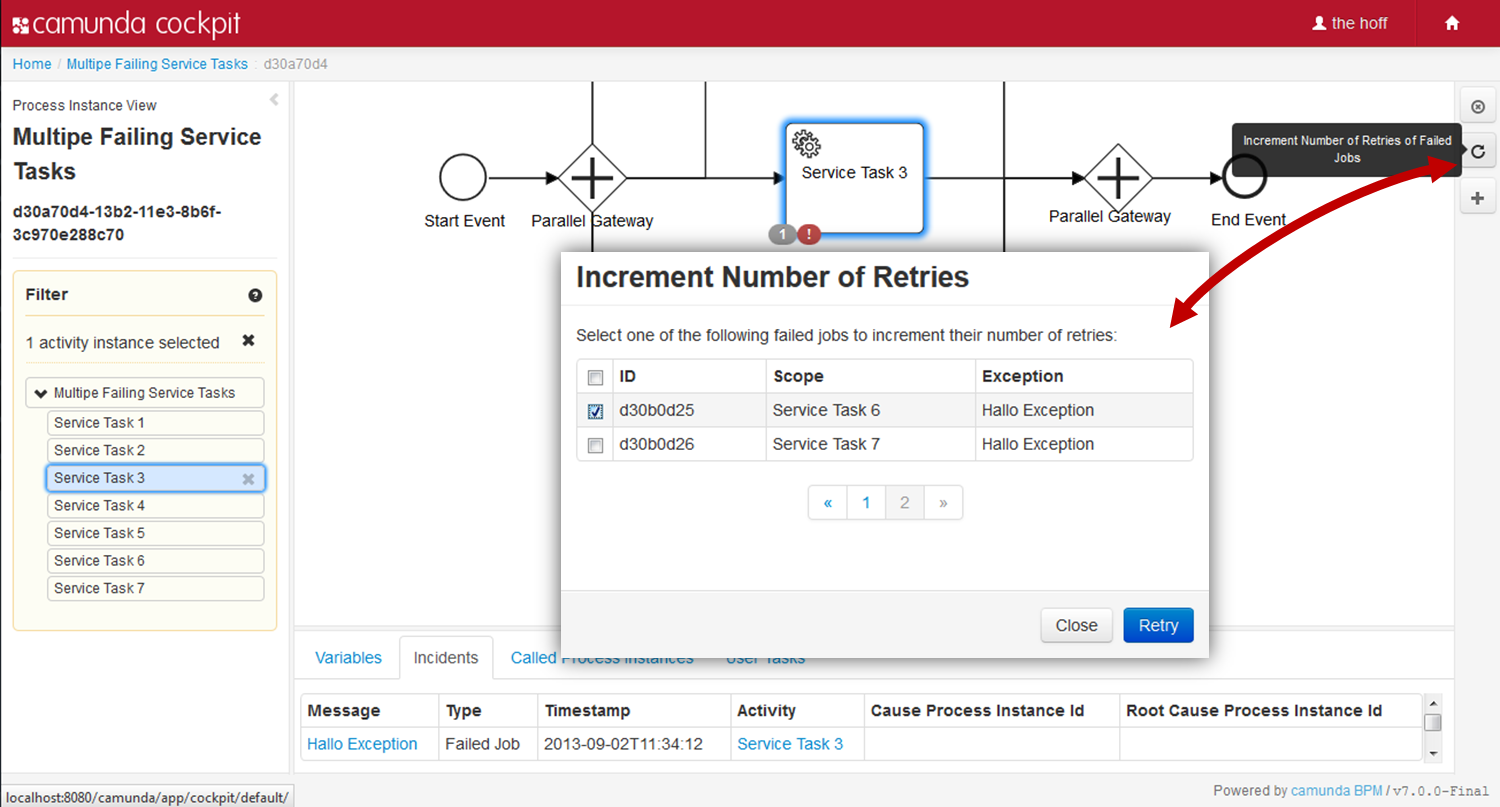
Bulk Retry
Enterprise Feature
Please note that the following feature is only included in the enterprise edition of the camunda BPM platform, it is not available in the community edition.Check the camunda enterprise homepage for more information or get your free trial version.

Suspension
In the Process Definition View and in the Process Instance View you have the option of suspending the selected process definition or the process instance that you are viewing by using the button on the right hand side.
Process definition suspension
If you suspend the process definition, you can prevent the process definition from being instantiated. No further operations can be done while the process definition is in the suspended state. You can simply re-activate the process definition by using the button on the right hand side. You also have the option of suspending/reactivating all process instances of the process definition as well as defining if the process definition (and process instances) should instantly be suspended/reactivated or at a specific time in a confirmation dialog. You can find more information about the functionality of this in the Suspending process definitions section of the Process Engine chapter.
Process instance suspension
If you suspend the process instance, you can prevent the process instance from being executed any further. This includes suspending all tasks included in the process instance. You can simply re-activate the process instance by using the button on the right hand side. You can find more information about the functionality of this in the Suspending process instances section of the Process Engine chapter.
Job definition suspension
In the Process Definition View you have the option of suspending a job definition. This can be done by using the button displayed in the Action column of the Job Definitions tab at the bottom of the screen. By doing this, you can prevent this job definition from being processed in all process instances of the selected process definition. You can simply re-activate the job definition by using the button in the same Action column. You can find more information about the functionality of this in the Suspending and activating job execution section of the Process Engine chapter.
Auditing of Cockpit Operations
Since Cockpit is a very powerful tool, it is often desired to inspect which user performed which operation for auditing purposes. Cockpit operations that change state are logged in the BPM platform's user operation log that is part of the process engine history. The log allows to understand
- which user performed an operation
- which operation was performed
- when the operation was performed
- which entities (process instances, tasks, etc.) were involved
- which changes were made
While this log can currently not be viewed in Cockpit's UI, there exist Java and REST API methods to perform this task.
Cockpit Operation Log Entries
The following table serves as an index that relates operations in the Cockpit user interface to operations in the user operation log. Whenever a listed operation is performed in Cockpit, entries for the corresponding user operations are created in the user operation log. The following list relates UI operations to the operation and entity types in the operation log. See the user operation log documentation for details on these types.
| UI Operation | Operation Type | Entity Type |
|---|---|---|
| Activate a Process Definition | ActivateProcessDefinition | ProcessDefinition |
| Suspend a Process Definition | SuspendProcessDefinition | ProcessDefinition |
| Activate a Process Instance | Activate | ProcessInstance |
| Suspend a Process Instance | Suspend | ProcessInstance |
| Activate a Job Definition | ActivateJobDefinition | JobDefinition |
| Suspend a Job Definition | SuspendJobDefinition | JobDefinition |
| Cancel a Process Instance | Delete | ProcessInstance |
| Cancel Multiple Process Instances | Delete | ProcessInstance |
| Add Process Instance Variables | SetVariable | Variable |
| Edit Process Instance Variables | ModifyVariable | Variable |
| Retry a Failed Job | SetJobRetries | Job |
| Bulk Retry of Failed Jobs | SetJobRetries | Job |
| Process Instance Modification | ModifyProcessInstance | ProcessInstance |
| Set Task Assignee | Assign | Task |
| Add Task Candidate Group | AddGroupLink | IdentityLink |
| Remove Task Candidate Group | DeleteGroupLink | IdentityLink |
Plugins
Cockpit defines a plugin concept to add own functionality without being forced to extend or hack the Cockpit web application. You can add plugins at various plugin points, e.g., the dashboard as shown in the following example:
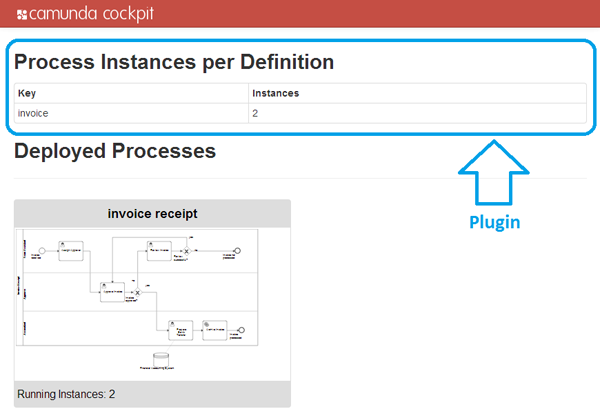
The nature of a cockpit plugin
A cockpit plugin is a maven jar project that is included in the cockpit webapplication as a library dependency. It provides a server-side and a client-side extension to cockpit.
The integration of a plugin into the overall cockpit architecture is depicted in the following figure.
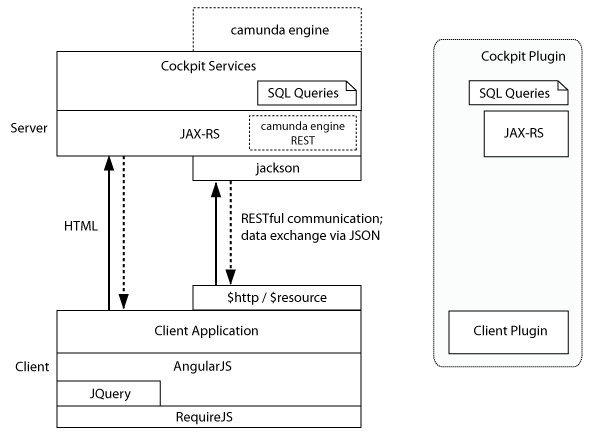
On the server-side, it can extend cockpit with custom SQL queries and JAX-RS resource classes. Queries (defined via MyBatis) may be used to squeeze additional intel out of an engine database or to execute custom engine operations. JAX-RS resources on the other hand extend the cockpit API and expose data to the client-side part of the plugin.
On the client-side a plugin may include AngularJS modules to extend the cockpit webapplication. Via those modules a plugin provides custom views and services.
File structure
The basic skeleton of a cockpit plugin looks as follows:
cockpit-plugin/
├── src/
| ├── main/
| | ├── java/
| | | └── org/my/plugin/
| | | ├── db/
| | | | └── MyDto.java (5)
| | | ├── resource/
| | | | ├── MyPluginRootResource.java (3)
| | | | └── ... (4)
| | | └── MyPlugin.java (1)
| | └── resources/
| | ├── META-INF/services/
| | | └── org.camunda.bpm.cockpit.plugin.spi.CockpitPlugin (2)
| | └── org/my/plugin/
| | ├── queries/
| | | └── sample.xml (6)
| | └── assets/app/ (7)
| | └── app/
| | ├── plugin.js (8)
| | ├── view.html
| | └── ...
| └── test/
| ├── java/
| | └── org/my/plugin/
| | └── MyPluginTest.java
| └── resources/
| └── camunda.cfg.xml
└── pom.xml
As runtime relevant resource it defines
- a plugin main class
- a
META-INF/servicesentry that publishes the plugin to Cockpit - a plugin root JAX-RS resource that wires the server-side API
- other resources that are part of the server-side API
- data transfer objects used by the resources
- mapping files that provide additional cockpit queries as MyBatis mappings
- resource directory from which client-side plugin assets are served as static files
- a main file that bootstraps the client-side plugin in a AngularJS / RequireJS environment
Plugin exclusion (Client Side)
You can exclude some plugins from the interface by adding a cam-exclude-plugins
attribute to the HTML base tag of the page loading the interface.
The content of the attribute is a comma separated list formatted like: <plugin.key>:<feature.id>.
If the feature ID is not provided, the whole plugin will be excluded.
Excluding a complete plugin
This example will completely deactivate the action buttons on the right side of the process instance view.
<base href="/"
cam-exclude-plugins="cockpit.processInstance.runtime.action" />Excluding a plugin feature
In this example we deactivate the cancel action in the cockpit process instance view and disable the job retry action button:
<base href="/"
cam-exclude-plugins="cockpit.processInstance.runtime.action:cancel-process-instance-action,
cockpit.processInstance.runtime.action:job-retry-action" />Plugin points
Here you can see the various points at which you are able to add your own plugins.

cockpit.dashboard.

cockpit.processDefinition.runtime.tab.

cockpit.processInstance.runtime.tab.

cockpit.processDefinition.runtime.action.

cockpit.processInstance.runtime.action.

cockpit.processDefinition.view.

cockpit.processInstance.view.

cockpit.processDefinition.diagram.overlay.

cockpit.processInstance.diagram.overlay.

cockpit.jobDefinition.action.
Here is an example of how to configure where you place your plugin:
var ViewConfig = [ 'ViewsProvider', function(ViewsProvider) {
ViewsProvider.registerDefaultView('cockpit.processDefinition.view', {
id: 'runtime',
priority: 20,
label: 'Runtime'
});
}];For more information on creating and configuring your own plugin, please see How to develop a Cockpit plugin.
Customizing
Some visual aspects of the web interface can be configured in the
_vars.less file (located in webapps/camunda-webapp/webapp/src/main/webapp/assets/styles/)
as follows:
Header colors: you can change the values of the
@main-colorand@main-darkervariables.Header logo: you can either override the
app-logo.pngimage file located inwebapps/camunda-webapp/webapp/src/main/webapp/assets/img/cockpit/or override the@logo-cockpitvariable to point to a other image file.
Admin
What is Admin?
Along with the Camunda web applications we ship Admin, accessible via http://localhost:8080/camunda/app/admin/. Admin is an application that allows you to configure users and groups via the engine's Identity Service and authorizations via the engine's Authorization Service. Furthermore, you can connect Camunda Admin to your LDAP system.
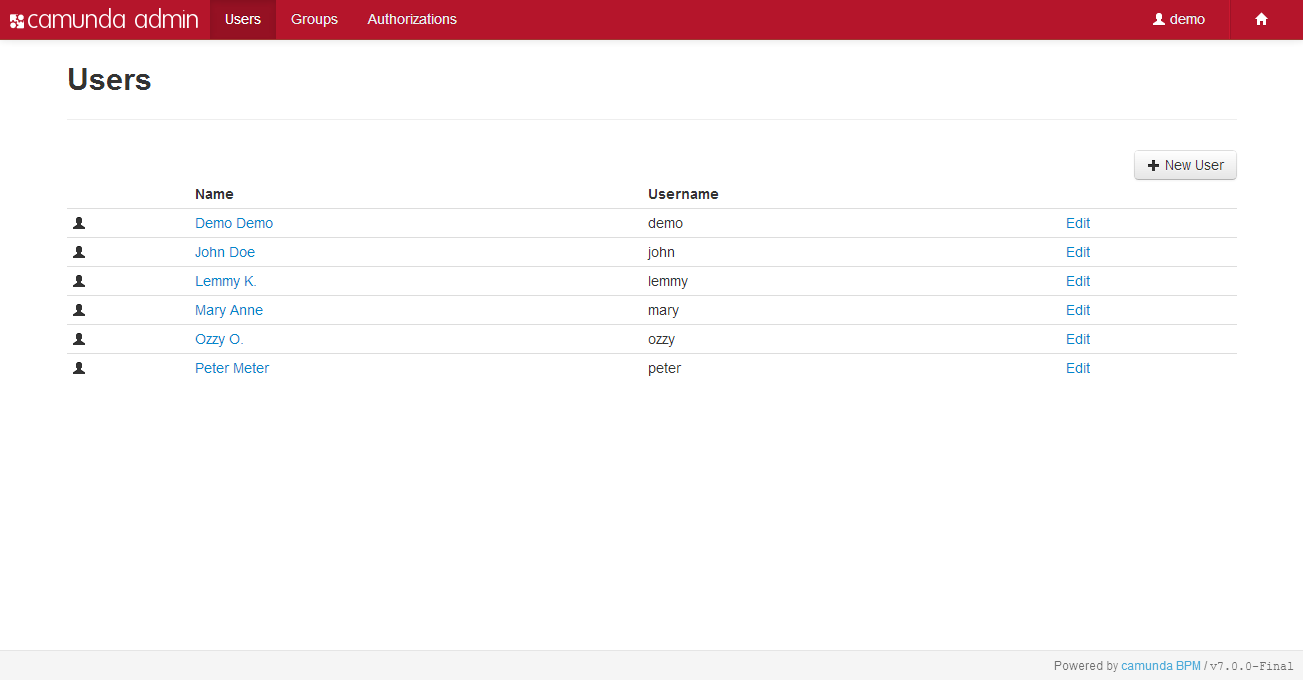
User Management
Users Menu
The Users menu allows you to add, edit and delete user profiles. Furthermore, you can manage group membership and change passwords.
My Profile
By clicking on your user name in the Users menu, you can access the My Profile menu. In the My Profile menu you can edit your personal account settings, such as:
- Profile: Change your name or email address. You cannot change the user account ID!
- Account: Change your password or delete your account. Be careful, deletion cannot be undone.
- Groups: This menu lists all groups of which you are member. With administrator rights you can assign your account to the available groups.
You can also access the My Profile menu from any of the web applications by clicking on your user name at the top right and selecting My Profile.
Initial User Setup
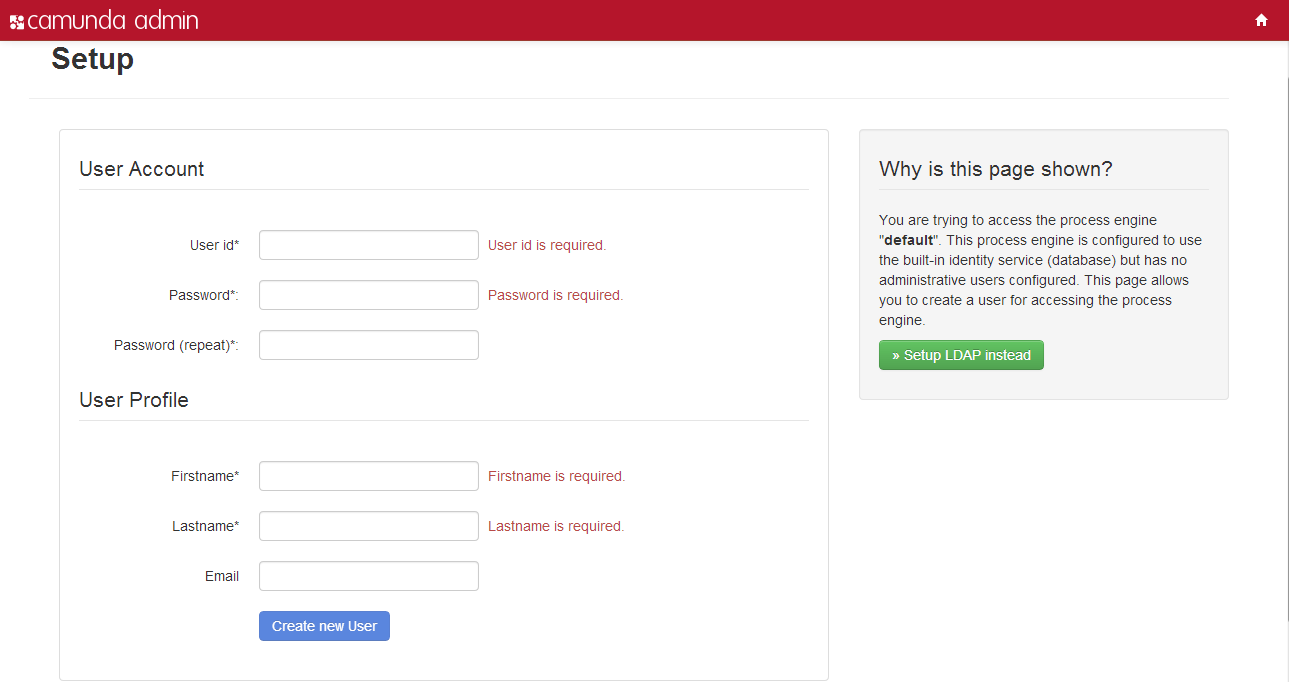
If no administrator account is configured, a setup screen will be shown on first access of a process engine through Cockpit or Tasklist . This screen allows you to configure an initial user account with administrator rights.
Administrator users are not global but per engine. Thus, you will need to set up an admin user for each separate engine.
Administrator Account
Users who belong to the group camunda-admin (default set by the invoice receipt demo process application) have administrator privileges. There must be at least one member in this group, otherwise the initial setup screen appears. Besides user- and groupmanagement, as administrator you are able to define authorization rules for a variety of resources. See the chapter on Authorizations for more details.
Group Management
Groups Menu
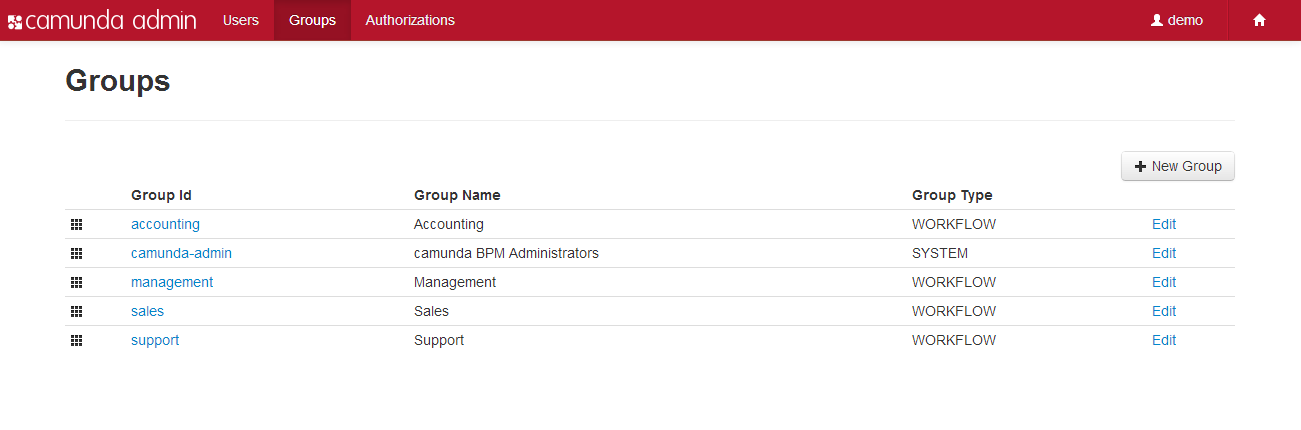
The Groups menu allows you to add, edit and delete user groups and you can view the members of groups.
Authorization Management
Authorizations
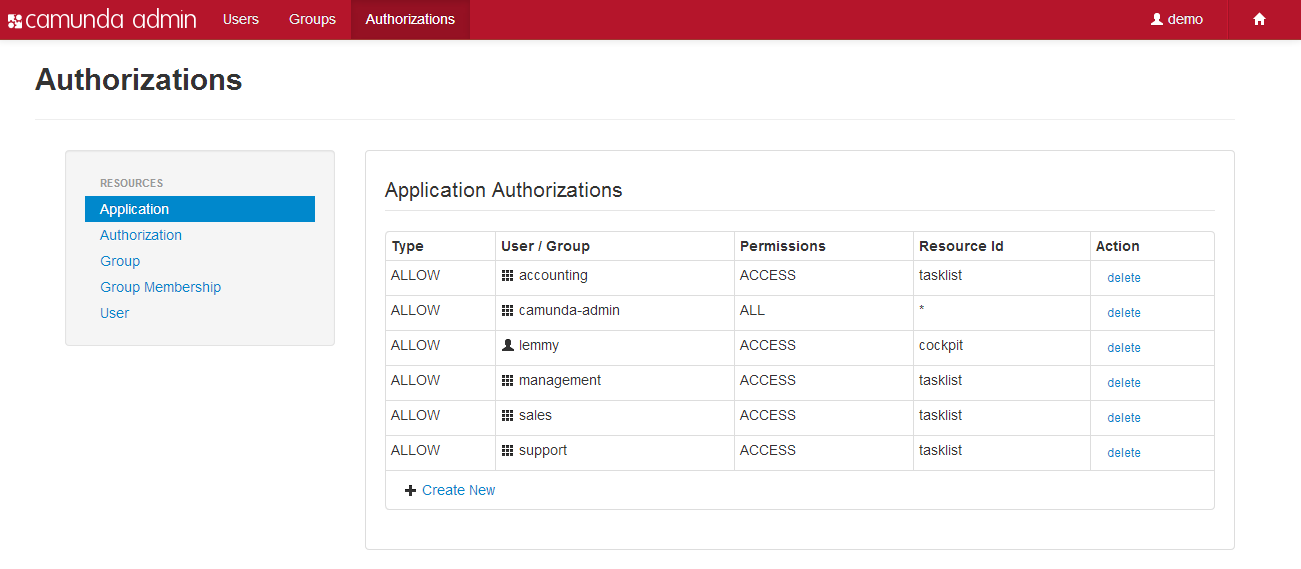
Manage authorizations for a variety of resources (e.g., Applications, Groups, Filters). In the following sections you will learn how to use an administrator account with the help of some simple use cases.
Grant basic permissions
In this use case, we'll grant some basic permissions. To start out, we'll need some users and a group. Create two users in the users menu, create a group called support in the groups menu and add the new users to the group in the users menu.
Application Access
Set the authorizations for the new group and the created users. First, you have to define which application the members of your new group have access to. Select the Application menu and create a new Application Authorization rule. The group members should be able to access Tasklist, so add the following rule:

Now every member of the group support can use Tasklist.
Furthermore, you want one of the new users to get access to Cockpit. Therefore, add a new user-specific rule:

This specific rule is only valid for the user 'lemmy' and provides him with additional authorization for the resource Cockpit.
Log in with the new user accounts and test if you can access the desired application.
Filter access
Currently the users in the support group can only see the predefined filters in Tasklist. We want the group members to have "READ" access to another filter, so we create a rule for that filter:

The authorizations set here correspond to the authorizations that can be set in the filter settings in Tasklist. The resource ID can be found in the database table ACT_RU_FILTER. See this section for more information about filters.
Member Visibility
Depending on the users authorization, Tasklist will show you information about your colleagues and groups. Currently you can only see the group folder support but not your colleague. To change that, log in to the admin application as administrator, enter the Users Authorization menu and create the following rules:

Now every member of the group support is able to see the new users lemmy and ozzy.
Application-specific permissions
This use case demonstrates how to give a group access to Cockpit, but restrict them to "READ" access. We will use the support group that we created in the previous example.
To limit the access we have to know which resources are accessible in Cockpit so that we can set the proper permissions for them. Of the predefined resources at the moment this would be:
- Process Definition
- Process Instance
- Task

First of all, we have to provide the permission to access Cockpit (also see the Application Access section).

For all the resources that are accessible from Cockpit we add "READ" permission for every resource id (indicated by the asterisk) for the group, e.g., in the screenshot for all process definitions.
Now every user of the support group can access Cockpit and see everything that is inside without being able to change anything (unless the user has special permissions himself, because those take precedence over group permissions).
Now that we have one group that can see everything in Cockpit, we want to have another group managing one single process.
Restrict process permissions
Not every process has to be managed by every user/group and with regards to different organizational levels not every group should be aware of every process present in the process engine. Therefore it might be necessary to restrict the access of users/groups to certain processes.
In this use case we want to give the group accounting, which we will assume is already present and has access to Cockpit (see Application-specific permission and Application Access), full access to the "invoice" process and only to this process.
For groups and users to be able to see process definitions they need at least "READ" permission for the "Process Definition" resource. To see running process instances the same permission is required for the "Process Instance" resource.

We grant the accounting group all permissions for the "invoice" process because they shall be able to manage their process completely. The resource id references to the key of the process definition.
Now that we know how to grant certain permissions, we might need a second user who serves as an administrator.
Create a user with all permissions
During the setup you had to create one administrator account. In a real-world scenario it could be beneficial to have a second administrator account to manage the users. Basically, an administrator is a user with the "ALL" permission for every possible resource and resource id. For example, to grant the accounting group all permissions for authorizations the following entry has to be made:

To create an administrator account, there are several options:
- If you kept the group camunda-admin in your application, you can add the user to this group.
- If you use the Administrator Authorization Plugin, you can configure the plugin to grant the user or a certain group all permissions.
- You can create your own administrator group (also see Groups), grant it all permissions and assign a user to it.
- Grant one certain user all permissions.
Now, after creating a new administrator account, we may want to start working and start processes.
Grant permission to start processes from Tasklist
Processes are started from Tasklist. For a user or group to be able to start processes we need, again, a certain combination of permissions. In this use case we want to give the accounting group the permission to start the "invoice" process from Tasklist.

To start, we will grant the group access to Tasklist (also see Application specific permission).

Next, we grant the _accounting_ group the "READ" and "CREATE_INSTANCE" permission for the "invoice" process to be able to see the process definition and create instances in Tasklist.

After that, we grant the "CREATE" permssion for process instances. The "CREATE" permission is necessary for the group to be able to create new process instances. The resource id references the generated process instance ids, therefore we use the asterisk, because we can't know the generated id in advance.
Now that we know how to start a process, we may want to restrict permissions to certain running processes.
Grant permission for single process instance
It is possible to restrict a group's/user's permissions to a single process instance, i.e., after the process ends, the group/user will not be able to change any other running process instances. We will use the accounting group again in this example. We assume that the group has access to Cockpit (see also Application Access) and that a process with the name and key "OrderProcess" is present.

To enable the group to see the process in Cockpit, we have to grant the "READ" permission for the process definition.

Now we have to get the process instance id from Cockpit. You can find the ids of all running processes after clicking on a process definition name or diagram preview on the dashboard.

This id then has to be used as the resource id when granting the user all permissions for the "Process Instance" resource.
This will limit the group's permissions to this running process instance. As with restricting access to a certain process instance, it is also possible to apply similar limitations for a single task.
Grant permission for single task
Since several groups can participate in a process, it could be useful to restrict certain tasks to certain people/groups. This can also be done with Admin and will take effect within Tasklist. For this example, we will reuse the accouting group and the "invoice" process from the previous sections. At least one instance of the process has to be running.

First of all, we have to grant the accounting group "READ" permission for filters so that tasks will be displayed in Tasklist.

Next we go into Cockpit and assign the desired task to the accounting group. This will automatically create an entry for the task with the task id as resource id in Admin and grant the "READ" and "UPDATE" permissions.
Those are the most common use cases for possible combinations of resources, permissions and resource ids.
System Settings

The System Settings menu gives you some general information about the process engine and allows you to access the Flow Node Count and, provided that you are using the Enterprise Edition of the Camunda BPM platform, you can insert your License Key.
Flow Node Count

The Flow Node Count feature in Admin displays an approximate number of flow nodes that have been executed by the engine within a specified time range.
Camunda License Key
Enterprise Feature
Please note that this feature is only included in the enterprise edition of the Camunda BPM platform, it is not available in the community edition.Check the Camunda enterprise homepage for more information or get your free trial version.

Here you can insert your company's License Key for the Camunda BPM platform and view some License Key details such as the Company Id and the validity of the license key.
LDAP Connection
If you connect the Camunda BPM platform with the LDAP identity service you have read-only access to the users and groups. Create new users and groups via the LDAP system, but not in the admin application. Find more information about how to configure the process engine in order to use the LDAP identity service here.
Customizing
Some visual aspects of the web interface can be configured in the
_vars.less file (located in webapps/camunda-webapp/webapp/src/main/webapp/assets/styles/)
as follows:
Header colors: you can change the values of
@main-colorand@main-darkervariables.Header logo: you can either override the
app-logo.pngimage file located in thewebapps/camunda-webapp/webapp/src/main/webapp/assets/img/admin/or override the@logo-adminvariable to point to another image file.
camunda Modeler
What is camunda Modeler?
The camunda Modeler is an open source BPMN 2.0 modeling plugin for Eclipse which focuses on seamless modeling of process and collaboration diagrams. The camunda Modeler supports the complete BPMN 2.0 standard.

Setup the IDE
After you have installed the camunda Modeler in Eclipse you can start to setup your environment. The modeler IDE is split into the following three parts:
Project Explorer

This view provides a hierarchical view of the resources in your workspace. Projects and files are displayed here. To open the Project Explorer click Window / Show View / Other... / General / Project Explorer. In the Project Explorer you can add, delete and rename files. Furthermore you can copy files from or to the explorer.
Properties Panel

The Properties Panel allows you to maintain BPMN and camunda BPM vendor extensions in your diagrams. To open this view click Window / Show View / Other... / General / Properties.
Diagram Canvas

To open the diagram canvas right-click on a *.bpmn file in the Project Explorer and select Open With / Bpmn2 Diagram Editor. On the right hand side of the screen, the Palette offers you all BPMN 2.0 elements grouped into different sections. You can add elements to your diagram by dragging and dropping them onto the Diagram Canvas.
Create a Process Model
Create a Project

Before you can create a BPMN file you need a project. You can create projects by right-clicking in the project explorer and selecting New / Project or in the menu File / New / Project .... Only a General / Project is suitable for using BPMN 2.0 files. For process application development select a Java Project.
Add a BPMN 2.0 Diagram

To add a new BPMN 2.0 file, select File / New / Other / BPMN / BPMN 2.0 Diagram. You can choose a location for the new file. Please note that this input is mandatory.
Start Modeling

Now you can start to create a BPMN 2.0 model. Add the desired elements from the palette on the right hand side by dragging and dropping them onto the diagram canvas. Alternatively, you can add new elements by using the context menu that appears when you hover over an element in the diagram. The type of an element can easily be changed by the morph function in the context menu.
In the properties panel you see and edit information about the element specific attributes, grouped into different tabs. Select the desired element and start to edit the properties.
Extend the Modeler with Custom Tasks
You can extend the modeler to ship reusable custom tasks through custom task providers.

The following functionality is exposed to custom task providers and thus usable when implementing custom tasks:
- Add extension to properties panel
- Create task from palette
- Add custom actions to task
- Change color and icon
Head over to the custom task tutorial to learn more about how to provide custom tasks. You may also check out the advanced custom task example that showcases most of the options.