This document will guide you through the installation of camunda BPM and its components on a Glassfish 3.1 application server.
$GLASSFISH_HOME points to the glassfish application server main directory (typically glassfish3/glassfish when extracted from a glassfish distribution).
$PLATFORM_VERSION denotes the version of the camunda BPM platform you want to or have installed, e.g. 7.0.0. $GLASSFISH_DISTRIBUTION represents the downloaded pre-packaged camunda BPM distribution for Glassfish, e.g. camunda-bpm-glassfish-$PLATFORM_VERSION.zip or camunda-bpm-glassfish-$PLATFORM_VERSION.tar.gz.
camunda-welcome.bat or using the $GLASSFISH_HOME/glassfish/config/startserv.{bat/sh} script.This section will describe how you can install the camunda BPM platform on a vanilla Glassfish 3.1, if you are not able to use the pre-packaged Glassfish distribution. Regardless we recommand you to download a Glassfish 3.1 distribution to use the required modules.
If you do not want to use the H2 database, you first have to create a database schema for camunda BPM platform. The camunda BPM distribution ships with a set of SQL create scripts that can be executed by a database administrator.
The database creation scripts are reside in the sql/create folder:
$GLASSFISH_DISTRIBUTION/sql/create/*_engine_$PLATFORM_VERSION.sql
$GLASSFISH_DISTRIBUTION/sql/create/*_identity_$PLATFORM_VERSION.sql
There is an individual SQL script for each supported database. Select the script appropriate for your database and run it with your database administration tool. (e.g. SqlDeveloper for Oracle).
The JDBC Connection Pool and the JDBC Resource can be configured by editing the file domain.xml inside the folder $GLASSFISH_HOME/glassfish/domains/<domain>/config/.
The following example shows the configuration based on a H2 database.
<domain>
  ...
  <resources>
    ...
    <jdbc-resource pool-name="ProcessEnginePool"
                   jndi-name="jdbc/ProcessEngine"
                   enabled="true">
    </jdbc-resource>

    <jdbc-connection-pool is-isolation-level-guaranteed="false"
                          datasource-classname="org.h2.jdbcx.JdbcDataSource"
                          res-type="javax.sql.DataSource"
                          non-transactional-connections="true"
                          name="ProcessEnginePool">
      <property name="Url"
                value="jdbc:h2:./camunda-h2-dbs/process-engine;DB_CLOSE_DELAY=-1;MVCC=TRUE;DB_CLOSE_ON_EXIT=FALSE">
      </property>
      <property name="User" value="sa"></property>
      <property name="Password" value="sa"></property>
    </jdbc-connection-pool>
  </resources>

  <servers>
    <server>
      ...
      <resource-ref ref="jdbc/ProcessEngine"></resource-ref>
    </server>
  </servers>
</domain>
In case of using another database (i.e. DB2, MySQL etc.) than H2 you have to adjust the datasource-classname and the res-type attributes with the corresponding database classes and set the database specific properties (like the url etc.) inside the JDBC Connection Pool. Furthermore you have to add the corresponding JDBC driver at $GLASSFISH_HOME/glassfish/lib/. For example you can add the H2 JDBC driver which is located at $GLASSFISH_DISTRIBUTION/server/glassfish3/glassfish/lib/h2-VERSION.jar to run with the H2 database.
Therefore you have to edit the file $GLASSFISH_HOME/glassfish/domains/<domain>/config/domain.xml and add the following elements to resources section.
<domain>
  ...
  <resources>
    ...
    <resource-adapter-config
      enabled="true"
      resource-adapter-name="camunda-jobexecutor-rar"
      thread-pool-ids="platform-jobexecutor-tp" >
    </resource-adapter-config>

    <connector-connection-pool
        enabled="true"
        name="platformJobExecutorPool"
        resource-adapter-name="camunda-jobexecutor-rar"
        connection-definition-name=
            "org.camunda.bpm.container.impl.threading.jca.outbound.JcaExecutorServiceConnectionFactory"
        transaction-support="NoTransaction" />

    <connector-resource
        enabled="true"
        pool-name="platformJobExecutorPool"
        jndi-name="eis/JcaExecutorServiceConnectionFactory" />
  </resources>

  <servers>
    <server>
      ...
      <resource-ref ref="eis/JcaExecutorServiceConnectionFactory"></resource-ref>
    </server>
  </servers>
</domain>
To configure a thread pool for the job executor you have to add it in the corresponding config elements of domain.xml.
<domain>
  ...
  <configs>
    ...
    <config name="server-config">
      ...
      <thread-pools>
        ...
        <thread-pool max-thread-pool-size="6"
                     name="platform-jobexecutor-tp"
                     min-thread-pool-size="3"
                     max-queue-size="10">
        </thread-pool>
      </thread-pools>
    </config>
  </configs>
</domain>
The following steps are required to deploy the camunda BPM platform on a Glassfish instance:
$GLASSFISH_DISTRIBUTION/modules/lib into GLASSFISH_HOME/glassfish/lib directory (i.e. copy the content into the Glassfish library directory).$GLASSFISH_DISTRIBUTION/modules/camunda-jobexecutor-rar-$PLATFORM_VERSION.rar into $GLASSFISH_HOME/glassfish/domains/<domain>/autodeploy. The jobexecutor recource adapter has to be deployed first because the artifact camunda-glassfish-ear-$PLATFORM_VERSION.ear depends on it and cannot deployed succesfully without the resource adapter. If you try to deploy both compoments with the auto-deploy feature in one step you should be aware that the deployment order is not defined in this case. Due to this we propose to startup the Glassfish to deploy initially the jobexecutor resource adapter. After a successful startup shutdown the Glassfish.$GLASSFISH_DISTRIBUTION/modules/camunda-glassfish-ear-$PLATFORM_VERSION.ear into $GLASSFISH_HOME/glassfish/domains/<domain>/autodeploy.As next step you can install for example the REST API on Glassfish.
To install the REST API, a Glassfish installation with the org.camunda.bpm.camunda-engine module is required.
See above, how to install the pre-built distro or install the platform on a vanilla Glassfish.
Note: The distro already ships the REST API exposing it on the context path /engine-rest.
The following steps are required to deploy the REST API on a Glassfish instance:
$PLATFORM_VERSION/camunda-engine-rest-$PLATFORM_VERSION.war./engine-rest).
Edit the file WEB-INF/sun-web.xml in the war file and update the context-root element accordingly.$GLASSFISH_HOME/domains/domain1/autodeploy./engine-rest. For more information on how to use the REST APINote: The distro already ships camunda Cycle. It may be accessed on the context path /cycle. See here, how to configure the distro.We do not recommend to install camunda Cycle together with the other platform components (webapps, engine, REST Api) on the same runtime environment. Such a combined installation is not supported.
Unless you are using the pre-packaged distribution and do not want to exchange the packaged H2 database, you first have to create a database schema for camunda Cycle. The camunda BPM distribution ships with a set of SQL create scripts that can be executed by a database administrator.
The database creation scripts reside in the sql/create folder:
camunda-bpm-glassfish-$PLATFORM_VERSION.zip/sql/create/*_cycle_$PLATFORM_VERSION.sqlThere is an individual SQL script for each supported database. Select the script appropriate for your database and run it with your database administration tool. (e.g. SqlDeveloper for Oracle).
We recommend to create a separate database or database schema for camunda Cycle.
The distribution comes with a preconfigured H2 database used by Cycle.
The H2 JDBC driver is located at camunda-bpm-glassfish-$PLATFORM_VERSION.zip/server/glassfish3/glassfish/lib/h2-VERSION.jar.
When you open the Glassfish administration console (by default http://localhost:4848), you can find under
Resources -> JDBC -> JDBC Connection Pools the preconfigured H2CyclePool connection pool
and under Resources -> JDBC -> JDBC Resources the corresponding JDBC Resource named jdbc/CycleDS.
To exchange the preconfigured H2 datasource with your own, e.g. Oracle, you have to do the following:
$GLASSFISH_HOME/glassfish/lib or when you want to integrate the JDBC driver into a GlassFish Server domain,
copy it into the $GLASSFISH_HOME/glassfish/domains/DOMAIN_DIR/lib directory, then restart the server.Resources -> JDBC -> JDBC Connection Pools and click on New. (show image)javax.sql.XADatasource because we want an XA Datasource in this example.
A Database Driver Vendor has to be specified for your driver, e.g. Oracle in our case. Click on Next. (show image)Resources -> JDBC -> JDBC Connection Pools -> Your Connection Pool and click the Ping button at the top.
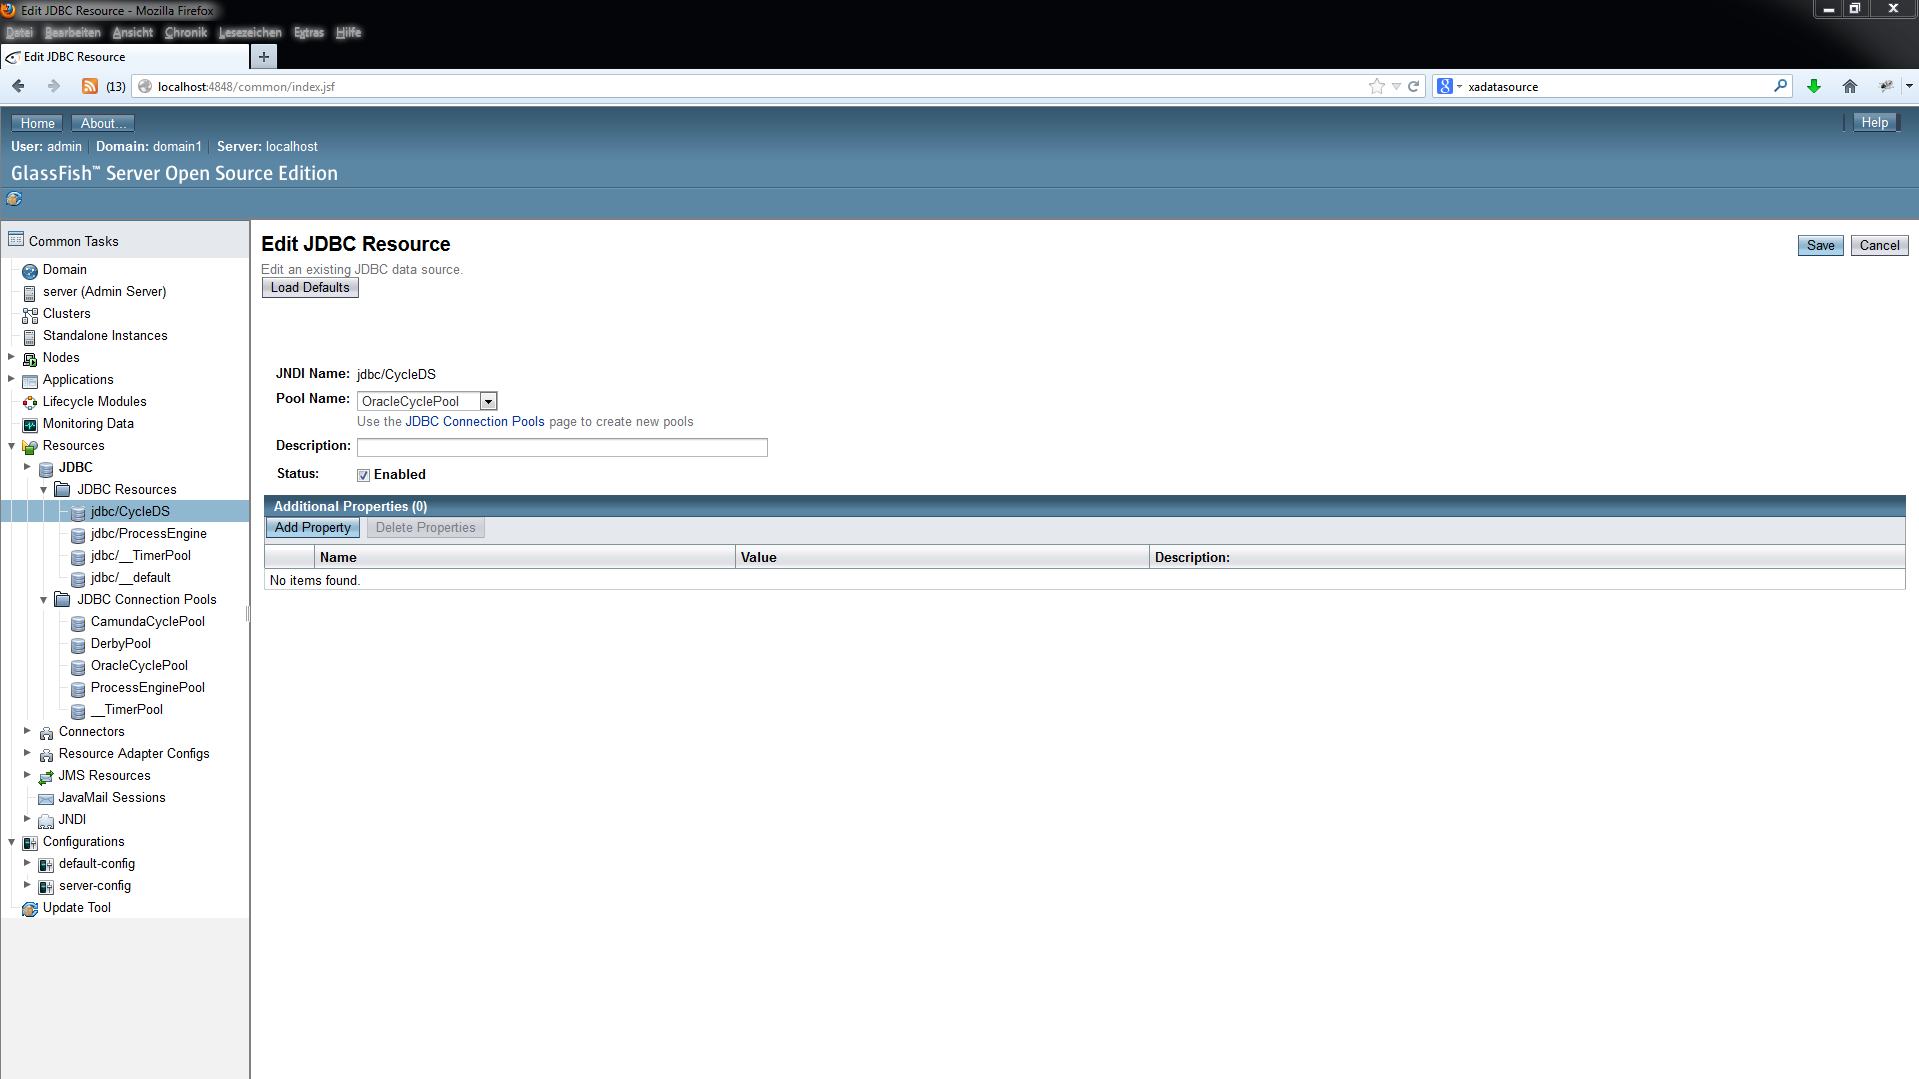
If no error is shown, proceed to step 9, otherwise consult your Glassfish / database manual.Resources -> JDBC -> JDBC Resources -> jdbc/CycleDS
and edit the Pool Name from H2CyclePool to our new connection pool, OracleCyclePool. (show image)You can download the camunda Cycle web application from our sever.
Choose the correct version named $PLATFORM_VERSION/camunda-cycle-glassfish-$PLATFORM_VERSION.war.
First, you must define a datasource in Glassfish Application Server. We assume here that you are familiar with the procedure. If in doubt, check the appropriate sections in the manual of your application server.
Cycle expects a datasource named jdbc/CycleDS.
In order to use a custom datasource name, you have to edit the file WEB-INF/classes/META-INF/cycle-persistence.xml in the Cycle web application file.
Open the default-web.xml and comment out / remove the following lines at the end of the file.
<login-config>
  <auth-method>BASIC</auth-method>
</login-config>/cycle).
Edit the file WEB-INF/sun-web.xml in the war file and update the context-root element accordingly.camunda-cycle-glassfish-$PLATFORM_VERSION.war file.
(show image)/cycle.Note: This step is optional and can be skipped if you do not require Cycle to send a welcome email to newly created users.
In order to use the Cycle email service, you have to configure a mail session in the application server and reference it in the Cycle configuration.
For this you have to configure a new mail session in Glassfish Application Server.
Resources -> JavaMail Sessions and click New.Now enter a JNDI name for the Mail Session, e.g. mail/Session and fill the mandatory fields for your mail server configuration. Later, the JNDI name will be referenced in Cycle's configuration.
For a complete overview of the mail session properties, like encryption protocols etc, consult the Glassfish manual.
Under Additional Properties, add these properties if your mail server requires password authentication
mail.smtp.port:port-number
mail.smtp.auth true
mail.smtp.password: myMailServerPassword
The name of the mail session looked up by Cycle can be changed by editing the following file in the Cycle web application:
WEB-INF/classes/spring/configuration.xmlThe file defines a Spring Bean named cycleConfiguration. On this spring bean, set the JNDI name of the Mail Session to a custom name:
<bean id="cycleConfiguration" class="org.camunda.bpm.cycle.configuration.CycleConfiguration">
  <!-- ... -->
  <!-- Cycle email service configuration -->
  <property name="emailFrom" value="cycle@localhost" />
  <property name="mailSessionName" value="my/mail/Session" />
  <!-- ... -->
</bean>Connector passwords are encrypted before they are stored in the Cycle database using the PBEWithMD5AndDES algorithm implementation.
To install camunda Cockpit and Tasklist, a Glassfish installation with the org.camunda.bpm.camunda-engine module is required.
See above, how to install the pre-built distro or install the platform on a vanilla Glassfish.
Note: The distro already ships the applications. They may be accessed via /camunda/app/cockpit and /camunda/app/tasklist, respectively.
The following steps are required to deploy the applications on a Glassfish instance:
$PLATFORM_VERSION/camunda-webapp-glassfish-$PLATFORM_VERSION.war./camunda).
Edit the file WEB-INF/sun-web.xml in the war file and update the context-root element accordingly.$GLASSFISH_HOME/domains/domain1/autodeploy./camunda/app/cockpit and /camunda/app/tasklist or under the context path you configured.In order to setup LDAP for the glassfish distribution, you have to perform the following steps:
1. Add LDAP Library
Make sure the camunda-identity-ldap-$PLATFORM_VERSION.jar is present in the
GLASSFISH_HOME/glassfish/lib folder.
2. Adjust Process Engine Configuration
Edit the file bpm-platform.xml located inside the folder $GLASSFISH_HOME/glassfish/domains/domain1/applications/camunda-bpm-platform/camunda-glassfish-service-VERSION.jar/META-INF and add the LDAP Identity Provider Plugin and the Administrator Authorization Plugin.
<?xml version="1.0" encoding="UTF-8"?>
<bpm-platform xmlns="http://www.camunda.org/schema/1.0/BpmPlatform"
  xmlns:xsi="http://www.w3.org/2001/XMLSchema-instance"
  xsi:schemaLocation="http://www.camunda.org/schema/1.0/BpmPlatform http://www.camunda.org/schema/1.0/BpmPlatform">
  <!-- ... -->
  <process-engine name="default">
    <!-- ... -->
    <plugins>
      <plugin>
        <class>org.camunda.bpm.identity.impl.ldap.plugin.LdapIdentityProviderPlugin</class>
        <properties>

          <property name="serverUrl">ldap://localhost:4334/</property>
          <property name="managerDn">uid=jonny,ou=office-berlin,o=camunda,c=org</property>
          <property name="managerPassword">s3cr3t</property>

          <property name="baseDn">o=camunda,c=org</property>

          <property name="userSearchBase"></property>
          <property name="userSearchFilter">(objectclass=person)</property>

          <property name="userIdAttribute">uid</property>
          <property name="userFirstnameAttribute">cn</property>
          <property name="userLastnameAttribute">sn</property>
          <property name="userEmailAttribute">mail</property>
          <property name="userPasswordAttribute">userpassword</property>

          <property name="groupSearchBase"></property>
          <property name="groupSearchFilter">(objectclass=groupOfNames)</property>
          <property name="groupIdAttribute">ou</property>
          <property name="groupNameAttribute">cn</property>

          <property name="groupMemberAttribute">member</property>

        </properties>
      </plugin>
      <plugin>
        <class>org.camunda.bpm.engine.impl.plugin.AdministratorAuthorizationPlugin</class>
        <properties>
          <property name="administratorUserName">admin</property>
        </properties>
      </plugin>
    </plugins>
  </process-engine>
</bpm-platform>
The administratorUserName property should contain the user id of the LDAP user you want to grant administrator authorizations to. You can then use this user to log into the webapplication and grant authorizations to additional users.
See userguide for complete documentation on the LDAP Identity Provider Plugin and the Administrator Authorization Plugin.