Camunda BPM Installation Guide (IBM WebSphere)
Introduction
Overview
This document will guide you through the installation of Camunda BPM and its components on an IBM WebSphere Application Server.
- IBM WebSphere Application Server v 8.0.x
- IBM WebSphere Application Server v 8.5.x
Enterprise Feature
Please note that this feature is only included in the enterprise edition of the Camunda BPM platform, it is not available in the community edition.Check the Camunda enterprise homepage for more information or get your free trial version.
Reading the Guide
Throughout this guide we will use a number of variables to denote common path names and constants.
$WAS_HOME points to the IBM WebSphere application server main directory (typically something like /opt/IBM/WebSphere/AppServer). $PLATFORM_VERSION denotes the version of the Camunda BPM platform you want to install or already have installed, e.g., 7.2.0. $WAS_DISTRIBUTION represents the downloaded Camunda BPM distribution for the IBM WebSphere Application Server, e.g., camunda-ee-ibm-was-$PLATFORM_VERSION.zip.
The distribution is available at the Camunda enterprise release page. You will be asked to enter the credentials you received during the trial or subscription process.
BPM Platform
Resource Configuration
The Camunda BPM platform requires a set of resources that need to be configured at the application server level:
- One or multiple datasources to be used by the engine(s).
- A work manager for the job executor.
Define resources in the right scope
In order to perform the steps listed in this guide, make sure you understand the concept of management scopes introduced by the IBM WebSphere Application Server. We assume that resources are defined at the "Node" scope. 
JDBC / Datasource Configuration
The Camunda BPM engine uses one or multiple process engines. Use your application server management tooling for the configuration of the datasources. The JNDI name of the datasource must be equal to the name used in the datasource-Element of the process engine(s) configured in the bpm-platform.xml file.
Default JNDI Name
The default JNDI name used by the process engine is jdbc/ProcessEngine
The following screenshot shows the configuration of an XA datasource:
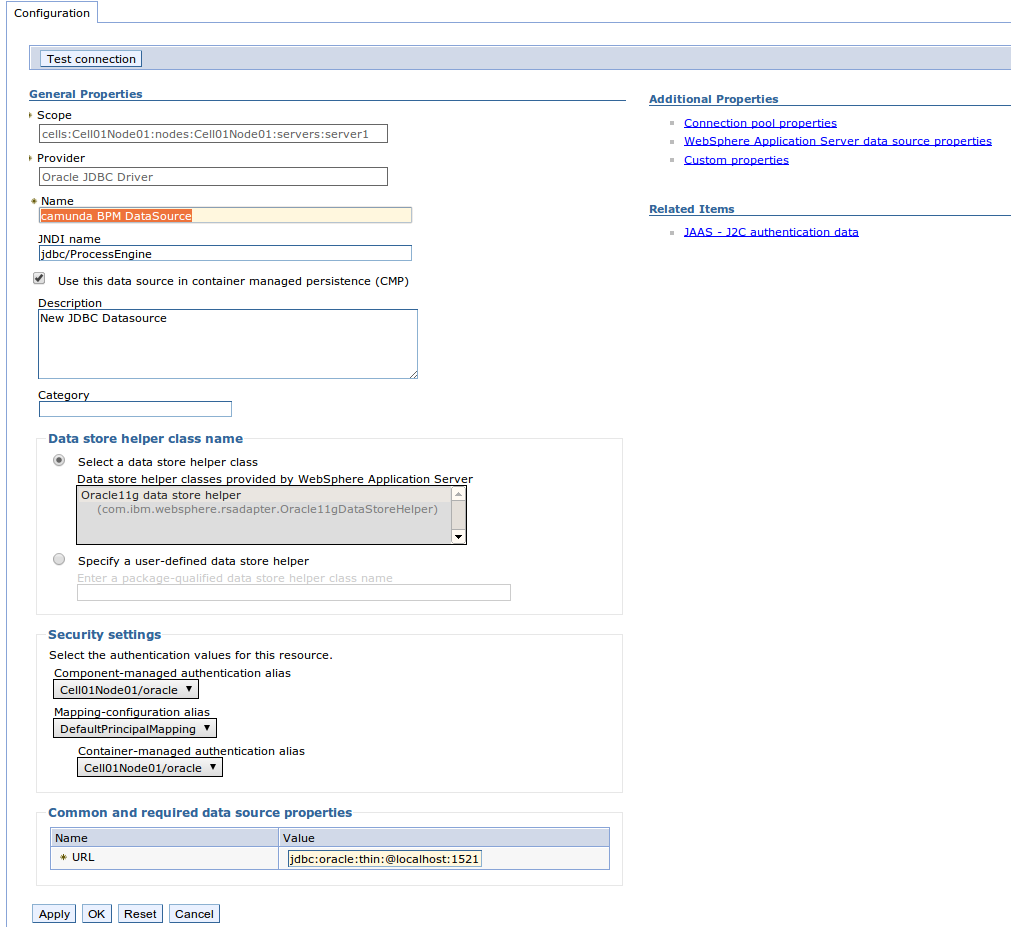
Note that you may configure multiple datasources used by different process engine instances. See the User Guide for details.
Configure a WorkManager to be used by the Camunda BPM platform jobexecutor
This section explains how you can use the WebSphere Integrated Solutions Console to configure a work manager to be used by the Camunda BPM platform jobexecutor. It is recommended to check the manual of the application server for additional details.
Go to Resources / Asynchronous Bean / Work Managers and select the appropriate scope, for example: Cell=
Create a new work manager in the scope using the Button New....
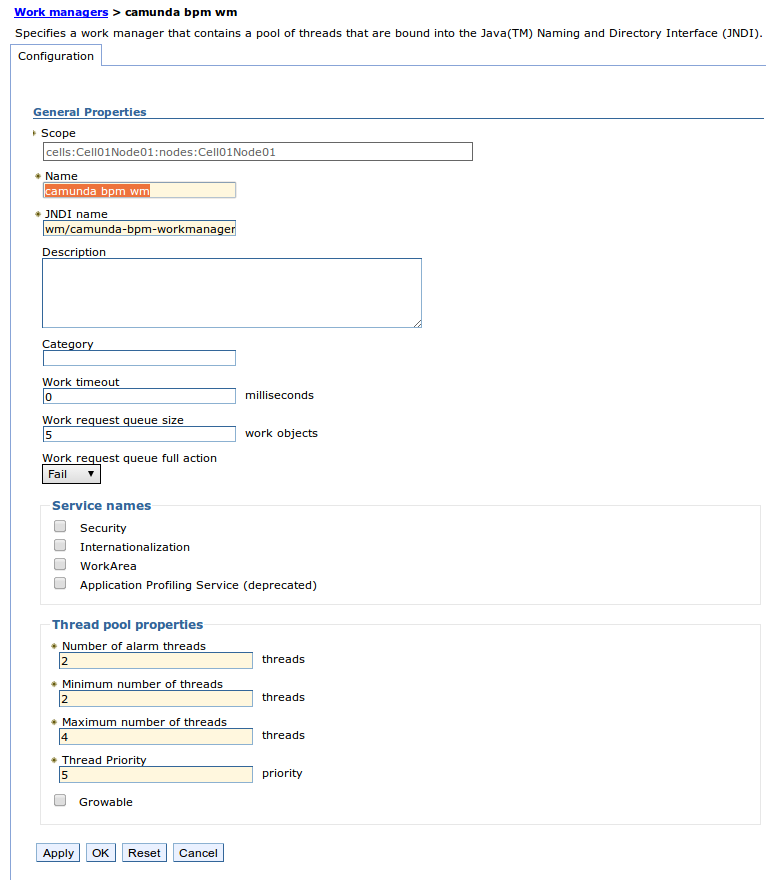
Configure the new Work Manager. The following is a selection of sensible default values:
General Properties
| Property | Default Value | Explanation |
|---|---|---|
| Name | camunda-platform-jobexecutor-WM | The name of the Work Manager. |
| JNDI name |
wm/camunda-bpm-workmanager |
Default JNDI name for WorkManager. This setting value is mandatory and must not be changed. |
| Description | "The work manager used by the Camunda platform job executor" | Describes the work manager. Any value can be used. |
| Work Request Queue Size | 5 | Specifies the size of the work request queue. The work request queue is a buffer that holds scheduled work objects and may be a value of 1 or greater. The thread pool pulls work from this queue. If you do not specify a value or the value is 0, the queue size is managed automatically. Large values can consume significant system resources. |
| Work request queue full action | Fail | Specifies the action that is taken when the thread pool is exhausted, and the work request queue is full. This action starts when you submit non-daemon work to the work manager. The default value is block but should be changed to "Fail". |
Thread Pool Properties
| Property | Default Value | Explanation |
|---|---|---|
| Number of alarm threads | 2 | Specifies the desired maximum number of threads that are used for alarms. The default value is 2. |
| Minimum number of threads | 2 | Specifies the minimum number of threads that are available in this work manager. Should not be below "2" since one thread is blocked by the job acquisition. If you configure multiple job acquisitions, the Minimal Size should not be below Nr. of Acquisitions + 1. |
| Maximum number of threads | 4 | Specifies the maximum number of threads that are available in this work manager used by the jobexecutor. Should be greater than "Minimum Size". |
| Thread Priority | 5 | Specifies the priority of the threads that are available in this work manager. |
| Growable | False | Specifies whether the number of threads in this work manager can be increased automatically when the maximum number of threads is reached.The default value is true, but should be changed to "False" |
The following screenshot shows an example configuration of the work manager and its thread pool properties.
Install the Camunda BPM platform shared libraries
Install the Camunda BPM platform modules
The Camunda BPM platform distribution for IBM WebSphere Application Server includes one module in the modules folder:
camunda-ee-ibm-was-$PLATFORM_VERSION.zip
|-- modules/
      |-- camunda-ibm-websphere-ear-$PLATFORM_VERSION.ear
The camunda-ibm-websphere-ear is a Java EE application enterprise archive (EAR) providing the Camunda BPM platform services. It contains an embedded rar module. This camunda-ibm-websphere-rar module is a JCA Resource Adapter providing the jobexecutor service to the Camunda BPM platform.
The EAR must be installed to your IBM WebSphere Application Server.
Install the Camunda BPM platform Application
In this section, we explain how the camunda-ibm-websphere-ear module can be installed using the WebSphere Integrated Solutions Console.
- Navigate to the Enterprise Applications page using the navigation path Applications / Application Types / WebSphere enterprise applications.
- Click the "Install" Button.
- Select the
camunda-ibm-websphere-ear-$PLATFORM_VERSION.earfile from the modules folder of the Camunda BPM platform for IBM WebSphere Application Server distribution. Click Next. - Select the "Fast Path" install option.
- In Step 1, enter an application-name, eg. "camunda-bpm-platform", customize other settings and click "Next".
- Continue through Steps 2-4, customize to your liking and finish the installation in Step 4 by clicking "Finish".
- Save the configuration.
- (optional) Configure location of the bpm-platform.xml file
- Start the camunda-bpm-platform application. If this initially fails, try to restart the server. Also make sure the EAR does correctly reference the previously created 'Camunda' shared library. If it doesn't, make sure you have correctly created the shared library as 'Camunda' or assign the 'Camunda' shared library manually after the EAR installation.
Install Optional Camunda Dependencies
This section describes how to install optional Camunda dependencies onto an IBM WebSphere server. None of these are required to work with the core platform.
The following covers the installation of these extensions:
Install Camunda Connect
Add the following artifacts (if not existing) from the folder $WAS_DISTRIBUTION/modules/lib to the Camunda shared library folder:
camunda-connect-core-$CONNECT_VERSION.jarcamunda-commons-logging-$COMMONS_VERSION.jarcamunda-commons-utils-$COMMONS_VERSION.jarslf4j-api-$SLF4J_VERSION.jar
In order to activate Camunda Connect functionality for a process engine, a process engine plugin has to be registered in the BPM platform configuration as follows:
<?xml version="1.0" encoding="UTF-8"?>
<bpm-platform ... ">
  <process-engine name="default">
    ...
    <plugins>
      ... existing plugins ...
      <plugin>
        <class>org.camunda.connect.plugin.impl.ConnectProcessEnginePlugin</class>
      </plugin>
    </plugins>
    ...
  </process-engine>

</bpm-platform>
Note that this requires a custom bpm-platform.xml file.
Install Camunda Spin
Add the following artifacts (if not existing) from the folder $WAS_DISTRIBUTION/modules/lib/ to the Camunda shared library folder:
camunda-spin-core-$SPIN_VERSION.jarcamunda-commons-logging-$COMMONS_VERSION.jarcamunda-commons-utils-$COMMONS_VERSION.jarslf4j-api-$SLF4J_VERSION.jar
In order to activate Camunda Spin functionality for a process engine, a process engine plugin has to be registered in the BPM platform configuration as follows:
<?xml version="1.0" encoding="UTF-8"?>
<bpm-platform ... ">
  ...
  <process-engine name="default">
    ...
    <plugins>
      ... existing plugins ...
      <plugin>
        <class>org.camunda.spin.plugin.impl.SpinProcessEnginePlugin</class>
      </plugin>
    </plugins>
    ...
  </process-engine>
  ...
</bpm-platform>
Note that this requires a custom bpm-platform.xml file.
Install Groovy Scripting
Add the following artifacts (if not existing) from the folder $WAS_DISTRIBUTION/modules/lib/ to the Camunda shared library folder:
groovy-all-$GROOVY_VERSION.jar
Install Freemarker Integration
Add the following artifacts (if not existing) from the folder $WAS_DISTRIBUTION/modules/lib/ to the Camunda shared library folder:
camunda-template-engines-freemarker-$TEMPLATE_VERSION.jarfreemarker-2.3.20.jarcamunda-commons-logging-$COMMONS_VERSION.jarcamunda-commons-utils-$COMMONS_VERSION.jarslf4j-api-$SLF4J_VERSION.jar
Install Process Applications
After installing a Process Application (PA) in your IBM WebSphere Application Server, which does not include the Camunda BPM dependencies, you must assign the previously created "Camunda" shared library with the Process Application deployment. This should only be necessary when you use the "shared" engine deployment approach and not the "embedded" process engine one (aka self-contained Process Application).
Troubleshooting
Defining IBM WebSphere Resources in the right scope
When installing the Camunda BPM platform Application, you may see error messages indicating that you are referencing resources from the wrong scope. Make sure you define the resources in the right scope so all components are visible to each other. Make sure you understand the IBM WebSphere management concepts "Cell", "Node" and "Server".
Web Applications
Install the REST API web application
The Camunda REST API WAR file resides under webapps/camunda-engine-rest-$PLATFORM_VERSION-was.war in the IBM WebSphere Application Server distribution archive.
In this section we explain how to install the WAR file using the IBM WebSphere enterprise application wizard provided within the WebSphere Integrated Solutions Console:
- Open the WebSphere Integrated Solutions Console.
- Navigate to the Applications / Application Types / WebSphere enterprise applications page.
- Click the Install Button
- The first page of the wizard opens. Using the file browser, select the
camunda-engine-rest-VERSION-was.warfile from the distribution and upload it. - Continue to the next page.
- Select the "Fast Path" on the next page.
- Step 1. Usually no changes are required.
- Step 2. Usually no changes are required.
- Step 3. Usually no changes are required.
- Step 4. Define a context root for the REST API. We propose to use /engine-rest
- Step 5. Usually no changes are required.
After completing the wizard, REST API should be successfully installed on the application server. Don't forget to save your changes to the master configuration.
The final step is to reference the shared libraries. To do so, follow these steps:
- Navigate to the Applications / Application Types / WebSphere enterprise applications page.
- Click on the name of the application (e.g., camunda-engine-rest-7_2_0-ee-was_war).
- Click on Shared library references.
- Click on the checkbox next to the application name and click on the Reference shared libraries button.
- Select the shared library Camunda.
- Confirm selection by clicking on OK.
In some situations, you have to start the web application manually from the Applications / Application Types / WebSphere enterprise applications page.
Install Camunda Cockpit and Tasklist
The web application archive that contains Camunda Cockpit and Camunda Tasklist resides under webapps/camunda-was-$PLATFORM_VERSION.war in the IBM WebSphere Application Server distribution archive.
In this section we explain how to install the WAR file using the IBM WebSphere enterprise application wizard provided by the WebSphere Integrated Solutions Console:
- Open the WebSphere Integrated Solutions Console.
- Navigate to the Applications / Application Types / WebSphere enterprise applications page.
- Click the Install Button
- The first page of the wizard opens. Using the file browser, select the
camunda-was-VERSION.warfile from the distribution and upload it. - Continue to the next page.
- Select the "Fast Path" on the next page.
- Step 1. Usually no changes are required.
- Step 2. Usually no changes are required.
- Step 3. Usually no changes are required.
- Step 4. Define a context root for the applications. We propose to use /camunda
- Step 5. Usually no changes are required.
After completing the wizard, the applications should be successfully installed on the application server. Don't forget to save your changes to the master configuration.
The final step is to reference the shared libraries. To do so, follow these steps:
- Navigate to the Applications / Application Types / WebSphere enterprise applications page.
- Click on the name of the application (e.g., camunda-webapp-ee-was-7_2_0-ee_war).
- Click on Shared library references.
- Click on the checkbox next to the application name and click on the Reference shared libraries button.
- Select the shared library Camunda.
- Confirm selection by clicking on OK.
In some situations, you have to start the web application manually from the Applications / Application Types / WebSphere enterprise applications page.
You can check if everything went well by accessing Cockpit and Tasklist via /camunda/app/cockpit and /camunda/app/tasklist or under the context path you configured.
LDAP Configuration
Configuring LDAP for Camunda Cockpit and Tasklist
In order to set up LDAP for the IBM WebSphere distribution, you have to perform the following steps:
Add the LDAP Library
Make sure the camunda-identity-ldap-$PLATFORM_VERSION.jar is present in the shared library 'Camunda' folder.
Adjust the Process Engine Configuration
Edit the file bpm-platform.xml located inside the Camunda BPM enterprise archive at camunda-ibm-websphere-ear-$VERSION.ear/camunda-ibm-websphere-service.jar/META-INF/ and add the LDAP Identity Provider Plugin and the Administrator Authorization Plugin.
<?xml version="1.0" encoding="UTF-8"?>
<bpm-platform xmlns="http://www.camunda.org/schema/1.0/BpmPlatform"
  xmlns:xsi="http://www.w3.org/2001/XMLSchema-instance"
  xsi:schemaLocation="http://www.camunda.org/schema/1.0/BpmPlatform http://www.camunda.org/schema/1.0/BpmPlatform ">
  ...
  <process-engine name="default"> ...
    <properties>...</properties>
    <plugins>
      <plugin>
        <class>org.camunda.bpm.identity.impl.ldap.plugin.LdapIdentityProviderPlugin</class>
        <properties>

          <property name="serverUrl">ldap://localhost:4334/</property>
          <property name="managerDn">uid=jonny,ou=office-berlin,o=camunda,c=org</property>
          <property name="managerPassword">s3cr3t</property>

          <property name="baseDn">o=camunda,c=org</property>

          <property name="userSearchBase"></property>
          <property name="userSearchFilter">(objectclass=person)</property>

          <property name="userIdAttribute">uid</property>
          <property name="userFirstnameAttribute">cn</property>
          <property name="userLastnameAttribute">sn</property>
          <property name="userEmailAttribute">mail</property>
          <property name="userPasswordAttribute">userpassword</property>

          <property name="groupSearchBase"></property>
          <property name="groupSearchFilter">(objectclass=groupOfNames)</property>
          <property name="groupIdAttribute">ou</property>
          <property name="groupNameAttribute">cn</property>

          <property name="groupMemberAttribute">member</property>

        </properties>
      </plugin>
      <plugin>
        <class>org.camunda.bpm.engine.impl.plugin.AdministratorAuthorizationPlugin</class>
        <properties>
          <property name="administratorUserName">admin</property>
        </properties>
      </plugin>
    </plugins>
  </process-engine>
</bpm-platform>
The administratorUserName property should contain the user id of the LDAP user you want to grant administrator authorizations to. You can then use this user to log into the webapplication and grant authorizations to additional users.
See our user guide for complete documentation on the LDAP Identity Provider Plugin and the Administrator Authorization Plugin.
Enable Hal Resource caching
If you use LDAP as Indentity Provider, you should consider activating caching of
Users and Groups in the Camunda webapplication. In order to activate this, add the following
configuration to the web.xml file of Camunda webapplication
(camunda-webapp-was-$PLATFORM_VERSION.war/WEB-INF/web.xml):
<?xml version="1.0" encoding="UTF-8"?>
<web-app version="2.5" xmlns="http://java.sun.com/xml/ns/javaee"
  xmlns:xsi="http://www.w3.org/2001/XMLSchema-instance"
  xsi:schemaLocation="http://java.sun.com/xml/ns/javaee http://java.sun.com/xml/ns/javaee/web-app_2_5.xsd">

  <!-- ... -->

  <listener>
    <listener-class>org.camunda.bpm.engine.rest.hal.cache.HalRelationCacheBootstrap</listener-class>
  </listener>

  <context-param>
    <param-name>org.camunda.bpm.engine.rest.hal.cache.config</param-name>
    <param-value>
      {
        "cacheImplementation": "org.camunda.bpm.engine.rest.hal.cache.DefaultHalResourceCache",
        "caches": {
          "org.camunda.bpm.engine.rest.hal.user.HalUser": {
            "capacity": 100,
            "secondsToLive": 900
          },
          "org.camunda.bpm.engine.rest.hal.group.HalGroup": {
            "capacity": 100,
            "secondsToLive": 900
          }
        }
      }
    </param-value>
  </context-param>

  <!-- ... -->

</web-app>
Migration
Migrate from Camunda BPM 7.1 to Camunda BPM 7.2
The following steps describe how to upgrade the Camunda artifacts on an IBM WebSphere application server in a shared process engine setting. For the entire migration procedure, refer to the migration guide. If not already done, make sure to download the Camunda BPM 7.2 IBM WebSphere distribution.
The upgrade procedure takes the following steps:
- Uninstall the Camunda libraries and archives
- Add the new Camunda libraries
- Install optional Camunda dependencies
- Configure process engines
- Create a shared Camunda library
- Install the Camunda archive
- Install the Camunda BPM web applications
- Associate existing applications with shared library
In each of the following steps, the identifiers $*_VERSION refer to the current version and the new versions of the artifacts.
Changing Platform Configuration
Depending on your chosen feature set for Camunda BPM, some of the (optional) migration steps may require to change the configuration of the BPM platform. The Camunda enterprise archive (EAR) contains a default platform configuration. If you want to change this configuration, you can replace it as described in the deployment descriptor reference.
1. Uninstall the Camunda Libraries and Archives
First, uninstall the Camunda web applications, namely the Camunda REST API (artifact name like camunda-engine-rest) and the Camunda applications Cockpit, Tasklist and Admin (artifact name like camunda-webapp).
Uninstall the Camunda EAR. Its name should be camunda-ibm-websphere-ear-$PLATFORM_VERSION.ear. Then, uninstall the Camunda job executor adapter, called camunda-ibm-websphere-rar-$PLATFORM_VERSION.rar. Delete the J2E connection factory and activation specification created for Camunda BPM 7.1.
After stopping the server, delete all Camunda BPM related libraries from the $WAS_HOME/lib/ext directory. These should be:
camunda-engine-$PLATFORM_VERSION.jarcamunda-bpmn-model-$PLATFORM_VERSION.jarcamunda-xml-model-$PLATFORM_VERSION.jarmybatis-$MYBATIS_VERSION.jarjava-uuid-generator-$VERSION.jarjoda-time-$VERSION.jarslf4j-api-$VERSION.jar
Note that the non-Camunda artifacts may be depended on by other applications.
2. Add the new Camunda Libraries
Camunda BPM 7.2 ships a new installation approach for the Camunda BPM platform on IBM WebSphere. The Camunda BPM libraries are now available through a shared library the server administrator has to create.
Copy the Camunda core modules from the folder $WAS_DISTRIBUTION/modules/lib to a folder that can be referenced from your IBM WebSphere installation when you later create the shared library. In detail, these are the following artifacts:
camunda-engine-$PLATFORM_VERSION.jarcamunda-bpmn-model-$PLATFORM_VERSION.jarcamunda-cmmn-model-$PLATFORM_VERSION.jarcamunda-xml-model-$PLATFORM_VERSION.jarmybatis-$MYBATIS_VERSION.jarjava-uuid-generator-$VERSION.jarjoda-time-$VERSION.jarslf4j-api-$VERSION.jar
If you have been previously using the Camunda LDAP plugin, also copy the following artifact:
camunda-identity-ldap-$PLATFORM_VERSION.jar
3. Install Optional Camunda Dependencies
There are artifacts for Camunda Connect, Camunda Spin, the Freemarker template language and Groovy scripting that may optionally be added to the shared library folder. Since all these artifacts add new functionality, the following steps are not required for migration.
Note: The default Camunda configuration file contained by the Camunda EAR automatically activates the newly introduced, optional Camunda dependencies, Camunda Spin and Connect. If you do not use a custom BPM platform configuration as described here and do not intend to do so, you must install the Camunda Spin and Connect core libraries to the shared libraries folder.
Not Using Connect/Spin
If you do not want to use Camunda Connect or Camunda Spin, you cannot use the default BPM platform configuration that is contained in the Camunda EAR. In this case, make sure to change the configuration location as described here. As a starting point, you can copy the default configuration from $WAS_DISTRIBUTION/modules/camunda-ibm-websphere-ear-$PLATFORM_VERSION.ear/camunda-ibm-websphere-service-$PLATFORM_VERSION.jar/META-INF/bpm-platform.xml and remove the <plugin/> entries for the classes ConnectProcessEnginePlugin and SpinProcessEnginePlugin.
Camunda Connect
If Camunda Connect is intended to be used, copy the following library from $WAS_DISTRIBUTION/modules/lib to the Camunda shared library folder:
camunda-connect-core-$CONNECT_VERSION.jarcamunda-commons-logging-$COMMONS_VERSION.jarcamunda-commons-utils-$COMMONS_VERSION.jarslf4j-api-$SLF4J_VERSION.jar
If you use a custom BPM platform configuration file, Camunda Connect functionality has to be activated for a process engine by registering a process engine plugin (note that if you use the default configuration, this step is not necessary):
<?xml version="1.0" encoding="UTF-8"?>
<bpm-platform ... ">
  <process-engine name="default">
    ...
    <plugins>
      ... existing plugins ...
      <plugin>
        <class>org.camunda.connect.plugin.impl.ConnectProcessEnginePlugin</class>
      </plugin>
    </plugins>
    ...
  </process-engine>

</bpm-platform>
Camunda Spin
If Camunda Spin is intended to be used, copy the following library from $WAS_DISTRIBUTION/modules/lib to the Camunda shared library folder:
camunda-spin-core-$CONNECT_VERSION.jarcamunda-commons-logging-$COMMONS_VERSION.jarcamunda-commons-utils-$COMMONS_VERSION.jarslf4j-api-$SLF4J_VERSION.jar
If you use a custom BPM platform configuration file, Camunda Spin functionality has to be activated for a process engine by registering a process engine plugin (note that if you use the default configuration, this step is not necessary):
<?xml version="1.0" encoding="UTF-8"?>
<bpm-platform ... ">
  <process-engine name="default">
    ...
    <plugins>
      ... existing plugins ...
      <plugin>
        <class>org.camunda.spin.plugin.impl.SpinProcessEnginePlugin</class>
      </plugin>
    </plugins>
    ...
  </process-engine>

</bpm-platform>
Groovy Scripting
If Groovy is to be used as a scripting language, add the following artifacts to the Camunda shared library folder:
groovy-all-$GROOVY_VERSION.jar
Freemarker Integration
If the Camunda integration for Freemarker is intended to be used, add the following artifacts to the Camunda shared library folder:
camunda-template-engines-freemarker-$TEMPLATE_VERSION.jarfreemarker-2.3.20.jarcamunda-commons-logging-$COMMONS_VERSION.jarcamunda-commons-utils-$COMMONS_VERSION.jarslf4j-api-$SLF4J_VERSION.jar
4. Configure Process Engines
Script Variable Storing
As of 7.2, the default behavior of script variables has changed. Script variables are set in e.g. a BPMN Script Task that uses a language such as JavaScript or Groovy. In previous versions, the process engine automatically stored all script variables as process variables. Starting with 7.2, this behavior has changed and the process engine does not automatically store script variables any longer. You can re-enable the legacy behavior by setting the boolean property autoStoreScriptVariables to true for any process engine in the bpm-platform.xml:
<?xml version="1.0" encoding="UTF-8"?>
<bpm-platform ... ">
  ...
  <process-engine name="default">
    ...
    <properties>
      ... existing properties ...
      <property name="autoStoreScriptVariables">true</property>
    </properties>
    ...
  </process-engine>
  ...
</bpm-platform>
As an alternative, process application developers can migrate script code by replacing all implicit declarations of process variables in their scripts with an explicit call to execution.setVariable('varName', 'value').
5. Create a Shared Camunda Library
Next, start up the server and create a shared library named Camunda for these artifacts. In detail, go to Environment / Shared libraries, choose the correct scope in which your EAR and applications will run and define a new shared library. Name it Camunda. This name is mandatory. Enter as classpath the path where you have copied the Camunda shared libraries, e.g., /opt/IBM/WebSphere/AppServer/profiles/AppSrv01/camunda-shared-libs. Enable the Use an isolated class loader for this shared library checkbox.
JDBC Drivers, DataSource and WorkManager settings stay the same as compared to 7.1.
6. Install the Camunda Archive
Install the Camunda EAR, i.e., the file $WAS_DISTRIBUTION/modules/camunda-ibm-websphere-ear-$PLATFORM_VERSION.ear. During the installation, the EAR will try to reference the previously created Camunda shared library.
As of version 7.2, the Camunda job executor resource adapter (RAR) that you uninstalled in step 1 is part of the Camunda EAR and therefore does not need to be installed separately.
7. Install the Camunda Web Applications
Camunda REST API
The following steps are required to upgrade the Camunda REST API on an IBM WebSphere instance:
- Deploy the web application
$WAS_DISTRIBUTION/webapps/camunda-engine-rest-$PLATFORM_VERSION-was.warto your IBM WebSphere instance. - Associate the web application with the
Camundashared library.
Camunda Cockpit, Tasklist, and Admin
The following steps are required to upgrade the Camunda web applications Cockpit, Tasklist, and Admin on an IBM WebSphere instance:
- Deploy the web application
$WAS_DISTRIBUTION/webapps/camunda-webapp-ee-was-$PLATFORM_VERSION.warto your IBM WebSphere instance. - Associate the web application with the
Camundashared library.
8. Associate Existing Applications with Shared Library
The new shared Camunda library affects process applications as well because the Camunda BPM libraries which are available with 7.1 on the global classpath are gone. In order to make the Camunda libraries available to applications, the Camunda shared library has to be associated with every process application. If this is not done, the applications fail due to missing resources.
LDAP Entity Caching
With 7.2, it is possible to enable entity caching for Hypertext Application Language (HAL) requests that the Camunda web applications make. This can be especially useful when you use Camunda in combination with LDAP. To activate caching, the Camunda webapp artifact has to be modified and the pre-built application cannot be used as is. See the REST Api Documentation for details.
Migrate from Camunda BPM 7.2 to Camunda BPM 7.3
The following steps describe how to upgrade the Camunda artifacts on an IBM WebSphere application server in a shared process engine setting. For the entire migration procedure, refer to the migration guide. If not already done, make sure to download the Camunda BPM 7.3 IBM WebSphere distribution.
The upgrade procedure takes the following steps:
- Uninstall the Camunda libraries and archives
- Replace Camunda core libraries
- Replace optional Camunda dependencies
- Maintain BPM platform configuration (optional)
- Install the Camunda archive
- Install the Camunda BPM web applications
In each of the following steps, the identifiers $*_VERSION refer to the current version and the new versions of the artifacts.
1. Uninstall the Camunda Libraries and Archives
First, uninstall the Camunda web applications, namely the Camunda REST API (artifact name like camunda-engine-rest) and the Camunda applications Cockpit, Tasklist and Admin (artifact name like camunda-webapp).
Uninstall the Camunda EAR. Its name should be camunda-ibm-websphere-ear-$PLATFORM_VERSION.ear.
2. Replace Camunda Core Libraries
With 7.2, you have created a shared library named Camunda. We identify the folder to this shared library as $SHARED_LIBRARY_PATH.
After shutting down the server, replace the following libraries in $SHARED_LIBRARY_PATH with their equivalents from $WAS_DISTRIBUTION/modules/lib:
camunda-engine-$PLATFORM_VERSION.jarcamunda-bpmn-model-$PLATFORM_VERSION.jarcamunda-cmmn-model-$PLATFORM_VERSION.jarcamunda-xml-model-$PLATFORM_VERSION.jar
3. Replace Optional Camunda Dependencies
In addition to the core libraries, there may be optional artifacts in $SHARED_LIBRARY_PATH for LDAP integration, Camunda Connect, and Camunda Spin. If you use any of these extensions, the following upgrade steps apply:
LDAP integration
Copy the following libraries from $WAS_DISTRIBUTION/modules/lib to the folder $SHARED_LIBRARY_PATH if present:
camunda-identity-ldap-$PLATFORM_VERSION.jar
Camunda Connect
Copy the following libraries from $WAS_DISTRIBUTION/modules/lib to the folder $SHARED_LIBRARY_PATH if present:
camunda-connect-core-$CONNECT_VERSION.jar
Camunda Spin
Copy the following libraries from $WAS_DISTRIBUTION/modules/lib to the folder $SHARED_LIBRARY_PATH if present:
camunda-spin-core-$SPIN_VERSION.jar
4. Maintain the BPM platform configuration
If you have previously replaced the default BPM platform configuration by a custom configuration following any of the ways outlined in the deployment descriptor reference, it may be necessary to restore this configuration. This can be done by repeating the configuration replacement steps for the upgraded platform.
5. Install the Camunda Archive
Install the Camunda EAR, i.e., the file $WAS_DISTRIBUTION/modules/camunda-ibm-websphere-ear-$PLATFORM_VERSION.ear. During the installation, the EAR will try to reference the previously created Camunda shared library.
6. Install the Camunda Web Applications
Camunda REST API
The following steps are required to upgrade the Camunda REST API on an IBM WebSphere instance:
- Deploy the web application
$WAS_DISTRIBUTION/webapps/camunda-engine-rest-$PLATFORM_VERSION-was.warto your IBM WebSphere instance. - Associate the web application with the
Camundashared library.
Camunda Cockpit, Tasklist, and Admin
The following steps are required to upgrade the Camunda web applications Cockpit, Tasklist, and Admin on an IBM WebSphere instance:
- Deploy the web application
$WAS_DISTRIBUTION/webapps/camunda-webapp-ee-was-$PLATFORM_VERSION.warto your IBM WebSphere instance. - Associate the web application with the
Camundashared library.
LDAP Entity Caching
Beginning with 7.2, it is possible to enable entity caching for Hypertext Application Language (HAL) requests that the Camunda web applications make. If you have previously used caching, you can enable this feature by modifying the Camunda webapp artifact. See the REST Api Documentation for details.